GitHub SSH 연결Connecting to GitHub over SSH
GitHub SSH 연결 설정 방법How to set up an SSH connection to GitHub

SSH 키를 사용하면 GitHub에 안전하게 연결할 수 있습니다. 여기서는 SSH 키를 사용하여 GitHub에 연결하는 방법과 과정 중에 발생 할 수 있는 문제를 해결하는 방법에 대해 설명합니다.
SSH(Secure Shell)
SSH(Secure Shell)는 네트워크 프로토콜 중 하나로, 컴퓨터와 컴퓨터가 인터넷과 같은 네트워크를 통해 안전하게 통신할 수 있게 해줍니다.
SSH의 핵심 기능 중 하나는 “암호화”입니다. SSH는 모든 통신 내용을 암호화하여 네트워크를 통해 전송되는 데이터가 타인에게 노출되는 것을 방지합니다. 이는 중요한 정보를 안전하게 보호하며, 해커의 공격으로부터 보호할 수 있습니다. SSH는 암호화에 비대칭키 방식을 사용합니다.
비대칭키
GitHub에 SSH를 연결하고 사용하기 위해서는 비대칭키 라는 것을 이해하면 좋습니다. 비대칭키의 큰 개념은 아래와 같습니다.
- 데이터를 암호화 & 복호화 하는 두 개의 키 = 키 페어가 있다.
-
비밀키(identification) 와 공개키(Public Key)
- 비밀키 : 공유해서는 안돼는 키
- 공개키 : 누구나 가질 수 있으며 사용 할 수 있는 키
- 각 키는 암호화 복호화에 사용된다. 한 키로 암호화한 내용은 다른 키로만 복호화 가능
- 비밀키로 암호화한 내용은 오직 공개키로만 복호화 가능하다.
- 공개키로 암호화한 내용은 오직 비밀키로만 복호화 가능하다.
어떤 키를 어떻게 쓰나?
Github에 등록되는 키는 누구나 볼 수 있습니다. URL에 user_id.keys를 입력하면 사용자가 등록한 키를 누구나 볼 수 있습니다. 누구나 볼 수 있는 키 = 즉 Github는 공개키를 가지고 있다는 뜻이겠죠? 반대로 우리가 가지고 있어야 하는 키는 나머지 비밀키가 됩니다.
https://github.com/tiaz0128.keys
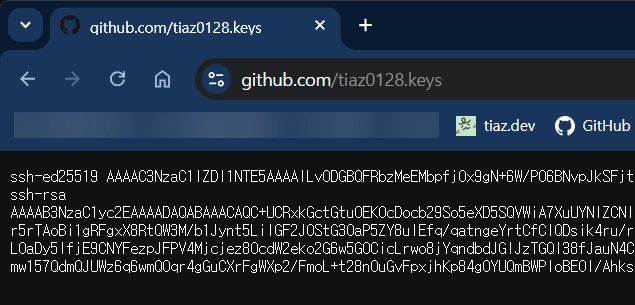
> 사용자가 GitHub에 등록한 공개키는 누구나 확인 가능하다
private 저장소로 생각 해보기
public 저장소는 누구나 소스코드를 보고 내려 받을 수 있으니 제외하고 여기서는 나만 소스코드를 올리고 받을 수 있는 private 저장소를 예를 들어 보겠습니다.
만약에 Github에 비밀키를 등록해 있다면 어떨까요? 비밀키로 암호화 한다면 누구나 가질 수 있는 공개키로 복호화 가능하니 내가 나인것을 증명 할 수 없게 됩니다. 즉 사용자를 인증 할 수 없게 됩니다.

> 누가 진짜인지 알 수 없다
따라서 Github는 공개키를 사용하며, 사용자의 비밀키로 인증을 확인하고 데이터의 안전한 전송을 보장합니다.
SSH 키 생성 및 등록
1. 로컬 시스템에 SSH 키가 있는지 확인
우선은 Linux/Mac 환경인 경우는 사용자의 .ssh 폴더를 확인 합니다. 아래의 명령어로 비대칭 키 페어 파일들을 찾아 봅니다.
$ ls -la ~/.ssh
Windows 의 경우는 Users 폴더에 사용자 이름의 폴더 안에 .ssh 폴더를 확인합니다.
> ls C:\Users\{user_id}\.ssh

> ls C:\Users\tiaz\.ssh
2. 공개 키가 없다면, 새로운 SSH 키를 생성
가지고 있는 키 페어가 없다면, 다음 명령을 사용하여 SSH 키를 생성할 수 있습니다. 이 명령은 새로운 SSH 키 페어를 생성하고, 이메일 주소를 키에 연결합니다.
$ ssh-keygen -t rsa -b 4096 -C "{email}" -f {file_path}

$ ssh-keygen -t rsa -b 4096 -C "tiaz0128.dev@gmail.com" -f ~/.ssh/github
> ssh-keygen -t rsa -b 4096 -C "{email}" -f {file_path}

> ssh-keygen -t rsa -b 4096 -C "tiaz0128.dev@gmail.com" -f c:\Users\tiaz\.ssh\github
-
-t rsa: 생성할 키의 유형을 지정 -
-b 4096: 키의 길이를 비트로 지정 -
-C "{email}": 선택적인 값. 키에 첨부할 주석을 지정, 키가 어떤 서비스에 사용되는지 쉽게 식별하기 위한 입력값 - -
f {file_path}: 생성할 키의 경로와 파일명을 지정
ssh-keygen 명령어를 입력하면 패스프레이즈(passphrase) 입력을 받습니다. 패스프레이즈를 설정하면 비밀키를 사용하기 전에 패스프레이즈를 입력해야 합니다. 설정하지 않으면, 비밀키를 사용할 때 입력 하지 않아도 됩니다. 따라서, 패스프레이즈 설정 여부는 편의성과 보안 사이의 균형을 고려하여 결정해야 합니다. 여기서는 그냥 빈 엔터값을 입력하겠습니다.
Generating public/private rsa key pair.
Enter passphrase (empty for no passphrase): ↵
Enter same passphrase again: ↵
생성된 파일을 확인해보면 두개의 파일, 키 페어가 생성됩니다. 이중에서 .pub 확장자가 붙어있는 키가 공개키(public key)이며 나머지 하나가 비밀키(identification) 입니다.
키 페어의 지문(fingerprint)는 키의 고유한 해시 값으로, 키를 식별하는 데 사용됩니다. 랜덤아트(randomart image)는 키의 지문을 시각적으로 표현한 것으로, 키가 변경되었는지 빠르게 확인하는 데 도움이 됩니다.
Your identification has been saved in c:\Users\tiaz0\.ssh\github
Your public key has been saved in c:\Users\tiaz0\.ssh\github.pub
The key fingerprint is:
SHA256:cyboaD4Jn1nZXehR0WXLBQ+DR529JprwL5kfsAxZP0M tiaz0128.dev@gmail.com
The key's randomart image is:
+---[RSA 4096]----+
|            .==+*|
|            o +*=|
|           + E oo|
|       . .= +. o |
|      .oS==+o+o  |
|  .  oo .==+o o  |
|   oo=.    o+.   |
|   o*      + ..  |
|    ..      o.   |
+----[SHA256]-----+
3. 공개키를 GitHub 계정에 추가
공개키의 내용을 복사합니다. 그런 다음 GitHub 계정 설정의 SSH 키 섹션에 이 키를 붙여넣습니다. Github에 로그인하여 우측 상단에 자신의 프로필을 클릭하여 setting - SSH 에서 공개키를 등록 가능합니다.
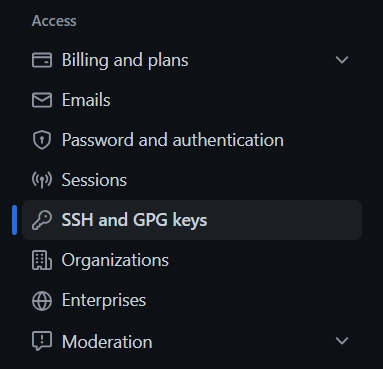
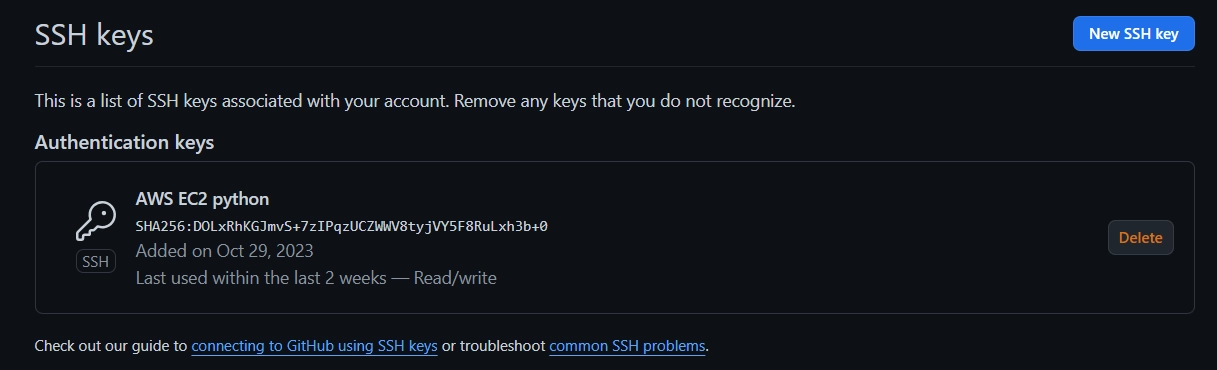
> Github - setting에서 SSH 공개키를 저장한다.
4. SSH를 통해 GitHub에 연결할 수 있는지 확인
제대로 공개키가 등록되었는지 확인해봅시다. 아래의 명령어는 GitHub에 연결을 시도하고, 연결이 성공적이면 아래와 같은 메시지를 출력합니다.
ssh -T git@GitHub.com
Hi tiaz0128! You've successfully authenticated, but GitHub does not provide ...
키 정보 삭제
등록한 키 정보를 삭제 할때는 -d 옵션을 이용하여 키를 지정하여 삭제합니다.
ssh-add -d ./github
에러 해결
Could not open a connection to your authentication agent
이 오류는 SSH 인증 에이전트가 실행 중이지 않거나 연결할 수 없음을 나타냅니다. 이 문제를 해결하려면, 먼저 SSH 인증 에이전트를 시작해야 합니다. 운영체제 별로 표시되는 에러 메시지와 이를 해결하는 명령어가 조금씩 다릅니다.
Could not open a connection to your authentication agent

$ eval "$(ssh-agent -s)"
Windows의 경우는 관리자 권한으로 아래의 명령어를 입력해 봅니다. 동작하지 않는 경우는 직접 서비스 시스템에 들어가서 OpenSSH Authentication Agent 서비스를 활성화 시켜줍니다.
Error connecting to agent: No such file or directory

> Start-Service ssh-agent
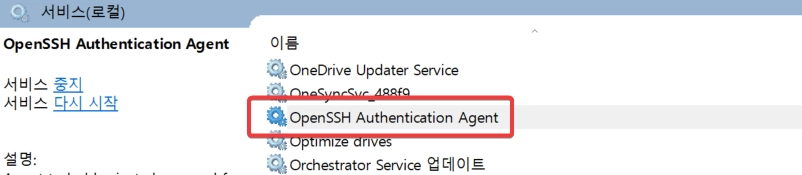
> Windows 서비스 - OpenSSH Authentication Agent
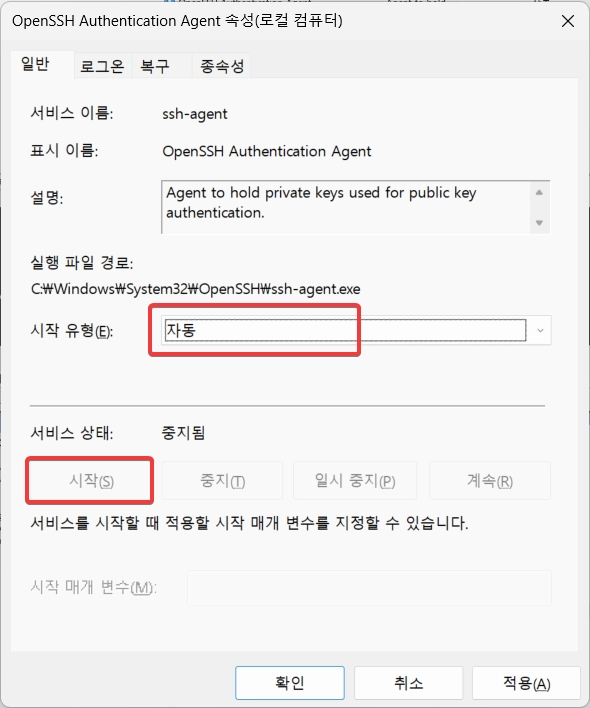
> SSH 를 활성화 해준다.
그런 다음, ssh-add 명령을 다시 실행하여 SSH 키를 인증 에이전트에 추가합니다.
$ ssh-add ~/.ssh/{private_key}

$ ssh-add ~/.ssh/github
> ssh-add  c:\Users\{user}\.ssh\{private_key}

> ssh-add  c:\Users\tiaz\.ssh\github
WARNING: UNPROTECTED PRIVATE KEY FILE
이 오류는 비밀키 파일의 권한이 너무 과도하게 설정된 경우 SSH에 의해 무시되었음을 나타냅니다. 이 문제를 해결하려면, 비밀키 파일의 권한을 변경해주면 됩니다. 다음 명령을 사용하여 파일 권한을 변경합니다.
$ chmod 600 ~/.ssh/{private_key}

$ chmod 600 ~/.ssh/github
SSH config 파일 작성
SSH config 파일은 SSH 연결 설정을 저장하는데 사용됩니다. 이 파일을 사용하면, 다양한 서버에 대한 SSH 연결 설정을 쉽게 관리할 수 있습니다. 파일은 config라는 이름으로 .ssh 폴더 내에 작성하면 됩니다.
파일에는 다음과 같은 설정을 포함할 수 있습니다.
-
Host(선택 옵션) : HostName을 대신해 이 별명을 사용하여 SSH 명령에서 연결 설정을 참조. -
HostName: 실제 호스트 이름 또는 IP 주소 -
User: 해당 호스트에 로그인할 때 사용할 사용자 이름 -
IdentityFile: 해당 호스트에 연결할 때 사용할 비밀키 파일의 경로 -
Port: 해당 호스트에 연결할 때 사용할 포트 번호
다음은 github.com의 config 파일의 예입니다.
Host github.alias
  HostName github.com
  User git
  IdentityFile ~/.ssh/github
-
github.alias이라는 Host 별명을 사용하여 -
github.com에git사용자로 로그인하고 -
~/.ssh/github키 파일을 사용
이 설정은 아래와 같이 사용 할 수 있습니다.
# HostName이 있는 경우, HostName으로 참조 가능하다.
$ git clone git@github.alias:tiaz0128/tiaz0128.github.io.git

# HostName을 작성하지 않는 경우, 실제 호스트명으로 작성
$ git clone git@github.com:tiaz0128/tiaz0128.github.io.git
-
Host별명github.alias를 이용하여 저장소를 clone 할때 SSH를 이용 할 수 있습니다. -
Host별명을 사용하지 않는 경우는HostName을 그대로 이용합니다.
개인 계정도 쓰고 회사 계정도 쓰고싶어
이런 경우가 있습니다. 점심시간에 짬내서 회사 컴퓨터에서도 개인 저장소에도 push를 하고 싶을 때가 있습니다. 매번 로그인을 했다가 풀었다가, 자격증명을 삭제했다가 다시 등록하고… 너무 번거롭고 귀찮을 때가 많습니다.
위의 내용까지 잘 이해했다면 이런 상황에서 SSH를 유용하게 사용 가능합니다. 서로 다른 계정을 여러개 등록하고 손쉽게 사용 할 수 있습니다. 상황을 가정해보겠습니다.
- 하나의 컴퓨터에 여러개의 GitHub 계정을 쓰고 싶다.
- 개인계정 : tiaz0128
- 회사계정 : dev0128
- 각각의 GitHub 계정에는 서로 다른 공개키가 등록되어 있다.
- 각 공개키의 페어인 비밀키를 컴퓨터에 저장하고 있다.
config 파일에서 Host 값을 잘 사용하면 간단하게 해결 됩니다.
- GitHub를 사용하기 위한, 이미 정해져 있는
HostName = github.com&User = git작성 -
IdentityFile는 각각의 계정의 공개키의 페어인 비밀키를 지정 -
Host는 사용할 키를 구분할 수 있게 작성
# 개인 키
Host github.private
  HostName github.com
  User git
  IdentityFile C:\Users\tiaz\.ssh\private

# 회사 키
Host github.company
  HostName github.com
  User git
  IdentityFile C:\Users\tiaz\.ssh\company
등록한 Host를 이용해 각 계정의 비밀키로 저장소를 clone 할 수 있습니다. clone 하면서 연결된 각 계정으로 push가 가능해집니다.
> git clone git@github.private:tiaz0128/private-project.git

> git clone git@github.company:dev0128/company-project.git
VScode extension : Remote - SSH
SSH를 VScode에서 손쉽게 연결할 수 있게 도와주는 extension입니다. 원격 대상에 VScode의 다른 extension을 설치가 가능하게 만들어주기 때문에 클라우드를 이용 할때, 서버 접속 등을 용이하게 해줍니다.

> 출처 : Remote - SSH
마무리
SSH는 비대칭키인 한 쌍의 비밀키와 공개키를 사용하여 암호화, 복호화 방법입니다. 키 페어에서 암호화에 사용된 키를 나머지 하나의 키로 복호화가 가능합니다. 이를 통해서 사용자 인증에 이용 할 수 있습니다.
config 파일에 설정을 저장하고 Host 값으로 하나의 서비스를 여러 계정으로 통신이 가능한 것을 알아봤습니다. 여기서는 GitHub로 예시를 들었지만, 다른 서비스도 SSH를 통한 통신을 할떄 기본 개념은 동일합니다. 😊
SSH keys let you connect to GitHub securely. This post explains how to connect to GitHub with an SSH key and how to fix the problems you may run into along the way.
SSH(Secure Shell)
SSH (Secure Shell) is a network protocol that lets computers communicate securely over a network such as the internet.
One of SSH’s key features is “encryption”. SSH encrypts everything it sends, so data traveling over the network isn’t exposed to others. This keeps sensitive information safe and protects it from attackers. SSH uses asymmetric keys for encryption.
Asymmetric Keys
To connect to and use GitHub over SSH, it helps to understand asymmetric keys. The big picture is:
- There are two keys that encrypt & decrypt data = a key pair.
-
The private key (identification) and the public key (Public Key)
- Private key: a key you must never share
- Public key: a key anyone can have and use
- Each key is used for encryption and decryption. What one key encrypts can only be decrypted by the other
- What is encrypted with the private key can only be decrypted with the public key.
- What is encrypted with the public key can only be decrypted with the private key.
Which Key Goes Where?
The keys registered on GitHub are visible to anyone. Add user_id.keys to the URL and anyone can see the keys a user has registered. A key anyone can see means GitHub holds the public key, right? Conversely, the key we have to keep is the other one, the private key.
https://github.com/tiaz0128.keys
> Anyone can see the public keys a user has registered on GitHub
Thinking It Through with a Private Repository
A public repository lets anyone view and download the source code, so let’s set that aside and take a private repository as the example, where only I can push and pull code.
What if you registered your private key on GitHub? Anything encrypted with the private key could be decrypted with the public key, which anyone can have, so you couldn’t prove that you’re you. In other words, the user can’t be authenticated.
> No way to tell which one is real
That’s why GitHub uses the public key and verifies authentication with the user’s private key, guaranteeing that data is transmitted safely.
Generating and Registering an SSH Key
1. Check Whether Your System Already Has an SSH Key
On Linux/Mac, first check the user’s .ssh folder. Use the command below to look for asymmetric key pair files.
$ ls -la ~/.ssh
On Windows, check the .ssh folder inside your user folder under Users.
> ls C:\Users\{user_id}\.ssh

> ls C:\Users\tiaz\.ssh
2. If There’s No Public Key, Generate a New SSH Key
If you don’t have a key pair, you can generate an SSH key with the following command. It creates a new SSH key pair and attaches your email address to the key.
$ ssh-keygen -t rsa -b 4096 -C "{email}" -f {file_path}

$ ssh-keygen -t rsa -b 4096 -C "tiaz0128.dev@gmail.com" -f ~/.ssh/github
> ssh-keygen -t rsa -b 4096 -C "{email}" -f {file_path}

> ssh-keygen -t rsa -b 4096 -C "tiaz0128.dev@gmail.com" -f c:\Users\tiaz\.ssh\github
-
-t rsa: the type of key to generate -
-b 4096: the key length in bits -
-C "{email}": optional. A comment attached to the key, making it easy to tell which service the key is for - -
f {file_path}: the path and file name of the key to generate
When you run ssh-keygen, it asks for a passphrase. If you set one, you have to enter it before the private key can be used; if you don’t, you won’t need to enter anything when using the private key. So whether to set a passphrase is a trade-off between convenience and security. Here I’ll just press Enter.
Generating public/private rsa key pair.
Enter passphrase (empty for no passphrase): ↵
Enter same passphrase again: ↵
Looking at the generated files, you’ll find two files: the key pair. Of these, the key with the .pub extension is the public key, and the other one is the private key (identification).
The key pair’s fingerprint is a unique hash of the key used to identify it. The randomart image is a visual representation of the fingerprint that helps you quickly spot whether a key has changed.
Your identification has been saved in c:\Users\tiaz0\.ssh\github
Your public key has been saved in c:\Users\tiaz0\.ssh\github.pub
The key fingerprint is:
SHA256:cyboaD4Jn1nZXehR0WXLBQ+DR529JprwL5kfsAxZP0M tiaz0128.dev@gmail.com
The key's randomart image is:
+---[RSA 4096]----+
|            .==+*|
|            o +*=|
|           + E oo|
|       . .= +. o |
|      .oS==+o+o  |
|  .  oo .==+o o  |
|   oo=.    o+.   |
|   o*      + ..  |
|    ..      o.   |
+----[SHA256]-----+
3. Add the Public Key to Your GitHub Account
Copy the contents of the public key, then paste it into the SSH keys section of your GitHub account settings. Log in to GitHub, click your profile in the top right, and register the public key under setting - SSH.
> Save the SSH public key in GitHub - setting.
4. Check That You Can Connect to GitHub over SSH
Let’s check that the public key was registered correctly. The command below tries to connect to GitHub and prints a message like the following if it succeeds.
ssh -T git@GitHub.com
Hi tiaz0128! You've successfully authenticated, but GitHub does not provide ...
Removing a Key
To remove a registered key, specify it with the -d option.
ssh-add -d ./github
Troubleshooting
Could not open a connection to your authentication agent
This error means the SSH authentication agent isn’t running or can’t be reached. To fix it, start the SSH authentication agent first. The error message and the fix differ slightly by operating system.
Could not open a connection to your authentication agent

$ eval "$(ssh-agent -s)"
On Windows, try the command below with administrator privileges. If that doesn’t work, open Services yourself and enable the OpenSSH Authentication Agent service.
Error connecting to agent: No such file or directory

> Start-Service ssh-agent
> Windows Services - OpenSSH Authentication Agent
> Enable SSH.
Then run ssh-add again to add the SSH key to the authentication agent.
$ ssh-add ~/.ssh/{private_key}

$ ssh-add ~/.ssh/github
> ssh-add  c:\Users\{user}\.ssh\{private_key}

> ssh-add  c:\Users\tiaz\.ssh\github
WARNING: UNPROTECTED PRIVATE KEY FILE
This error means SSH ignored the private key file because its permissions are too open. To fix it, change the private key file’s permissions with the following command.
$ chmod 600 ~/.ssh/{private_key}

$ chmod 600 ~/.ssh/github
Writing an SSH config File
The SSH config file stores SSH connection settings. With it, you can easily manage SSH connection settings for many servers. Just create a file named config in the .ssh folder.
The file can contain settings like these:
-
Host(optional) : an alias you use in SSH commands instead of the HostName to refer to the connection settings. -
HostName: the actual host name or IP address -
User: the user name to log in with on that host -
IdentityFile: the path to the private key file used to connect to that host -
Port: the port number used to connect to that host
Here’s an example config file for github.com.
Host github.alias
  HostName github.com
  User git
  IdentityFile ~/.ssh/github
- Using the Host alias
github.alias, - log in to
github.comas thegituser, - with the
~/.ssh/githubkey file
You can use this setting like so:
# With a Host alias, you can refer to it by the alias.
$ git clone git@github.alias:tiaz0128/tiaz0128.github.io.git

# Without an alias, use the real host name
$ git clone git@github.com:tiaz0128/tiaz0128.github.io.git
- You can use SSH when cloning a repository through the
Hostaliasgithub.alias. - Without a
Hostalias, use theHostNameas is.
I Want to Use Both My Personal and Work Accounts
This happens: during lunch, you want to push to your personal repository from your work computer. Logging in and out every time, deleting credentials and adding them back… it’s often a real hassle.
If you’ve followed everything so far, SSH comes in handy here. You can register several different accounts and switch between them easily. Let’s set up the scenario.
- I want to use several GitHub accounts on one computer.
- Personal account : tiaz0128
- Work account : dev0128
- Each GitHub account has a different public key registered.
- The private key paired with each public key is stored on the computer.
Using the Host value in the config file solves this neatly.
- For GitHub, write the fixed values
HostName = github.com&User = git - Set
IdentityFileto the private key paired with each account’s public key - Write
Hostso you can tell which key to use
# Personal key
Host github.private
  HostName github.com
  User git
  IdentityFile C:\Users\tiaz\.ssh\private

# Work key
Host github.company
  HostName github.com
  User git
  IdentityFile C:\Users\tiaz\.ssh\company
Using the registered Hosts, you can clone repositories with each account’s private key. Once cloned this way, you can push as the account each repository is tied to.
> git clone git@github.private:tiaz0128/private-project.git

> git clone git@github.company:dev0128/company-project.git
VScode extension : Remote - SSH
This extension makes it easy to connect over SSH from VScode. It lets you install other VScode extensions on the remote target, which makes things like connecting to servers much easier when working in the cloud.
> Source: Remote - SSH
Wrapping Up
SSH encrypts and decrypts using an asymmetric pair of keys: a private key and a public key. Whatever one key in the pair encrypts, the other can decrypt. This can be used to authenticate users.
We also saw how to save settings in a config file and use the Host value to talk to one service with multiple accounts. I used GitHub as the example here, but the basic idea is the same for any other service you communicate with over SSH. 😊