Server-Sent Events(SSE) 알람 : 기초Server-Sent Events (SSE) Notifications: Basics
Flask에서 Server-Sent Events(SSE)를 활용한 실시간 알림 구현Real-time notifications in Flask with Server-Sent Events (SSE)

프롤로그
Flask 에서 클라이언트에게 알람 메시지를 주기적으로 전달하기 위해서, Server-Sent Events (SSE) 를 사용하여 알람 메시지를 구현 해보겠습니다.
소켓 vs SSE
소켓을 사용하지 않고 SSE 를 선택 이유는 간단합니다. 알람은 서버가 클라이언트에게 주기적으로 데이터를 전달하고 그중에 새로운 데이터가 있을 때만 특별히
새로운 알람이 왔어!
라고 알려주기만 하면, 클라이언트에서 받은 데이터로 리랜더링 하거나 새로운 알람을 받아오는 API 를 호출하면 되기에, 클라이언트와 양방향 통신이 필요치 않다고 생각했습니다. 몇가지 SSE 의 특징을 적어 보겠습니다.
- 텍스트 기반: 데이터는 순수한 텍스트 형식으로 전송됩니다.
- 단방향 통신: 데이터는 서버에서 클라이언트로만 전송됩니다. 클라이언트에서 서버로는 데이터를 보낼 수 없습니다.
- 지속적 연결: 한 번 연결이 수립되면, 서버는 연결을 지속적으로 유지하면서 데이터를 전송할 수 있습니다.
- 자동 재연결: 연결이 끊어졌을 경우 클라이언트는 자동으로 재연결을 시도합니다.
Flask SSE 구현
기본 적인 SSE 구현 Response 객체를 생성하여, content_type을 text/event-stream 로 설정합니다. text/event-stream 은 문자열 데이터를 반환하는SSE 의 콘텐츠 타입입니다. 서버가 클라이언트로 보내는 이 문자열 데이터는 특정한 규칙을 따릅니다. 우선은 기본적인 데이터를 보내는 형식입니다.
-
data:라는 문자열로 시작 - 보내고 싶은 문자열 데이터
- 각 메시지는 빈 줄(즉,
\n\n)으로 끝나야 합니다.
from flask import Flask, Response
import time

app = Flask(__name__)

def generate():
    while True:
        # DO NOT forget the prefix and suffix
        yield f"data: Hello! {user_id}\n\n"
        time.sleep(5)

@app.get("/connection/<user_id>")
def connection(user_id: str):
    return Response(generator(user_id), content_type="text/event-stream")

if __name__ == "__main__":
    app.run(port=5000)
const eventSource = new EventSource("http://localhost:5000/connection/tiaz");

eventSource.onmessage = function(event) {
    console.log("New event:", event.data);
};
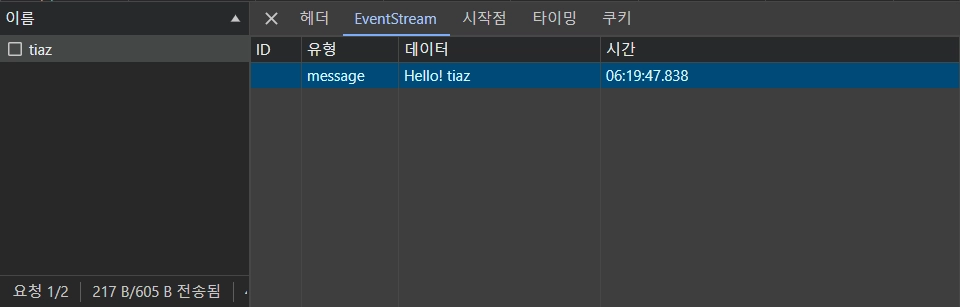
text/event-stream 필드
SSE 메시지는 일반 텍스트 형식으로 전송되며, 몇 가지 특별한 필드를 사용하여 구성됩니다. 주요 필드는 다음과 같습니다.
event 필드
원하는 이벤트의 이름을 지정합니다. 클라이언트는 이 이름을 사용하여 특정 이벤트 유형에 대한 리스너(listener)를 설정할 수 있습니다.
event: notice\n
data 필드
이벤트의 실제 데이터를 포함합니다. 데이터는 여러 줄에 걸쳐 있을 수 있으며, 각 줄은 data:로 시작해야 합니다. 여러 줄의 데이터는 연결되어 하나의 메시지로 처리됩니다. event 를 명시하지 않으면 message 라는 event 가 설정됩니다.
data: {"userId": 1, "status": "online"}
data: {"additional": "info"}
id 필드
이벤트 스트림의 마지막 이벤트 ID를 설정합니다. 연결이 끊어진 후 재연결 시, 클라이언트는 이 ID를 사용하여 끊어진 이후의 이벤트를 요청할 수 있습니다.
id: 12345\n
retry 필드
연결이 끊어진 경우 재연결을 시도하기 전 대기해야 하는 시간(밀리초 단위)을 지정합니다.
retry: 3000\n
이러한 필드들은 각각 개별적으로 사용될 수도 있고, 조합하여 사용될 수도 있습니다.
data: {"userId": 1, "status": "online"}

event: notice
data: {"userId": 2, "status": "offline"}

id: 67890
data: {"message": "Something happened"}

retry: 5000
data: {"retryMessage": "Please wait"}
이러한 형식을 따르면, SSE를 지원하는 웹 브라우저나 클라이언트는 이러한 메시지를 적절히 파싱하고, 필요한 동작을 수행할 수 있습니다.
서버에서 주의 사항
문자열 데이터를 반환하는SSE 는 위에서 설명한 형식을 따르면 됩니다. 다만, JSON 데이터를 보내고 싶은 경우, 보내고자 하는 data 필드에 원하는 데이터를 직렬화(Serialization) 를 수행해서 형식에 맞는 문자열로 구성해서 보내야 합니다.
yield f"""event: notice\ndata: {json.dumps(data)}\n\n"""
from flask import Flask, Response
from time import sleep
import json

app = Flask(__name__)

def generator(user_id):
    yield f"data: Hello! {user_id}\n\n"

    while True:
        data = {"name": user_id}
        yield f"""event: notice\ndata: {json.dumps(data)}\n\n"""
        sleep(5)

@app.get("/connection/<user_id>")
def connection(user_id: str):
    return Response(generator(user_id), content_type="text/event-stream")

if __name__ == "__main__":
    app.run(port=5000)
const eventSource = new EventSource("http://localhost:5000/connection/tiaz");

eventSource.onmessage = function(event) {
    console.log("New event:", event.data);
};

eventSource.addEventListener("notice", (e) => {
  console.log(event.data);
});
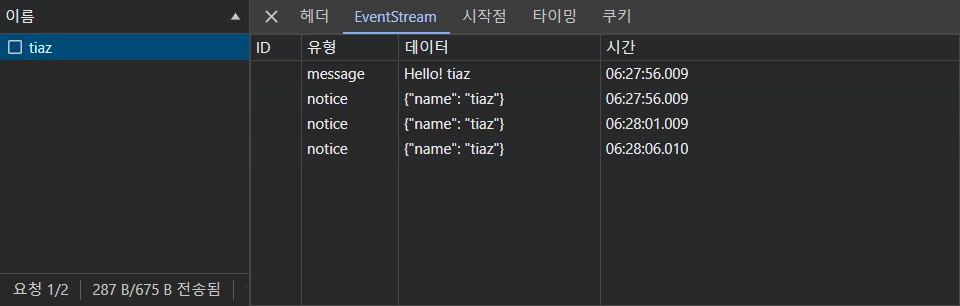
마무리
Server-Sent Events(SSE) 는 서버에서 클라이언트로 문자열 데이터를 전송 할 수 있는 단방향 통신 방법입니다. 구현 시 중요한 것은 규격에 알맞은 형태의 문자열을 구성하는 것 입니다. 각 필드의 규격을 정확히 확인하고 작성 하시길 바랍니다. 😊
다음으로
다음은 SSE 알람을 구현하면서 고려해야 할 주요 사항에 대해 Server-Sent Events (SSE) 알람 : 활용편에서 알아보겠습니다!
Prologue
To deliver notification messages to clients periodically from Flask, let’s implement them with Server-Sent Events (SSE).
Sockets vs SSE
The reason I chose SSE over sockets is simple. For notifications, the server periodically sends data to the client, and only when there’s something new does it need to say
You’ve got a new notification!
The client can then re-render with the data it received or call an API to fetch the new notifications, so I didn’t think two-way communication with the client was necessary. Here are a few characteristics of SSE.
- Text-based: data is sent as plain text.
- One-way communication: data flows only from the server to the client. The client can’t send data to the server.
- Persistent connection: once a connection is established, the server can keep it open and keep sending data.
- Automatic reconnection: if the connection drops, the client automatically tries to reconnect.
Implementing SSE in Flask
For a basic SSE implementation, create a Response object and set its content_type to text/event-stream. text/event-stream is the SSE content type, which returns string data. The string data the server sends to the client follows specific rules. First, here’s the format for sending basic data.
- Start with the string
data: - The string data you want to send
- Each message must end with a blank line (i.e.
\n\n).
from flask import Flask, Response
import time

app = Flask(__name__)

def generate():
    while True:
        # DO NOT forget the prefix and suffix
        yield f"data: Hello! {user_id}\n\n"
        time.sleep(5)

@app.get("/connection/<user_id>")
def connection(user_id: str):
    return Response(generator(user_id), content_type="text/event-stream")

if __name__ == "__main__":
    app.run(port=5000)
const eventSource = new EventSource("http://localhost:5000/connection/tiaz");

eventSource.onmessage = function(event) {
    console.log("New event:", event.data);
};
text/event-stream Fields
SSE messages are sent as plain text and are built from a few special fields. The main fields are:
The event Field
Specifies the name of the event. The client can use this name to set up a listener for a specific event type.
event: notice\n
The data Field
Contains the event’s actual data. The data can span several lines, and each line must start with data:. Multiple data lines are joined and handled as one message. If no event is specified, the event is set to message.
data: {"userId": 1, "status": "online"}
data: {"additional": "info"}
The id Field
Sets the ID of the last event in the event stream. When reconnecting after a dropped connection, the client can use this ID to request the events it missed.
id: 12345\n
The retry Field
Specifies how long (in milliseconds) to wait before trying to reconnect after the connection drops.
retry: 3000\n
These fields can be used on their own or combined.
data: {"userId": 1, "status": "online"}

event: notice
data: {"userId": 2, "status": "offline"}

id: 67890
data: {"message": "Something happened"}

retry: 5000
data: {"retryMessage": "Please wait"}
As long as you follow this format, web browsers and clients that support SSE can parse these messages properly and act on them.
Things to Watch Out for on the Server
For SSE returning string data, just follow the format described above. However, if you want to send JSON data, you have to serialize it into the data field so that it becomes a string in the right format.
yield f"""event: notice\ndata: {json.dumps(data)}\n\n"""
from flask import Flask, Response
from time import sleep
import json

app = Flask(__name__)

def generator(user_id):
    yield f"data: Hello! {user_id}\n\n"

    while True:
        data = {"name": user_id}
        yield f"""event: notice\ndata: {json.dumps(data)}\n\n"""
        sleep(5)

@app.get("/connection/<user_id>")
def connection(user_id: str):
    return Response(generator(user_id), content_type="text/event-stream")

if __name__ == "__main__":
    app.run(port=5000)
const eventSource = new EventSource("http://localhost:5000/connection/tiaz");

eventSource.onmessage = function(event) {
    console.log("New event:", event.data);
};

eventSource.addEventListener("notice", (e) => {
  console.log(event.data);
});
Wrapping Up
Server-Sent Events (SSE) is a one-way communication method for sending string data from the server to the client. The key to implementing it is building strings in the format the spec requires. Be sure to check the exact format of each field as you write them. 😊
What’s Next
Next, in Server-Sent Events (SSE) Notifications: In Practice, we’ll look at the key things to consider when implementing SSE notifications!