Celery 기본 사용법Celery Basics
Celery와 RabbitMQ를 활용한 분산 작업 처리Distributed task processing with Celery and RabbitMQ

응답이 너무 느려
요청(Request)을 처리하는데 오래 걸리는 작업있다면, 화면에서는 응답(Response)가 올때까지 기다려야 하는 문제가 있습니다.

>응답이 오질 않아... 새로고침 해? 말어?
그래서 일단 요청을 작업은 큐에 넣고, 응답을 먼저 보내고 실제 요청에 대한 처리는 뒤에서 수행해 문제를 해결합니다. 이런 방식을 ‘작업 큐(Task Queue)’를 이용한 분산 처리 라고 합니다.
작업 큐는 시간이 오래 걸리거나 리소스를 많이 사용하는 작업을 메인 애플리케이션 흐름에서 분리하여 백그라운드에서 처리할 수 있게 해주는 시스템입니다.
Celery

파이썬에서는 작업 큐를 사용하기 위해 Celery를 많이 사용됩니다. 주로 웹 애플리케이션에서 백그라운드 작업을 처리하는 데 사용되며, 분산 시스템을 구축하는 데 매우 유용합니다.
Celery는 크게 세 가지 주요 컴포넌트로 구성되어 있습니다.
- 클라이언트(Client)
- 브로커(Broker)
- 워커(Worker)
Celery 구성
클라이언트(Client)
작업을 생성하고 브로커에 전송하는 역할을 하며, Producer라고도 합니다. 일반적으로 웹 애플리케이션이나 스크립트가 클라이언트가 됩니다. Celery를 사용하여 작업을 정의하고 실행을 요청합니다.
브로커(Broker)
클라이언트와 워커 사이에서 메시지를 중개 하며 Task Queue / Message Queue라고도 합니다. 작업 메시지를 저장하고 워커에게 전달하는 역할을 합니다.
워커(Worker)
브로커로부터 작업을 받아 실제로 실행하는 프로세스이며, Consumer라고도 합니다. 여러 워커를 동시에 실행하여 작업을 병렬 처리할 수 있습니다. 작업 결과를 결과 백엔드에 저장할 수 있습니다.
> 얄팍한 코딩사전 : Message Broker - 카프카와 RabbitMQ를 알아보자
추가 구성요소
선택적으로 구성 할 수 있는 컴포넌트는 아래와 같습니다.
결과 백엔드(Result Backend)
작업의 상태와 결과를 저장합니다. 클라이언트가 작업 상태를 조회하거나 결과를 가져올 때 사용합니다. Redis, 데이터베이스 등을 백엔드로 사용할 수 있습니다.
그 이외에
-
Beat: 주기적인 작업 스케줄링을 위한 스케줄러 -
Flower: Celery 모니터링 및 관리를 위한 웹 기반 도구
Celery 작동 과정
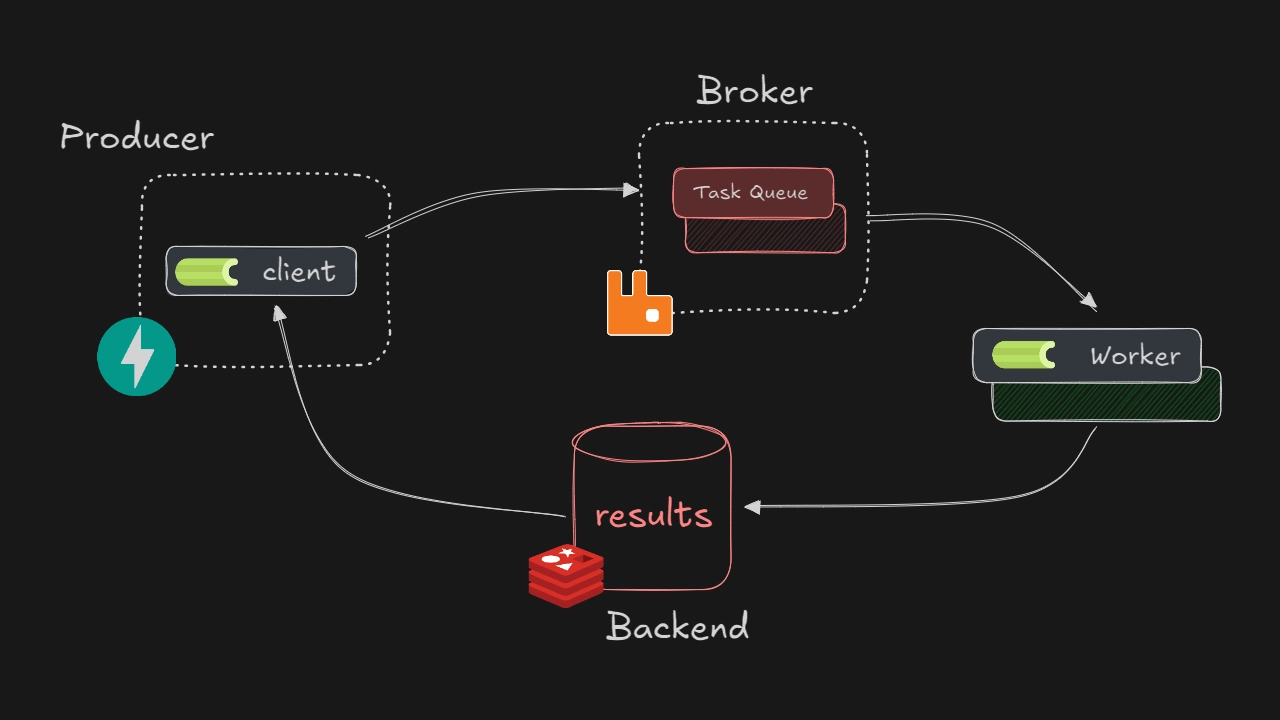
- 클라이언트가 작업을 생성하고 브로커에 전송
- 브로커는 받은 작업을 큐에 저장
- 워커는 브로커의 큐를 모니터링하고 있다가 새 작업이 들어오면 가져감
- 워커가 작업을 실행
- 작업 결과는 결과 백엔드에 저장 (설정된 경우)
- 클라이언트는 필요에 따라 결과 백엔드에서 작업 상태나 결과를 조회
Celery 환경 구축
가장 기본적인 REST API를 통해 작업을 처리하는 구성을 만들어 봅시다.
- Client : FastAPI
- Broker : RabbitMQ
- Result Backend : Redis
도커를 이용해서 각 컨터이너를 실행하겠습니다.
RabbitMQ
Installing RabbitMQ 페이지를 참고합니다.
$ docker run -d -it --rm --name rabbitmq -p 5672:5672 -p 15672:15672 rabbitmq:4.0-management
Redis
Run Redis Stack on Docker 페이지를 참고합니다. 여기에서는 redis:alpine 이미지를 사용하도록 하겠습니다.
$ docker run -d --rm --name redis -p 6379:6379 redis:alpine
fastapi 작성
라이브러리 설치
우선 필요한 파이썬 라이브러리를 설치하도록 하겠습니다.
$ pip install Celery fastapi

$ pip install "uvicorn[standard]"
폴더 구조
apps/rest-api 폴더내에 fastapi 코드를 작성하겠습니다.
project/
├── apps/
│   └── rest-api/
│       └── run.py    (추가 파일)
run.py
fastapi 라우터를 작성합니다. Celery 라이브러를 사용하여 broker를 지정해서 앱을 생성합니다. 생성한 앱의 send_task 메서드를 사용하여 broker에 작업을 전송 할 수 있습니다.
from random import randint
from fastapi import FastAPI
from fastapi.responses import PlainTextResponse

from celery import Celery

app = FastAPI()

url = "localhost"
username = "guest"
password = "guest"

celery = Celery(
    "Client Publisher App",
    broker=f"pyamqp://{username}:{password}@{url}//",
    backend=f"redis://{url}:6379/0",
)

@app.get("/publish")
def publish_task():
    a = randint(1, 100)
    b = randint(1, 100)

    celery.send_task(
        "tasks.sum.consume_task",
        kwargs={"a": a, "b": b},
        queue="sum-queue",
    )

    return PlainTextResponse(f"FastAPI : {a=},{ b=} Published to the queue")
send_task 설명
send_task는 Celery에서 작업(Task)을 직접 import하지 않고 비동기적으로 실행할 수 있도록 도와주는 메서드입니다. 즉, Celery 인스턴스를 통해 작업 이름을 문자열로 전달하여 실행하므로, 코드 간 의존성을 줄일 수 있습니다.
- 첫번째 인자값(=name)으로 생성하는 작업을 처리할
worker(=처리 함수)를 지정 - kwargs 인자값으로 worker 인자값을 전달 가능
- queue 인자값으로 작업을 가져올 broker 큐를 지정
celery.send_task(
    "tasks.sum.consume_task",
    kwargs={"a": a, "b": b},
    queue="sum-queue",
)
$ cd apps/rest-api

$ uvicorn run:app
작업 생성해보기
fastapi를 통해서 RabbitMQ로 작업을 넣어보고 확인해보겠습니다.
fastapi 로 작업 생성
fastapi를 통해서 작업을 생성(publish) 해보겠습니다. 아래의 URL로 접속하면 랜덤한 두 수를 인자로 한 작업을 생성할 수 있습니다. 여러번 시도하고 작업이 브로커(=RabbitMQ)에 쌓이는 것을 확인해 보겠습니다.
localhost:8000/publish
RabbitMQ 웹 콘솔
RabbitMQ는 기본적인 웹 콘솔을 제공해줍니다. 아래의 URL로 접속해 봅시다.
localhost:15672
콘솔 로그인 정보는 기본 세팅되는 아이디 / 패스워드는 아래와 같습니다. 로그인 후 큐 정보를 확인해 봅시다.
- Username : guest
- Password : guest
작업을 생성한 큐 sum-queue가 생성되어 있고 몇개의 작업(=여기서는 Message)가 쌓여 있는지 확인 할 수 있습니다. 대상 큐를 클릭해서 Get messages를 통해서 현재 쌓여있는 메시지를 가져와서 확인 할 수 있습니다.
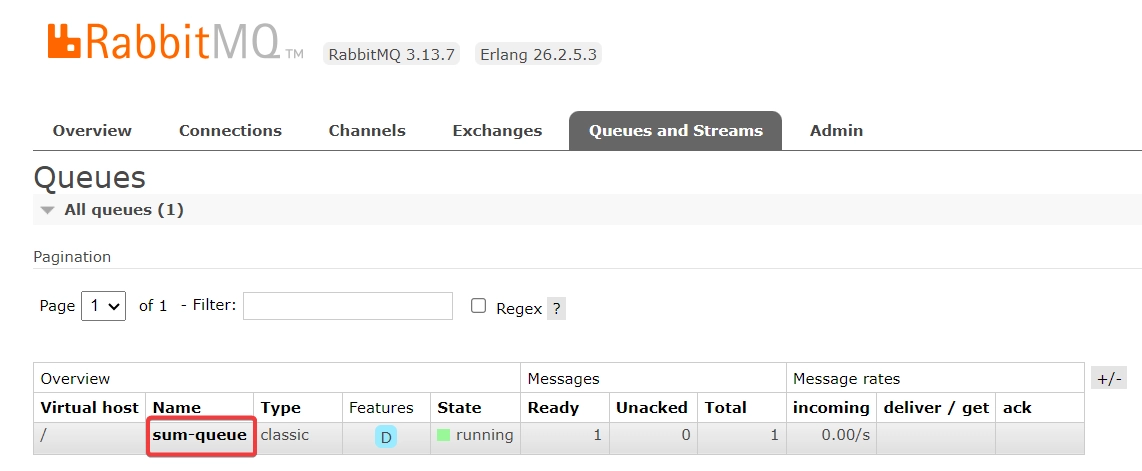
RabbitMQ 웹 콘솔에서 확인 가능
Celery Worker
폴더 구조
이제 작업을 브로커 큐에 넣었으니 해당 작업을 가져와 처리하는 Celery 워커(Worker)를 실행할 환경을 구성하겠습니다. apps/worker/ 폴더를 생성하고 필요한 파일을 추가하겠습니다.
project/
├── apps/
│   ├── rest-api/
│   └── worker/
│       ├── celeryconfig.py (추가 파일)
│       └── run.py          (추가 파일)
run.py
Celery 앱을 생성하고 config_from_object를 통해서 celeryconfig 파일에서 설정을 읽어와서 업데이트 합니다. Celery의 include 옵션은 작업 모듈을 명시적으로 등록하는 역할을 합니다.
from celery import Celery

app = Celery(
    "Celery Worker",
    include=[
        "tasks.sum",
    ],
)

app.config_from_object("celeryconfig")
celeryconfig.py
설정을 작성하는 파일입니다. 각 변수에 값을 할당합니다. Configuration and defaults 페이지를 참고합니다.
broker_url = "pyamqp://guest:guest@localhost//"
result_backend = "redis://localhost:6379/0"

task_serializer = "json"
accept_content = ["json"]
result_serializer = "json"
enable_utc = True
timezone = "UTC"
broker_connection_retry_on_startup = True
- broker_url: 메시지 브로커의 URL을 지정
- result_backend: 작업 결과를 저장할 백엔드의 URL을 지정
- task_serializer: 작업을 직렬화할 때 사용할 형식을 지정
- accept_content: 허용할 메시지 형식의 리스트. 여기서는 JSON 형식만 허용
- result_serializer: 결과를 직렬화할 때 사용할 형식을 지정
- enable_utc: UTC 시간대 사용을 활성화
- timezone: Celery가 사용할 기본 시간대를 설정
- broker_connection_retry_on_startup: 시작 시 브로커 연결 재시도를 활성화
Task 파일 추가
tasks 폴더를 만들고 실제로 작업을 처리하는 작업 모듈 sum.py를 작성하겠습니다.
project/
├── apps/
│   ├── rest-api/
│   └── worker/
│       ├── tasks/
│       │   └── sum.py (추가 파일)
│       ├── celeryconfig.py
│       └── run.py
tasks/sum.py
Celery에서는 비동기로 처리할 작업을 정의하기 위해 @app.task 데코레이터를 사용합니다. 이렇게 정의된 작업은 Celery 워커가 큐에서 가져와서 실행하게 됩니다. 아래 예제에서는 작업 수행에 일정 시간이 걸리는 상황을 가정했습니다.
import logging
import time

from run import app

@app.task(queue="sum-queue")
def consume_task(a, b):
    time.sleep(5)

    logging.info(f"{a=}, {b=}")
    logging.info(f"Task Done : {a} + {b} = {a + b}")

    return a + b
Worker 실행
Worker가 실행되면 RabbitMQ에 sum-queue에 미리 들어가 있던 작업을 가져와서 처리합니다. 처리 결과는 Redis에 저장됩니다. 많은 요청이 들어와도 워커 4개가 순차적으로 이를 처리 하는것을 확인 할 수 있습니다!
-
-A run: Celery 애플리케이션을 지정.--app동일 -
worker: celery Worker로 시작. beat라는 값도 존재 -
-Q sum-queue: Worker가 소비할 큐를 지정.,로 여러개 지정 가능.--queues동일 -
--hostname worker@%h: 처리하는 Worker 이름.Worker@Celery Worker -
-c 4: 워커가 최대 4개의 작업을 동시에 처리할 수 있음을 의미.--concurrency동일 -
--loglevel=info: info 로그 출력
$ cd apps/worker

$ celery -A run worker -Q sum-queue --hostname worker@%h -c 4 --loglevel=info
[2025-02-12 13:44:28,904: INFO/MainProcess] Task tasks.sum.consume_task[49c19f92-0c1e-4223-9827-20061856cc01] received
[2025-02-12 13:44:33,906: INFO/ForkPoolWorker-2] a=86, b=63
[2025-02-12 13:44:33,906: INFO/ForkPoolWorker-2] Task Done : 86 + 63 = 149
[2025-02-12 13:44:33,911: INFO/ForkPoolWorker-2] Task tasks.sum.consume_task[49c19f92-0c1e-4223-9827-20061856cc01] succeeded in 5.005200453000725s: 149
Redis 결과 확인
컨네이터 내부에 들어가서 redis-cli 명령어로 콘솔로 접속합니다. 0번 데이터베이스에 저장된 결과를 확인해 봅니다.
$ docker exec -it redis-stack-server bash

$ redis-cli
127.0.0.1:6379> SELECT 0

127.0.0.1:6379> KEYS *
1) "celery-task-meta-49c19f92-0c1e-4223-9827-20061856cc01"
2) "celery-task-meta-278e1511-17d6-4802-a362-ff7fd279835c"
3) "celery-task-meta-e8ef71db-83ce-417e-ae57-c58e6e6659dc"

127.0.0.1:6379> get "celery-task-meta-49c19f92-0c1e-4223-9827-20061856cc01"
"{\"status\": \"SUCCESS\", \"result\": 149, \"traceback\": null, \"children\": [], \"date_done\": \"2025-02-12T04:44:33.906617+00:00\", \"task_id\": \"49c19f92-0c1e-4223-9827-20061856cc01\"}"
부하 테스트
curl 명령어를 통해 동시에 100개의 작업을 생성하고 큐에 쌓인 작업이 잘 처리되는지 확인해보세요!
$ for i in {1..100}; do curl -s -o /dev/null http://localhost:8000/publish & done
마무리
Celery를 통해 작업 큐(Task Queue)를 사용한 분산처리에 대해 알아보았습니다. 기본 구성은 아래와 같습니다.
- Client: 작업을 생성하고 큐에 전송합니다.
- Broker: 작업을 저장하고 워커에게 전달합니다.
- Worker: 실제 작업을 수행합니다.
- Backend: 작업 결과를 저장합니다.
Celery를 사용하면 RabbitMQ나 Redis를 대신해 다른 Broker나 Backend로 손쉽게 변경 가능합니다. Celery와 다른 서비스를 함께 사용하여 분산처리를 사용해 보는 것도 좋을 듯합니다. 😊
다음으로
전체적인 Celery의 사용방법에 대해서 공부해 보았으니, Celery 기초: App & Tasks에서 Celery의 핵심 구성요소인 Application과 Tasks의 개념, 구현 방법에 대해서 알아보겠습니다!
The Response Is Too Slow
If handling a request (Request) takes a long time, the screen has to sit and wait until the response (Response) arrives.
>Still no response... should I hit refresh or not?
So instead, we put the request’s work into a queue, send the response first, and do the actual processing in the background. This approach is called distributed processing with a ‘Task Queue’.
A task queue is a system that pulls long-running or resource-heavy work out of the main application flow so it can be processed in the background.
Celery
In Python, Celery is the go-to tool for task queues. It’s mostly used to handle background jobs in web applications, and it’s very handy for building distributed systems.
Celery is made up of three main components.
- Client
- Broker
- Worker
Celery Components
Client
The client creates tasks and sends them to the broker; it’s also called the Producer. Usually a web application or a script plays the client. It uses Celery to define tasks and request their execution.
Broker
The broker relays messages between the client and the workers, and is also called the Task Queue / Message Queue. It stores task messages and hands them to workers.
Worker
A worker is the process that takes tasks from the broker and actually runs them; it’s also called the Consumer. You can run several workers at once to process tasks in parallel. Workers can store task results in the result backend.
> Yalpakhan Coding Dictionary: Message Broker - Kafka and RabbitMQ explained
Additional Components
These components are optional.
Result Backend
Stores task states and results. The client uses it to look up a task’s status or fetch its result. Redis, a database, and so on can serve as the backend.
Others
-
Beat: a scheduler for periodic tasks -
Flower: a web-based tool for monitoring and managing Celery
How Celery Works
- The client creates a task and sends it to the broker
- The broker stores the task in a queue
- The worker watches the broker’s queue and picks up new tasks as they arrive
- The worker runs the task
- The task result is stored in the result backend (if configured)
- The client queries the result backend for the task’s status or result as needed
Setting Up the Celery Environment
Let’s build the most basic setup: tasks triggered through a REST API.
- Client : FastAPI
- Broker : RabbitMQ
- Result Backend : Redis
We’ll run each piece as a Docker container.
RabbitMQ
See the Installing RabbitMQ page.
$ docker run -d -it --rm --name rabbitmq -p 5672:5672 -p 15672:15672 rabbitmq:4.0-management
Redis
See the Run Redis Stack on Docker page. Here we’ll use the redis:alpine image.
$ docker run -d --rm --name redis -p 6379:6379 redis:alpine
Writing the FastAPI App
Installing Libraries
First, let’s install the Python libraries we need.
$ pip install Celery fastapi

$ pip install "uvicorn[standard]"
Folder Structure
We’ll write the FastAPI code in the apps/rest-api folder.
project/
├── apps/
│   └── rest-api/
│       └── run.py    (new file)
run.py
Write the FastAPI router. Using the Celery library, create an app with the broker specified. The app’s send_task method lets you send tasks to the broker.
from random import randint
from fastapi import FastAPI
from fastapi.responses import PlainTextResponse

from celery import Celery

app = FastAPI()

url = "localhost"
username = "guest"
password = "guest"

celery = Celery(
    "Client Publisher App",
    broker=f"pyamqp://{username}:{password}@{url}//",
    backend=f"redis://{url}:6379/0",
)

@app.get("/publish")
def publish_task():
    a = randint(1, 100)
    b = randint(1, 100)

    celery.send_task(
        "tasks.sum.consume_task",
        kwargs={"a": a, "b": b},
        queue="sum-queue",
    )

    return PlainTextResponse(f"FastAPI : {a=},{ b=} Published to the queue")
About send_task
send_task is a method that lets you run a Celery task asynchronously without importing it. Because you pass the task’s name as a string through the Celery instance, it reduces dependencies between codebases.
- The first argument (=name) specifies the
worker(=handler function) that will process the task - The kwargs argument passes arguments to the worker
- The queue argument specifies the broker queue the task goes into
celery.send_task(
    "tasks.sum.consume_task",
    kwargs={"a": a, "b": b},
    queue="sum-queue",
)
$ cd apps/rest-api

$ uvicorn run:app
Creating Tasks
Let’s push tasks into RabbitMQ through FastAPI and check on them.
Creating Tasks with FastAPI
Let’s create (publish) tasks through FastAPI. Visiting the URL below creates a task with two random numbers as arguments. Try it a few times and watch the tasks pile up in the broker (=RabbitMQ).
localhost:8000/publish
RabbitMQ Web Console
RabbitMQ comes with a basic web console. Open the URL below.
localhost:15672
The default username and password for the console are below. After logging in, let’s look at the queue information.
- Username : guest
- Password : guest
You’ll see that the queue sum-queue has been created and how many tasks (called Messages here) are waiting in it. Click the queue and use Get messages to fetch and inspect the messages currently queued.
You can check it in the RabbitMQ web console
Celery Worker
Folder Structure
Now that tasks are in the broker queue, let’s set up an environment to run a Celery worker that picks them up and processes them. Create an apps/worker/ folder and add the files we need.
project/
├── apps/
│   ├── rest-api/
│   └── worker/
│       ├── celeryconfig.py (new file)
│       └── run.py          (new file)
run.py
Create a Celery app and update its settings from the celeryconfig file with config_from_object. Celery’s include option explicitly registers task modules.
from celery import Celery

app = Celery(
    "Celery Worker",
    include=[
        "tasks.sum",
    ],
)

app.config_from_object("celeryconfig")
celeryconfig.py
This file holds the configuration: assign a value to each variable. See the Configuration and defaults page.
broker_url = "pyamqp://guest:guest@localhost//"
result_backend = "redis://localhost:6379/0"

task_serializer = "json"
accept_content = ["json"]
result_serializer = "json"
enable_utc = True
timezone = "UTC"
broker_connection_retry_on_startup = True
- broker_url: the URL of the message broker
- result_backend: the URL of the backend that stores task results
- task_serializer: the format used to serialize tasks
- accept_content: a list of accepted message formats; here only JSON is allowed
- result_serializer: the format used to serialize results
- enable_utc: enables the UTC time zone
- timezone: sets Celery’s default time zone
- broker_connection_retry_on_startup: enables retrying the broker connection on startup
Adding the Task File
Create a tasks folder and write sum.py, the task module that does the actual work.
project/
├── apps/
│   ├── rest-api/
│   └── worker/
│       ├── tasks/
│       │   └── sum.py (new file)
│       ├── celeryconfig.py
│       └── run.py
tasks/sum.py
Celery uses the @app.task decorator to define work to be processed asynchronously. A Celery worker pulls tasks defined this way from the queue and runs them. The example below simulates a task that takes a while to finish.
import logging
import time

from run import app

@app.task(queue="sum-queue")
def consume_task(a, b):
    time.sleep(5)

    logging.info(f"{a=}, {b=}")
    logging.info(f"Task Done : {a} + {b} = {a + b}")

    return a + b
Running the Worker
When the worker starts, it picks up the tasks already waiting in RabbitMQ’s sum-queue and processes them. The results are stored in Redis. You can see that even with lots of requests coming in, the four workers work through them one after another!
-
-A run: specifies the Celery application. Same as--app -
worker: starts a Celery worker.beatis another possible value -
-Q sum-queue: the queue(s) the worker consumes. Separate multiple queues with,. Same as--queues -
--hostname worker@%h: the name of the worker.Worker@Celery Worker -
-c 4: the worker can process up to 4 tasks concurrently. Same as--concurrency -
--loglevel=info: print info-level logs
$ cd apps/worker

$ celery -A run worker -Q sum-queue --hostname worker@%h -c 4 --loglevel=info
[2025-02-12 13:44:28,904: INFO/MainProcess] Task tasks.sum.consume_task[49c19f92-0c1e-4223-9827-20061856cc01] received
[2025-02-12 13:44:33,906: INFO/ForkPoolWorker-2] a=86, b=63
[2025-02-12 13:44:33,906: INFO/ForkPoolWorker-2] Task Done : 86 + 63 = 149
[2025-02-12 13:44:33,911: INFO/ForkPoolWorker-2] Task tasks.sum.consume_task[49c19f92-0c1e-4223-9827-20061856cc01] succeeded in 5.005200453000725s: 149
Checking the Results in Redis
Get into the container and open the console with redis-cli. Let’s look at the results stored in database 0.
$ docker exec -it redis-stack-server bash

$ redis-cli
127.0.0.1:6379> SELECT 0

127.0.0.1:6379> KEYS *
1) "celery-task-meta-49c19f92-0c1e-4223-9827-20061856cc01"
2) "celery-task-meta-278e1511-17d6-4802-a362-ff7fd279835c"
3) "celery-task-meta-e8ef71db-83ce-417e-ae57-c58e6e6659dc"

127.0.0.1:6379> get "celery-task-meta-49c19f92-0c1e-4223-9827-20061856cc01"
"{\"status\": \"SUCCESS\", \"result\": 149, \"traceback\": null, \"children\": [], \"date_done\": \"2025-02-12T04:44:33.906617+00:00\", \"task_id\": \"49c19f92-0c1e-4223-9827-20061856cc01\"}"
Load Test
Use curl to create 100 tasks at once and see whether the queued tasks get processed properly!
$ for i in {1..100}; do curl -s -o /dev/null http://localhost:8000/publish & done
Wrapping Up
We looked at distributed processing with a task queue using Celery. The basic setup is:
- Client: creates tasks and sends them to the queue.
- Broker: stores tasks and hands them to workers.
- Worker: does the actual work.
- Backend: stores task results.
With Celery, you can easily swap RabbitMQ or Redis for a different broker or backend. It’s also worth trying Celery together with other services for distributed processing. 😊
What’s Next
Now that we’ve covered how Celery is used overall, in Celery Basics: App & Tasks we’ll look at the concepts and implementation of Celery’s core building blocks: the Application and Tasks!