Celery 기초: App & TasksCelery Basics: App & Tasks
Celery의 핵심 구성요소인 Application과 Tasks의 개념, 구현 방법The concepts and implementation of Celery's core building blocks: the Application and Tasks

환경 구성
이번부터는 Celery의 주요 개념과 사용법을 톺아보는 시간을 가져보겠습니다!
docker-compose
Redis와 RabbitMQ를 동작시키기 위해 docker compose를 사용하겠습니다. docker-compose.yaml 파일을 작성하고 아래의 명령으로 컨테이너를 실행합니다.
$ docker compose up -d
services:
  rabbitmq:
    image: rabbitmq:4.0-management
    ports:
      - "5672:5672"
      - "15672:15672"
  redis:
    image: redis:alpine
    ports:
      - "6379:6379"
Celery Application
Celery의 가장 기본이 되는 인스턴스를 의미합니다. Celery Application 또는 app 이라고 합니다. Celery 클래스를 이용해서 생성할 수 있습니다.
폴더 구조
├── docker-compose.yaml
└── src
    └── run.py (추가 파일)
run.py 파일 작성
from celery import Celery

app = Celery(
    "Celery App",
    broker="pyamqp://guest:guest@localhost//",
    broker_connection_retry_on_startup=True, # 생략가능. 없으면 호환성 warning 경고
)
- 첫 번째 인자값은 생성하는 인스턴스 = Application의 이름을 넣어줍니다.
-
broker: 메시지 큐 지정 -
broker_connection_retry_on_startup: 시작 시 브로커와의 연결이 실패했을 때 재시도할지 여부
Celery 실행
아래의 명령으로 브로커에서 작업(Task)를 가져와 처리하는 Worker를 실행 할 수 있습니다.
-
-A run: app 객체가 있는 패키지 지정 -
worker: Celery Worker 실행
우선 출력된 내용을 한 번 확인하겠습니다.
$ cd src

$ celery -A run worker
 -------------- celery@tiaz v5.4.0 (opalescent)
--- ***** -----
-- ******* ---- Linux-5.15.153.1-microsoft-standard-...
- *** --- * ---
- ** ---------- [config]
- ** ---------- .> app:         Celery App:0x7f77f4403f80
- ** ---------- .> transport:   amqp://guest:**@localhost:5672//
- ** ---------- .> results:     disabled://
- *** --- * --- .> concurrency: 12 (prefork)
-- ******* ---- .> task events: OFF (enable -E to monitor tasks in this worker)
--- ***** -----
 -------------- [queues]
                .> celery           exchange=celery(direct) key=celery

[tasks]
[config] 확인
-
app: 지정한 Application의 이름 -
transport: 작업을 전송해주는 메시지 큐 -
results: 결과를 저장하는 백엔드. 지금은 지정하지 않았기 때문에 disabled -
concurrency: 동시에 동작하는 Worker의 개수
[queues] & [tasks] 확인
[queues]를 확인해보면 메시지가 저장되는 celery라는 큐가 기본으로 있는 것을 확인할 수 있습니다. 그리고 [tasks]에는 아무것도 없는 것을 확인할 수 있습니다.
Celery Tasks
Task는 Celery Application의 기본 구성 요소입니다. Task는 두 가지 역할을 담당합니다.
- 메시지 전송
- Worker가 해당 메시지를 수신했을 때의 동작 정의
그렇다면 Task는 어떻게 정의하는지 알아봅시다.
폴더 구조
tasks 폴더를 생성하고 math.py 파일을 작성하겠습니다.
├── docker-compose.yaml
└── src
    └── run.py
    └── tasks
        └── math.py (추가 파일)
math.py 파일 작성
from run import app

@app.task
def add(x, y):
    return x + y
Celery.task 데코레이터
Celery.task 데코레이터를 이용하면 Task를 정의할 수 있습니다. 여기서는 @app.task가 그 역할을 수행합니다. Callable 객체인 일반 함수 add를 Task 객체로 변환합니다.
실제로 데코레이터는 다음과 동일한 작업을 수행합니다.
app.task(add)
$ cd src

$ celery -A run worker
하지만 Celery를 다시 실행해 보면, 여전히 화면의 [tasks]에는 아무런 Task가 등록되지 않은 것을 확인할 수 있습니다.
Task Registry
Celery Application은 내부적으로 tasks 딕셔너리를 가지고 있습니다. 이를 Task Registry라고 합니다. 생성한 Task 객체를 사용하기 위해서는 이 딕셔너리에 등록해야 합니다. Task의 이름이 키가 되고, Task 객체가 값이 됩니다.
run.py 수정
src/run.py 파일에 Task를 등록하는 코드를 작성합니다. register_task라는 메서드를 통해 Task 객체를 Task Registry에 등록할 수 있습니다. 다시 Celery를 실행하면 우리가 생성한 add Task가 등록된 것을 확인할 수 있습니다.
from celery import Celery

app = Celery("Celery App", broker="pyamqp://guest:guest@localhost//")

from tasks.math import add

app.register_task(add)
(생략)

--- ***** -----
 -------------- [queues]
                .> celery           exchange=celery(direct) key=celery

[tasks]
  . tasks.math.add
Task 이름
각 Task는 고유한 이름을 가지며, 이 이름으로 Celery Worker가 실행할 함수를 찾습니다. 기본적으로 [패키지명].[모듈명].[함수명] 형식으로 Task 이름이 자동 생성됩니다.
그리고 Celery.task 데코레이터의 name 옵션을 사용하면 원하는 이름으로 변경할 수 있습니다.
@app.task(name="add_task")
기존 코드 개선
이제까지 작성한 코드는 가독성이 매우 떨어지는 느낌입니다. Celery의 다양한 기능을 사용해 기존의 코드를 개선해 보도록 하겠습니다.
shared_task
shared_task를 사용하면 Celery app 인스턴스를 직접 참조할 필요가 없습니다.
from celery import shared_task

@shared_task
def add(x, y):
    return x + y
- 여러 Celery app에서 Task 소스를 재사용 가능
- 재사용 가능한 라이브러리나 패키지 개발 시 유용
- 순환 임포트 문제 방지
include 옵션
Celery include 인자값을 사용하면 Celery Worker 시작 시 자동으로 지정된 모듈에서 Task를 등록합니다. 새로운 Task 추가 시, 모듈 경로를 추가하면 됩니다.
from celery import Celery

app = Celery(
    "Celery App",
    broker="pyamqp://guest:guest@localhost//",
    include=["tasks.math"],
)
Task 큐에 넣기
Celery cli : call
Celery cli(Command-Line Interface)를 사용하여 Task를 큐에 넣어보겠습니다. 아래의 명령으로 Task의 이름으로 해당 Task를 호출(call)할 수 있습니다. 작업을 호출하면 해당 작업을 메시지로 큐에 넣게 됩니다.
$ celery call -a '[1,2]' --eta '2025-02-14T13:00:00+09:00' --countdown 10 tasks.math.add
-
-a '[1,2]': JSON 배열 형태로 Task의 인자값 전달 -
--eta '2025-02-14T13:00:00+09:00': eta (Estimated Time of Arrival). 시작하는 예약 시간 -
--countdown 10: 10초 대기 후 실행 -
tasks.math.add: 실행할 Task 이름
RabbitMQ 큐 확인
RabbitMQ에서 큐에 Task를 메시지로 들어왔는지 확인해보겠습니다. RabbitMQ 웹 콘솔에서 Queues and Streams 탭에서 celery 큐를 보면, Ready 상태의 메시지가 있는 것을 확인할 수 있습니다.
http://localhost:15672/

guest / guest
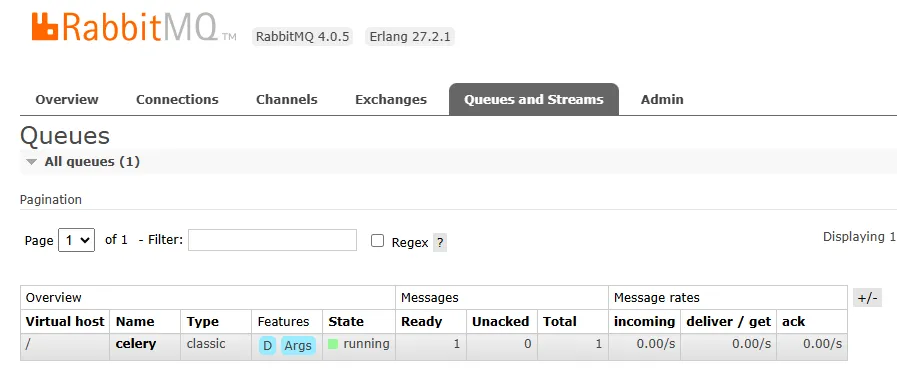
> RabbitMQ 큐에 메시지 확인
RabbitMQ 자세히 보기
좀 더 자세히 RabbitMQ에서 메시지를 확인해보겠습니다. 큐 이름 celery를 클릭합니다. 아래 Consumers를 확인해보면 연결된 컨슘머가 없는 것을 확인할 수 있습니다.
Get Message(s) 버튼으로 현재 메시지를 가져와서 확인할 수 있습니다. 우리가 설정한 eta, argsrepr 등을 확인할 수 있습니다.
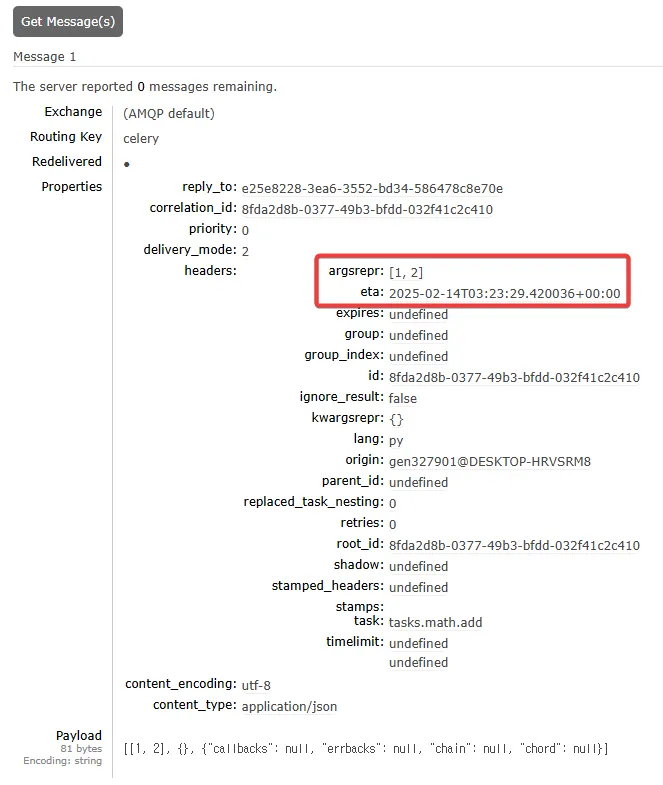
> 메시지의 자세한 정보 확인
Task Workflow
이제 큐에 들어온 메시지를 가져와서 Task를 처리하는 과정을 확인해보겠습니다. Celery Worker를 실행합니다.
$ cd src

$ celery -A run worker
1. Task received
Celery Worker가 동작하면서 즉시 큐에서 해당 메시지를 받아(received)옵니다. eta 시간까지 아직 작업이 수행되지 않고 대기하고 있습니다.
[2025-02-14 13:09:34,765: INFO/MainProcess] Connected to amqp://guest:**@127.0.0.1:5672//
[2025-02-14 13:09:34,772: INFO/MainProcess] mingle: searching for neighbors
[2025-02-14 13:09:35,811: INFO/MainProcess] mingle: all alone
[2025-02-14 13:09:35,827: INFO/MainProcess] celery@DESKTOP-HRVSRM8 ready.
[2025-02-14 13:09:35,829: INFO/MainProcess] Task tasks.math.add[609974ca-4b9c-4544-88ba-3bf51cd0c8c1] received
2. Message Unacked
RabbitMQ에서 Celery Worker가 컨슘머로 연결된 것을 확인할 수 있고, 해당 메시지가 Ready에서 Unacked 상태로 변한 것을 확인할 수 있습니다. 메시지는 Celery Worker가 승인하기 전까지 큐에서 제거되지는 않습니다.

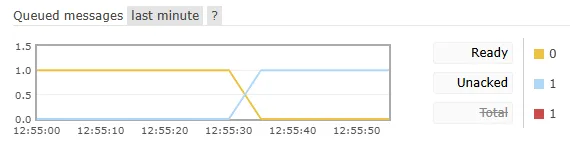
> Ready에서 Unacked로 변한 메시지 상태
3. 승인(acknowledge)
기본적으로 Celery Worker는 Task 실행 직전에 메시지를 승인(acknowledge)합니다. 따라서 --countdown 10 후에 Task가 실행되면서 해당 메시지는 큐에서 삭제됩니다.
[2025-02-14 13:10:00,003: INFO/ForkPoolWorker-2] Task tasks.math.add[609974ca-4b9c-4544-88ba-3bf51cd0c8c1] succeeded in 0.000499843001307454s: 3
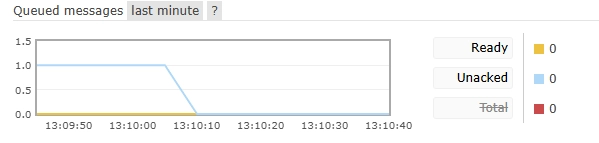
> Task가 실행되며 Unacked 메시지 삭제
마무리
이번에는 Celery의 가장 기본이 되는 구성 요소들에 대해 알아보았습니다. 😊
Celery Application
- Celery의 시작점이 되는 인스턴스
- 브로커 연결, Worker 설정 등 기본 구성 관리
- Task Registry를 통한 Task 관리
Celery Tasks
-
@app.task데코레이터를 사용한 Task 정의 -
shared_task를 통한 재사용성 향상
Task의 실행 흐름
- Task 발행 → 메시지 큐 저장 → Worker 수신 → Task 실행
- 메시지 상태 변화: Ready → Unacked → Acknowledged
참고 문헌
Setting Up the Environment
Starting with this post, let’s take a close look at Celery’s key concepts and how to use them!
docker-compose
We’ll use docker compose to run Redis and RabbitMQ. Write a docker-compose.yaml file and start the containers with the command below.
$ docker compose up -d
services:
  rabbitmq:
    image: rabbitmq:4.0-management
    ports:
      - "5672:5672"
      - "15672:15672"
  redis:
    image: redis:alpine
    ports:
      - "6379:6379"
Celery Application
This is Celery’s most fundamental instance, called the Celery Application, or simply the app. You create it with the Celery class.
Folder Structure
├── docker-compose.yaml
└── src
    └── run.py (new file)
Writing run.py
from celery import Celery

app = Celery(
    "Celery App",
    broker="pyamqp://guest:guest@localhost//",
    broker_connection_retry_on_startup=True, # optional; without it you get a compatibility warning
)
- The first argument is the name of the instance being created, i.e. the Application.
-
broker: the message queue -
broker_connection_retry_on_startup: whether to retry when the connection to the broker fails at startup
Running Celery
The command below starts a Worker that takes tasks (Tasks) from the broker and processes them.
-
-A run: the package containing the app object -
worker: run a Celery Worker
First, let’s look at the output.
$ cd src

$ celery -A run worker
 -------------- celery@tiaz v5.4.0 (opalescent)
--- ***** -----
-- ******* ---- Linux-5.15.153.1-microsoft-standard-...
- *** --- * ---
- ** ---------- [config]
- ** ---------- .> app:         Celery App:0x7f77f4403f80
- ** ---------- .> transport:   amqp://guest:**@localhost:5672//
- ** ---------- .> results:     disabled://
- *** --- * --- .> concurrency: 12 (prefork)
-- ******* ---- .> task events: OFF (enable -E to monitor tasks in this worker)
--- ***** -----
 -------------- [queues]
                .> celery           exchange=celery(direct) key=celery

[tasks]
Checking [config]
-
app: the name of the Application we specified -
transport: the message queue that delivers tasks -
results: the backend that stores results; disabled for now since we didn’t set one -
concurrency: the number of Workers running concurrently
Checking [queues] & [tasks]
Under [queues] you can see a default queue named celery where messages are stored. And [tasks] is empty.
Celery Tasks
A Task is the basic building block of a Celery Application. A Task plays two roles:
- Sending messages
- Defining what happens when a Worker receives that message
So let’s see how to define a Task.
Folder Structure
Create a tasks folder and write a math.py file.
├── docker-compose.yaml
└── src
    └── run.py
    └── tasks
        └── math.py (new file)
Writing math.py
from run import app

@app.task
def add(x, y):
    return x + y
The Celery.task Decorator
The Celery.task decorator lets you define a Task; here @app.task does that job. It turns the plain callable function add into a Task object.
In fact, the decorator does the same thing as:
app.task(add)
$ cd src

$ celery -A run worker
But if you run Celery again, you’ll see that [tasks] still shows no registered Tasks.
Task Registry
A Celery Application keeps a tasks dictionary internally, called the Task Registry. To use a Task object you’ve created, it has to be registered in this dictionary. The Task’s name is the key and the Task object is the value.
Updating run.py
Add code to src/run.py that registers the Task. The register_task method registers a Task object in the Task Registry. Run Celery again and you’ll see that our add Task is registered.
from celery import Celery

app = Celery("Celery App", broker="pyamqp://guest:guest@localhost//")

from tasks.math import add

app.register_task(add)
(omitted)

--- ***** -----
 -------------- [queues]
                .> celery           exchange=celery(direct) key=celery

[tasks]
  . tasks.math.add
Task Names
Every Task has a unique name, and the Celery Worker uses that name to find the function to run. By default, Task names are generated automatically in the form [package].[module].[function].
You can change it to whatever you like with the name option of the Celery.task decorator.
@app.task(name="add_task")
Improving the Code
The code so far doesn’t read very well. Let’s improve it using some of Celery’s features.
shared_task
With shared_task, you don’t need to reference the Celery app instance directly.
from celery import shared_task

@shared_task
def add(x, y):
    return x + y
- Task code can be reused across multiple Celery apps
- Handy when developing reusable libraries or packages
- Avoids circular import problems
The include Option
With Celery’s include argument, Tasks in the listed modules are registered automatically when the Celery Worker starts. When you add a new Task, just add its module path.
from celery import Celery

app = Celery(
    "Celery App",
    broker="pyamqp://guest:guest@localhost//",
    include=["tasks.math"],
)
Putting a Task in the Queue
Celery cli : call
Let’s put a Task in the queue using the Celery CLI (Command-Line Interface). The command below calls a Task by its name. Calling a task puts it into the queue as a message.
$ celery call -a '[1,2]' --eta '2025-02-14T13:00:00+09:00' --countdown 10 tasks.math.add
-
-a '[1,2]': passes the Task’s arguments as a JSON array -
--eta '2025-02-14T13:00:00+09:00': eta (Estimated Time of Arrival), the scheduled start time -
--countdown 10: wait 10 seconds before running -
tasks.math.add: the name of the Task to run
Checking the RabbitMQ Queue
Let’s check in RabbitMQ that the Task arrived in the queue as a message. In the RabbitMQ web console, open the Queues and Streams tab and look at the celery queue: there’s a message in the Ready state.
http://localhost:15672/

guest / guest
> Checking the message in the RabbitMQ queue
A Closer Look at RabbitMQ
Let’s look at the message in RabbitMQ in more detail. Click the queue name celery. Under Consumers below, you’ll see that no consumer is connected.
The Get Message(s) button fetches the current messages so you can inspect them. You can see the eta, argsrepr and other values we set.
> Inspecting the message details
Task Workflow
Now let’s watch the process of fetching the queued message and running the Task. Start the Celery Worker.
$ cd src

$ celery -A run worker
1. Task received
As soon as the Celery Worker starts, it receives the message from the queue. The task isn’t run yet; it waits until the eta time.
[2025-02-14 13:09:34,765: INFO/MainProcess] Connected to amqp://guest:**@127.0.0.1:5672//
[2025-02-14 13:09:34,772: INFO/MainProcess] mingle: searching for neighbors
[2025-02-14 13:09:35,811: INFO/MainProcess] mingle: all alone
[2025-02-14 13:09:35,827: INFO/MainProcess] celery@DESKTOP-HRVSRM8 ready.
[2025-02-14 13:09:35,829: INFO/MainProcess] Task tasks.math.add[609974ca-4b9c-4544-88ba-3bf51cd0c8c1] received
2. Message Unacked
In RabbitMQ you can see the Celery Worker connected as a consumer, and the message has changed from Ready to the Unacked state. A message is not removed from the queue until the Celery Worker acknowledges it.
> The message state changed from Ready to Unacked
3. Acknowledge
By default, the Celery Worker acknowledges the message right before running the Task. So when the Task runs after --countdown 10, the message is deleted from the queue.
[2025-02-14 13:10:00,003: INFO/ForkPoolWorker-2] Task tasks.math.add[609974ca-4b9c-4544-88ba-3bf51cd0c8c1] succeeded in 0.000499843001307454s: 3
> The Unacked message is deleted as the Task runs
Wrapping Up
This time we looked at Celery’s most fundamental building blocks. 😊
Celery Application
- The instance that serves as Celery’s starting point
- Manages the basic setup, such as the broker connection and Worker settings
- Manages Tasks through the Task Registry
Celery Tasks
- Defining Tasks with the
@app.taskdecorator - Better reusability with
shared_task
Task Execution Flow
- Task published → stored in the message queue → received by a Worker → Task runs
- Message state changes: Ready → Unacked → Acknowledged