MCP 옵시디언 연동Connecting Obsidian with MCP
MCP를 이용해서 LLM이 내 옵시디언을 참고하게 해보자!Let's use MCP to let an LLM read my Obsidian vault!

MCP(Model Context Protocol)란?

모델 컨텍스트 프로토콜(MCP)은 LLM 애플리케이션과 외부 데이터 소스 및 도구 간의 원활한 통합을 가능하게 하는 개방형 프로토콜입니다. AI 기반 IDE를 구축하든, 채팅 인터페이스를 개선하든, 맞춤형 AI 워크플로를 만들든, MCP는 LLM이 필요한 컨텍스트와 연결할 수 있는 표준화된 방법을 제공합니다.
> 출처 : github - Model Context Protocol
MCP(Model Context Protocol)는 Claude를 만든 Anthropic에서 제안한 프로토콜입니다. 간단히 말해 LLM이 여러가지 어플리케이션을 통해 추가 컨텍스트를 참고할 수 있게 만들어주는 프로토콜입니다.
LLM이 필요에 따라 스스로 여러 어플리케이션을 하나의 도구(tool)로써 이용할 수 있게 만들어주는 기술입니다.
Claude + 옵시디언
이미 수많은 어플리케이션이 MCP를 사용하여 LLM Claude 연동할 수 있게 플러그인이 만들어져 있습니다. 여기서는 옵시디언(Obsidian)을 MCP로 연동해 보겠습니다.
Claude Desktop 설치
Claude와 MCP를 연동하기 위해서는 가장 먼저, 로컬 PC에 Claude Desktop을 설치해야 합니다.

> Claude Desktop
MCP server for Obsidian
MCP server for Obsidian라는 python 라이브러리를 사용해서 Claude와 옵시디언을 MCP로 연동해 보겠습니다.
1. 커뮤니티 플러그인 설치
우선 해당 MCP 서버 라이브러리는 REST API로 옵시디언을 이용합니다. 따라서 옵시디언에 REST API를 사용할 수 있게 만들어주는 Local REST API Community plugin을 설치해야 합니다.
Options - Community plugins - Browse 버튼에 들어가서 Local REST API 플러그인을 검색해서 설치해줍니다. 그리고 반드시 해당 플러그인을 사용할 수 있게 활성화해줍니다.
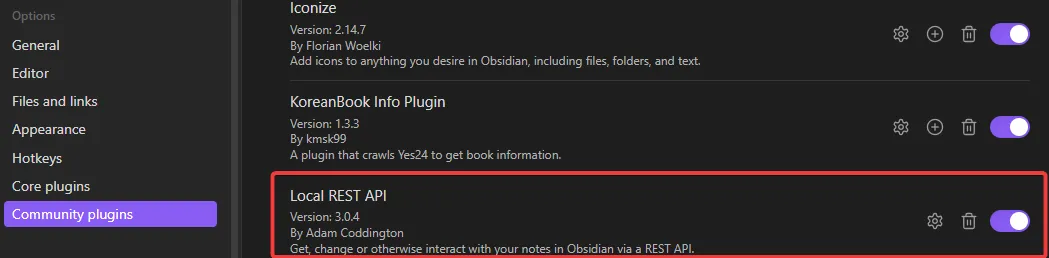
> Community plugin 설치 후 반드시 활성화하자
활성화 버튼 옆에 ⚙️버튼을 클릭하여 설정을 열어서 API Key를 복사해둡니다. 해당 정보는 MCP 설정에 필요합니다.
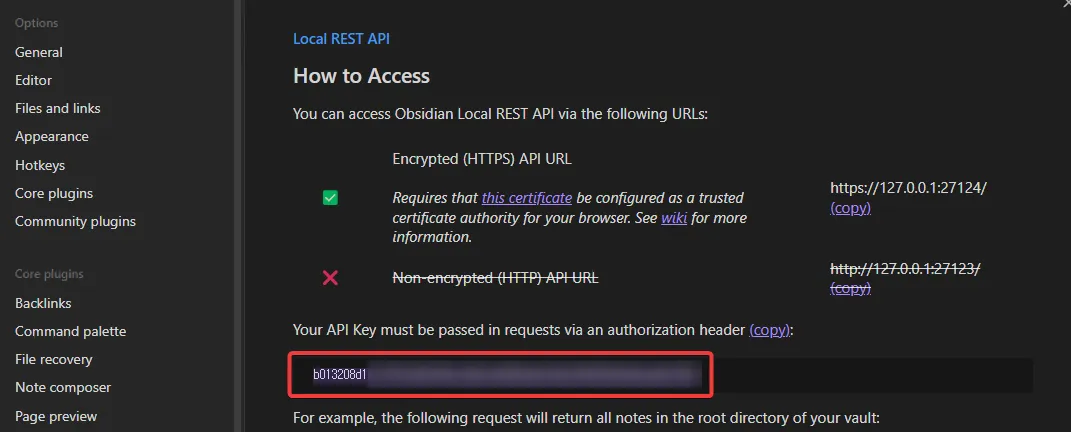
> Claude MCP 설정에 필요한 API Key를 복사해두자
2. python uv 설치
uv는 파이썬 패키지 매니저입니다. Installing uv 페이지를 참고해서 설치를 진행합니다.
$ curl -LsSf https://astral.sh/uv/install.sh | sh
> powershell -ExecutionPolicy ByPass -c "irm https://astral.sh/uv/install.ps1 | iex"
아래의 명령으로 uv가 제대로 설치되었는지 확인합니다.
$ uv --version
uv 0.6.3 (a0b9f22a2 2025-02-24)
3. Claude MCP 설정
- Claude Desktop를 실행하여
Settings창을 열어야 합니다. - 좌측 상단에 햄버거 버튼에서
File-Settings를 클릭합니다. - 해당 창에서
Developer탭을 선택합니다. -
Edit Config버튼을 눌러서claude_desktop_config.json파일을 열겠습니다.
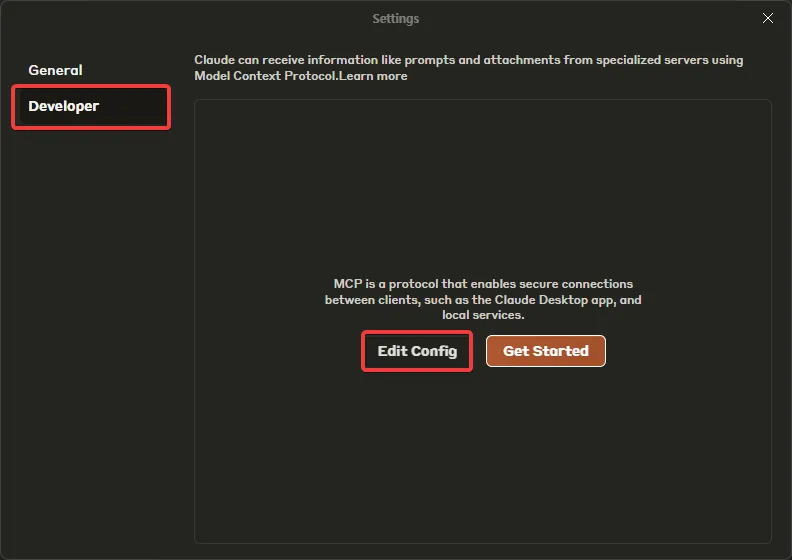
> Claude Desktop에서 Settings를 열자
claude_desktop_config.json 파일에 아래의 JSON을 붙여 넣습니다. 마지막으로 <YOUR_OBSIDIAN_API_KEY> 부분에 자신의 옵시디언 플러그인에서 복사해뒀던 API Key를 입력합니다.
{
  "mcpServers": {
    "mcp-obsidian": {
      "command": "uvx",
      "args": [
        "mcp-obsidian"
      ],
      "env": {
        "OBSIDIAN_API_KEY" : "<YOUR_OBSIDIAN_API_KEY>"
      }
    }
  }
}
4. 연동 확인
Claude 입력창 하단에 새로운 🔨 아이콘이 추가되었으면 제대로 연동됐습니다! 이제 Claude가 볼트 내에 있는 정보를 검색해서 답변하는지 확인 해보겠습니다.
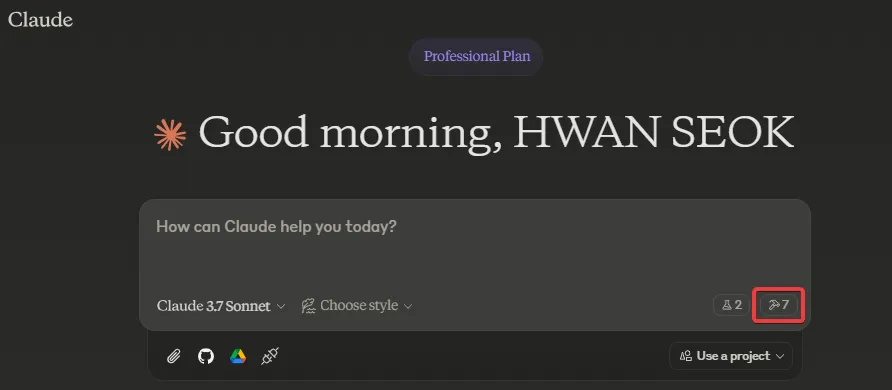
> Claude에 MCP tools가 추가된 것을 확인
5. 질의 해보기
질의에 대해서 참고할 정보를 빠르게 찾을 수 있게 도와주는 내용(경로, 파일명)을 적어주는 것을 추천드립니다!
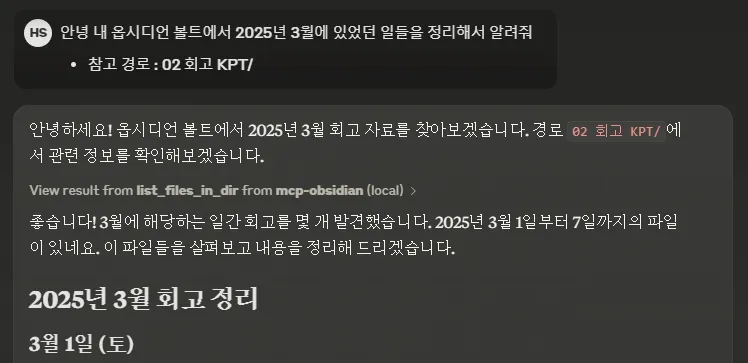
> Claude가 옵시디언을 참고하는 것을 볼 수 있다!
마무리
MCP(Model Context Protocol)를 통해 LLM과 외부 데이터 소스 및 도구 간의 원활한 통합을 가능하게 하는 방법을 알아보았습니다. 이를 통해 LLM이 보다 풍부한 컨텍스트를 활용하여 더 나은 답변을 제공할 수 있게 되었습니다.
다음으로
다음글: MCP Cursor 연동에서는 Cursor에서 MCP로 GitHub와 Chrome 개발자 도구를 연동하는 방법에 대해서 알아보겠습니다. 나아가서는 MCP SDK로 직접 MCP 서버를 만들어 보겠습니다!
감사합니다! 😊
참고 문헌
What is MCP (Model Context Protocol)?
The Model Context Protocol (MCP) is an open protocol that enables seamless integration between LLM applications and external data sources and tools. Whether you’re building an AI-powered IDE, enhancing a chat interface, or creating custom AI workflows, MCP provides a standardized way to connect LLMs with the context they need.
> Source: github - Model Context Protocol
MCP (Model Context Protocol) is a protocol proposed by Anthropic, the company behind Claude. Put simply, it’s a protocol that lets an LLM pull in extra context through various applications.
It’s the technology that lets an LLM use other applications as tools on its own, whenever it needs them.
Claude + Obsidian
Plugins already exist that let a huge number of applications connect to the LLM Claude through MCP. In this post, we’ll connect Obsidian via MCP.
Installing Claude Desktop
To connect Claude with MCP, the first thing you need is Claude Desktop installed on your local machine.
> Claude Desktop
MCP server for Obsidian
We’ll use a Python library called MCP server for Obsidian to connect Claude and Obsidian over MCP.
1. Install the community plugin
First, this MCP server library talks to Obsidian through a REST API. So we need to install the Local REST API community plugin, which exposes a REST API for Obsidian.
Go to Options - Community plugins - Browse button, search for the Local REST API plugin and install it. Then make sure to enable the plugin.
> Don't forget to enable the community plugin after installing it
Click the ⚙️ button next to the enable toggle to open its settings, and copy the API Key. You’ll need it for the MCP configuration.
> Copy the API Key needed for the Claude MCP configuration
2. Install Python uv
uv is a Python package manager. Follow the Installing uv page to install it.
$ curl -LsSf https://astral.sh/uv/install.sh | sh
> powershell -ExecutionPolicy ByPass -c "irm https://astral.sh/uv/install.ps1 | iex"
Run the command below to check that uv was installed correctly.
$ uv --version
uv 0.6.3 (a0b9f22a2 2025-02-24)
3. Configure MCP in Claude
- Launch Claude Desktop and open the
Settingswindow. - From the hamburger menu at the top left, click
File-Settings. - In that window, select the
Developertab. - Click the
Edit Configbutton to open theclaude_desktop_config.jsonfile.
> Open Settings in Claude Desktop
Paste the JSON below into claude_desktop_config.json. Finally, replace <YOUR_OBSIDIAN_API_KEY> with the API Key you copied from your Obsidian plugin.
{
  "mcpServers": {
    "mcp-obsidian": {
      "command": "uvx",
      "args": [
        "mcp-obsidian"
      ],
      "env": {
        "OBSIDIAN_API_KEY" : "<YOUR_OBSIDIAN_API_KEY>"
      }
    }
  }
}
4. Verify the connection
If a new 🔨 icon shows up below the Claude input box, the connection works! Now let’s check whether Claude searches the notes in your vault when answering.
> MCP tools have been added to Claude
5. Ask a question
I recommend including hints (paths, file names) in your question that help Claude quickly find the information it should refer to!
> You can see Claude referring to Obsidian!
Wrapping Up
We looked at how MCP (Model Context Protocol) enables seamless integration between LLMs and external data sources and tools. With it, an LLM can draw on richer context and give better answers.
What’s Next
Next post: in Connecting Cursor with MCP, we’ll see how to connect GitHub and Chrome DevTools to Cursor through MCP. Going further, we’ll build our own MCP server with the MCP SDK!
Thank you! 😊