AWS CodePipeline CI/CD 구축Building CI/CD with AWS CodePipeline
React + Docker를 EC2에 자동 배포하는 CI/CD 구축 방법How to build CI/CD that auto-deploys React + Docker to EC2

CI/CD
CI/CD는 현대 소프트웨어 개발에서 핵심적인 개발 방법론입니다. CI(Continuous Integration)는 개발자들이 코드 변경사항을 주기적으로 메인 브랜치에 병합하는 과정을 자동화하는 것을 말하며, CD는 Continuous Delivery(지속적 제공)와 Continuous Deployment(지속적 배포)를 의미합니다.
CI (Continuous Integration)
- 여러 개발자의 코드 변경사항을 주기적으로 통합
- 자동화된 빌드와 테스트 진행
- 코드 품질 유지와 버그 조기 발견
CD (Continuous Delivery/Deployment)
- Continuous Delivery: 프로덕션 환경으로 배포할 수 있는 상태 유지
- Continuous Deployment: 프로덕션 환경까지 자동 배포
React App + Docker NGINX
React 앱을 빌드하여 Docker NGINX 컨테이너로 실행하는 코드입니다. 이 코드를 AWS CodePipeline을 이용하여 EC2에 배포해 보도록 하겠습니다.
아래의 명령으로 로컬에서 확인 가능합니다.
$ docker build -t docker-react .

$ docker run -it -d -p 8080:80 --name web docker-react
AWS CodePipeline
AWS CodePipeline은 CI/CD 스테이지를 모델링하고 자동화하는 AWS의 완전관리형 서비스입니다. 코드 변경이 발생할 때마다 빌드, 테스트 및 배포 스테이지를 자동으로 실행하여 안정적인 애플리케이션 업데이트를 가능하게 합니다.
AWS CodePipeline 구성도
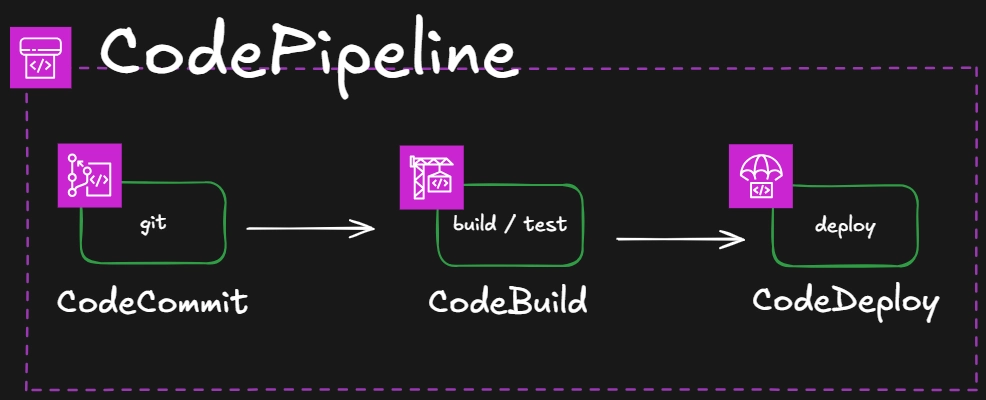
여기서는 AWS CodePipeline을 통해 각 스테이지에 다음 서비스를 연결해 사용해 보겠습니다.
- AWS CodeCommit
- AWS CodeBuild
- AWS CodeDeploy
AWS CodeCommit으로 git을 연동하고 AWS CodeBuild로 빌드 및 테스트를 수행하며, AWS CodeDeploy를 통해 EC2에 코드를 배포해 보도록하겠습니다.
아티팩트(artifacts)
각 스테이지마다 생성되는 결과물을 아티팩트(artifacts)라고 부릅니다. 이 아티팩트가 어떻게 생성되고 어떻게 사용되는지 유심히 관찰해보세요. 이 흐름을 따라가면 CI/CD를 보다 쉽게 이해할 수 있습니다!
CI/CD 구성도
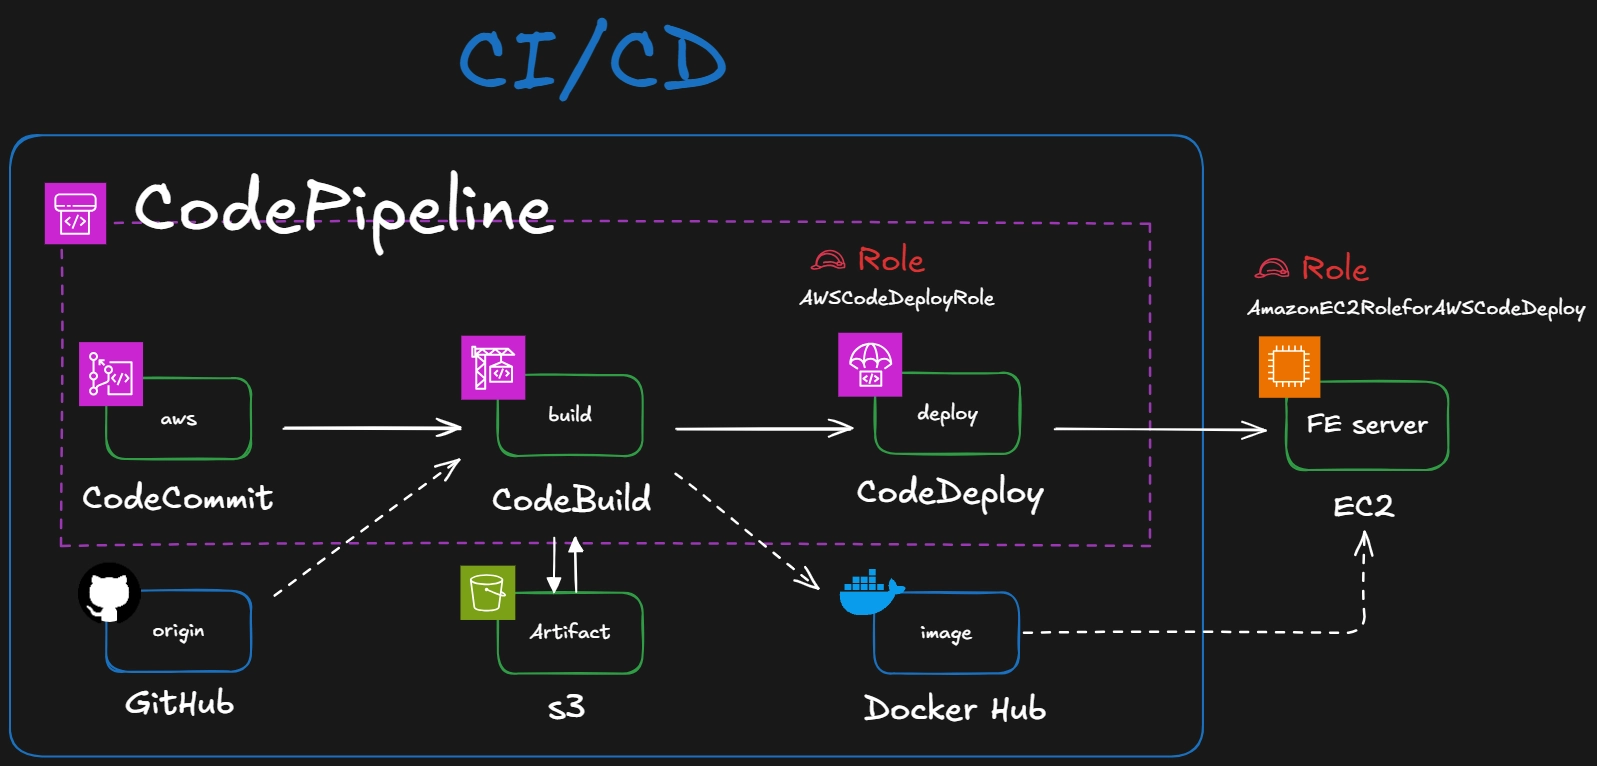
- AWS CodePipeline을 중심으로 CI/CD 구성
- AWS CodeBuild에서 도커 이미지를 빌드하고 Docker Hub에 push
- AWS CodeDeploy로 도커 이미지를 pull 받아서 Amazon EC2에 배포
AWS CodeCommit
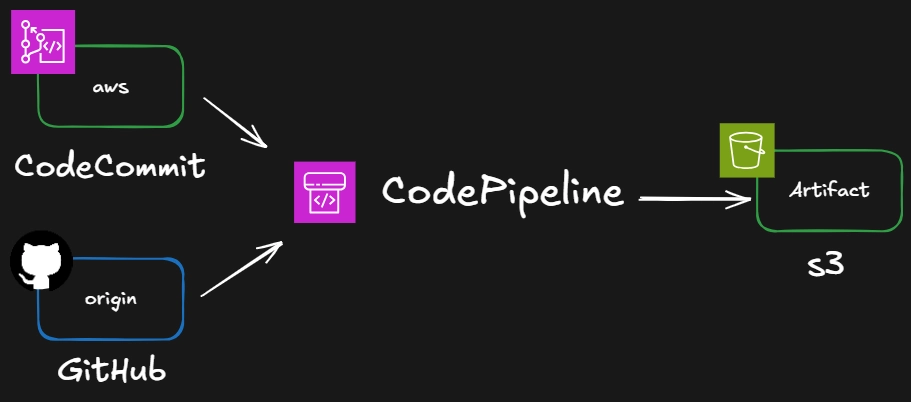
AWS CodeCommit은 AWS에서 제공하는 버전 관리 git 서비스입니다. GitHub과 유사한 서비스라고 생각하시면 됩니다. AWS Commit 또는 GitHub의 소스코드를 AWS CodePipeline을 통해 아티팩트로 S3에 가져올 수 있습니다.
주의 사항
또한 기존 Account라도 이미 생성된 AWS CodeCommit 리포지토리가 있는 경우에만 추가로 생성할 수 있습니다.
하지만 여전히 회사에서 AWS CodeCommit을 사용하는 곳이 있기 때문에, 여기서는 SSH로 AWS CodeCommit을 연결 하겠습니다. GitHub 또는 GitLab을 이용하시면 다음 AWS CodeBuild로 넘어가세요!
리포지토리 생성
AWS CodeCommit에서 리포지토리 이름을 입력하고 생성합니다.
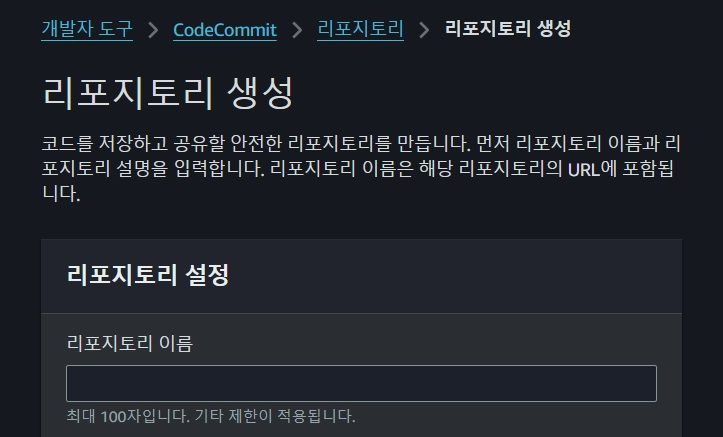
> AWS CodeCommit으로 git 저장소를 생성
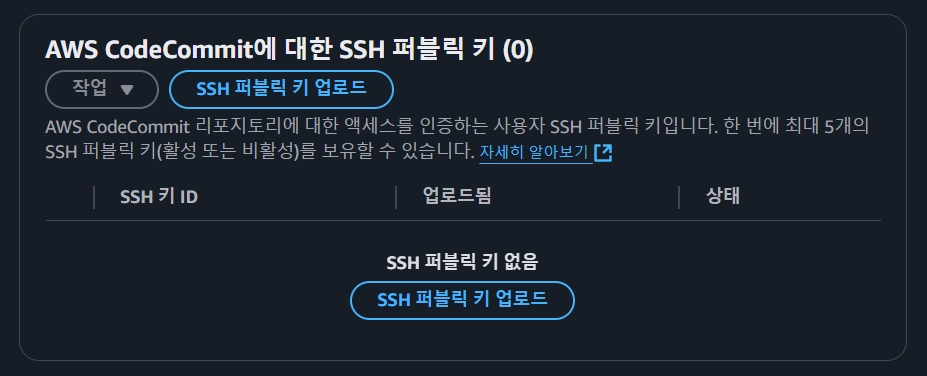
SSH 퍼블릭 키를 업로드
AWS CodeCommit 리포지토리를 SSH로 연결하겠습니다. GitHub와 완전히 동일한 방식인 것을 알 수 있습니다.
IAM - 사용자 - 보안 자격 증명 - AWS CodeCommit에 대한 SSH 퍼블릭 키 업로드 합니다. 아래 명령으로 생성한 비대칭 키페어 중에서 공개키(id_rsa.pub)를 등록해주면 됩니다. 퍼블릭 키 업로드하면 SSH 키 ID가 나오는데 이 값은 SSH config에 사용하게 될 값입니다.
$ ssh-keygen -t rsa
SSH config 설정
SSH config 파일에 아래와 같이 작성합니다.
- Host :
git-codecommit.*.amazonaws.com - User :
SSH 키 ID - IdentityFile :
비대칭 키페어 중에서 개인키
Host git-codecommit.*.amazonaws.com
    User APKAZN6Q
    IdentityFile C:\Users\tiaz0128\.ssh\id_rsa
git remote 연결
AWS CodeCommit에 생성된 레포지토리의 URL 복제 - SSH 주소를 복사해서 git 원격 저장소로 등록합니다.
$ git remote add aws ssh://git-codecommit.ap-northeast-2.amazonaws.com/v1/repos/docker-react
AWS CodeBuild
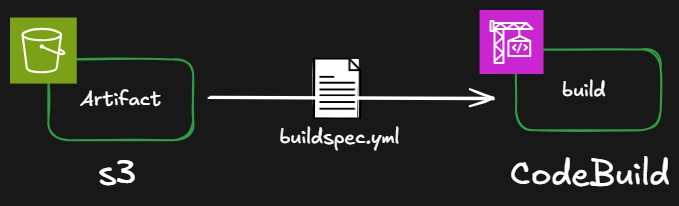
AWS CodeBuild는 도커 컨테이너에서 소스 코드를 컴파일하고 테스트를 실행합니다. 또한 커스텀 도커 이미지를 사용해 빌드 환경을 직접 구성 가능합니다. 소스 아티팩트를 이용하여 buildspec.yml 파일에 정의된 각 단계(phases)에 따라 동작합니다.
- 소스 코드 컴파일 / 빌드
- 테스트 실행
프로젝트 생성
- AWS CodeBuild에서
프로젝트 빌드-프로젝트 생성합니다. -
소스 공급자는 AWS CodeCommit / GitHub 중에 선택합니다. -
환경-추가 구성-도커 이미지를 빌드하거나 빌드의 권한을 승격하려면 이 플래그를 활성화합니다.선택 -
환경-추가 구성-파라미터 생성을 통해서 중요한 환경변수 값들을 생성합니다.- DOCKER_USERNAME : Docker Hub 아이디
- DOCKER_PASSWORD : Docker Hub 비밀번호
-
Buildspec-빌드 사양-buildspec 파일 사용선택 -
아티팩트-유형-아티팩트 없음
buildspec.yml
buildspec.yml은 각 단계(phases) 별로 프로젝트의 빌드 방법을 정의하는 YAML 형식의 파일입니다. 주요 내용은 다음과 같습니다.
- AWS Systems Manager의 parameter-store에 저장된 환경변수를 이용
- 도커 이미지 빌드 및 Docker Hub에 push
- artifacts 폴더 내에 AWS CodeDeploy에서 사용할 파일들 복사
각 세션의 세부정보는 CodeBuild의 빌드 사양 참조를 참고 합시다.
version: 0.2
env:
  parameter-store:
    DOCKER_USERNAME: "/CodeBuild/DOCKER_USERNAME"
    DOCKER_PASSWORD: "/CodeBuild/DOCKER_PASSWORD"

phases:
  pre_build:
    commands:
      - mkdir -p artifacts    # artifacts 디렉토리 생성
      - cp -r scripts/ artifacts/
      - cp appspec.yml artifacts/
      - ls -al artifacts
  build:
    commands:
      - docker build -t $DOCKER_USERNAME/docker-react .
  post_build:
    commands:
      - docker login docker.io -u $DOCKER_USERNAME -p $DOCKER_PASSWORD
      - docker push $DOCKER_USERNAME/docker-react

artifacts:
  files:
    - "**/*"
  base-directory: artifacts
AWS CodeBuild 구성도
위에서 설명대로 도커 이미지를 빌드하고 Docker Hub에 push 합니다. 그리고 다음 스테이지인 AWS CodeDeploy에서 필요한 파일을 아티팩트로 전달합니다.
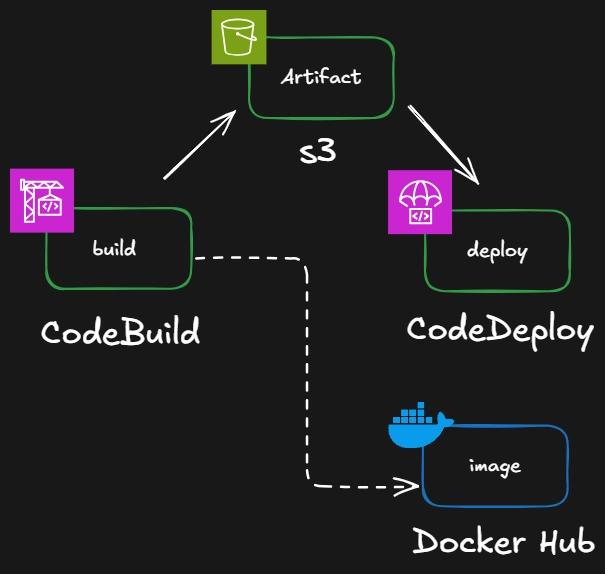
> AWS CodeBuild로 도커 이미지를 빌드하고 Docker Hub에 push
AWS CodeDeploy
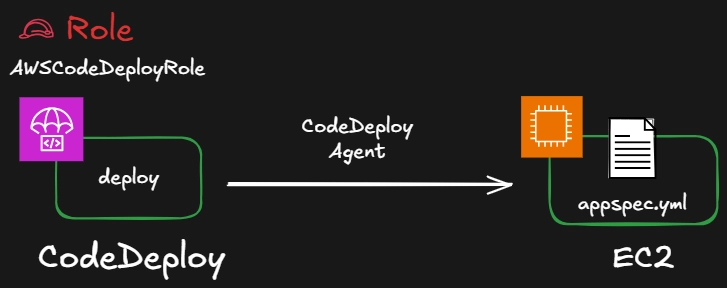
AWS CodeDeploy는 애플리케이션 배포를 자동화하는 서비스입니다. 태그를 기반으로 대상 EC2의 CodeDeploy 에이전트를 통해 appspec.yml 배포 스크립트를 수행합니다.
CodeDeploy 역할 생성
AWS CodeDeploy에서 배포에 필요한 역할(Role)을 생성하겠습니다.
- AWSCodeDeployRole
애플리케이션 생성
우선은 AWS CodeDeploy에서 애플리케이션 구성 - 컴퓨팅 플랫폼 - EC2/온프레미스 선택해서 애플리케이션 생성합니다.
배포 그룹
다음 애플리케이션 내에서 배포 대상 인스턴스 그룹을 생성합니다.
-
서비스 역할-생성한 CodeDeploy 역할선택 -
배포 유형-현재 위치선택 -
환경 구성-Amazon EC2 인스턴스선택 -
환경 구성-태그 그룹- 키, 값 입력- ⚠️주의 : Name은 대소문자를 정확히 Name으로 입력합니다.
-
Name:fe-server
-
로드 밸런서-로드 밸런싱 활성화선택 해제
appspec.yml
appspec.yml은 AWS CodeDeploy의 핵심 구성 파일로, 배포 과정과 절차를 정의합니다. CodeDeploy AppSpec 파일 참조를 참고 합시다.
- 정해진 각 수명 주기 이벤트마다 hooks 스크립트를 실행
- BeforeInstall : cleanup.sh 스크립트로 기존의 도커 컨테이너를 중지
- AfterInstall : update_container.sh 스크립트로 새로운 도커 이미지를 pull 받아 컨터이너를 실행
version: 0.0
os: linux
files:
  - source:  /
    destination: /home/ec2-user
    overwrite: true
file_exists_behavior: OVERWRITE

permissions:
  - object: /
    pattern: "**"
    owner: ec2-user
    group: ec2-user

hooks:
  BeforeInstall:
    - location: scripts/cleanup.sh
      runas: ec2-user
  AfterInstall:
    - location: scripts/update_container.sh
      runas: ec2-user
배포 대상 EC2
AWS CodeDeploy가 지정된 태그를 가진 EC2에 CodeDeploy 에이전트로 아티팩트를 전송합니다. 아티팩트 내부에 appspec.yml을 통해 스크립트를 실행되어 배포가 이루어 집니다.
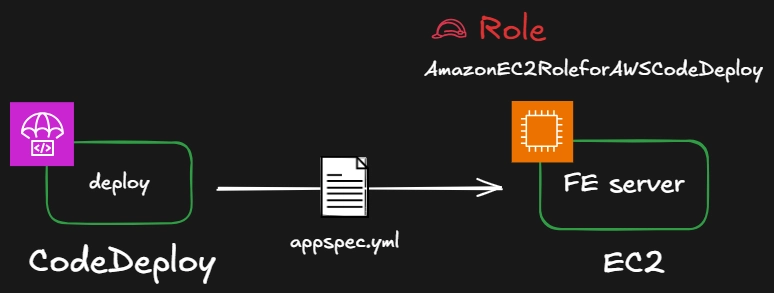
> 지정된 태그를 가진 EC2에 appspec.yml 파일이 동작
EC2 이름 및 태그
배포 대상 EC2를 이름 및 태그 - fe-server로 생성합니다. AWS CodeDeploy는 태그 그룹으로 지정한 EC2의 태그 기반으로 배포 대상을 찾기 때문에 생성 시 태그를 정확히 입력하는게 중요합니다.
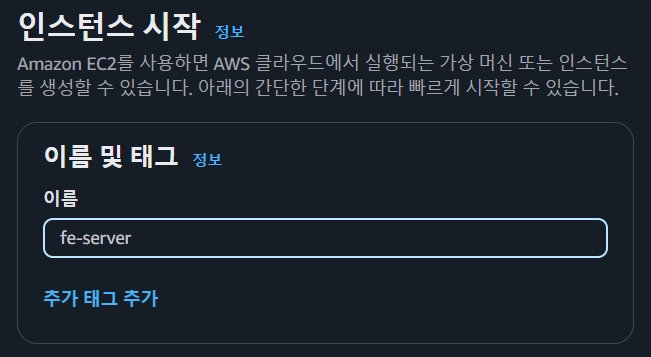
> AWS CodeDeploy는 배포 대상 EC2를 이름 및 태그로 찾는다.
EC2 역할(Role) 부여
EC2에서 AWS CodeDeploy를 사용하기 위해서는 필요한 역할(Role)을 생성해 지정합니다.
- AmazonEC2RoleforAWSCodeDeploy
Docker 설치
EC2에 도커를 설치 합니다.
$ sudo yum -y install docker

$ sudo systemctl restart docker

$ sudo usermod -a -G docker ec2-user
CodeDeploy 에이전트 설치
마지막으로 EC2 내부에 AWS CodeDeploy와 통신 할 수 있는 에이전트를 설치합니다. CodeDeploy 에이전트 설치 메뉴얼을 참고해서 에이전트를 설치 합니다.
$ wget https://aws-codedeploy-ap-northeast-2.s3.ap-northeast-2.amazonaws.com/latest/install

$ chmod +x ./install

$ sudo ./install auto
메인 에이전트 로그는 아래의 명령으로 확인 가능합니다. 반드시 EC2에 AmazonEC2RoleforAWSCodeDeploy 권한이 있는지 역할(Role)을 다시 한번 확인 합니다.
$ sudo tail -f /var/log/aws/codedeploy-agent/codedeploy-agent.log
AWS CodePipeline로 연결하기
이제 AWS CodePipeline을 통해 각 스테이지에 서비스들을 연결합니다.
-
파이프라인 생성-Build custom pipeline -
소스 스테이지 추가-소스 공급자AWS CodeCommit / GitHub 중에 선택 -
빌드 스테이지 추가-Other build providers-AWS CodeBuild선택 -
배포 스테이지 추가-AWS CodeDeploy선택 및애플리케이션 이름/배포 그룹선택
배포 확인
git 변경이 발생하는 경우 도커 이미지가 빌드 후 배포되고 컨테이너가 변경되는 것을 확인 할 수 있습니다.
마지막으로 EC2에 배포가 제대로 이루어지는 아래의 명령으로 로그를 확인 할 수 있습니다.
$ sudo tail -f /opt/codedeploy-agent/deployment-root/deployment-logs/codedeploy-agent-deployments.log
마무리
여기까지 도커를 사용하는 소스코드를 AWS CodePipeline을 통해 CI/CD를 구축해봤습니다.
- AWS CodeCommit에 git을 연결하고
- AWS CodeBuild를 통해 도커 이미지를 빌드 및 push
- AWS CodeDeploy로 각 EC2에 배포
각 서비스에는 더 많은 다양한 기능이 있으니 사용해 봅시다. 그리고 나아가 다른 AWS 서비스와 다른 서드파티 프로그램을 함께 사용해 CI/CD를 더 고도화 해봐도 좋을 듯 합니다! 😊
CI/CD
CI/CD is a core methodology in modern software development. CI (Continuous Integration) means automating the process of developers regularly merging their code changes into the main branch, and CD stands for Continuous Delivery and Continuous Deployment.
CI (Continuous Integration)
- Regularly integrates code changes from multiple developers
- Runs automated builds and tests
- Keeps code quality up and catches bugs early
CD (Continuous Delivery/Deployment)
- Continuous Delivery: always keeps the code in a state that can be deployed to production
- Continuous Deployment: deploys automatically all the way to production
React App + Docker NGINX
This code builds a React app and runs it in a Docker NGINX container. We’ll deploy it to EC2 with AWS CodePipeline.
You can check it locally with the commands below.
$ docker build -t docker-react .

$ docker run -it -d -p 8080:80 --name web docker-react
AWS CodePipeline
AWS CodePipeline is a fully managed AWS service for modeling and automating CI/CD stages. Every time code changes, it automatically runs the build, test and deploy stages, enabling reliable application updates.
AWS CodePipeline architecture
Here we’ll use AWS CodePipeline to wire the following services into each stage:
- AWS CodeCommit
- AWS CodeBuild
- AWS CodeDeploy
We’ll hook up git with AWS CodeCommit, build and test with AWS CodeBuild, and deploy the code to EC2 with AWS CodeDeploy.
Artifacts
The output produced by each stage is called an artifact. Pay close attention to how these artifacts are created and used. Follow that flow and CI/CD becomes much easier to understand!
CI/CD Architecture
- CI/CD built around AWS CodePipeline
- AWS CodeBuild builds the Docker image and pushes it to Docker Hub
- AWS CodeDeploy pulls the Docker image and deploys it to Amazon EC2
AWS CodeCommit
AWS CodeCommit is AWS’s git-based version control service. Think of it as something similar to GitHub. Through AWS CodePipeline, source code from AWS CodeCommit or GitHub can be pulled into S3 as an artifact.
Caveats
Existing accounts can also create more repositories only if they already have an AWS CodeCommit repository.
Still, some companies continue to use AWS CodeCommit, so here we’ll connect to AWS CodeCommit over SSH. If you’re using GitHub or GitLab, skip ahead to AWS CodeBuild!
Create a repository
In AWS CodeCommit, enter a repository name and create it.
> Creating a git repository with AWS CodeCommit
Upload an SSH public key
Let’s connect to the AWS CodeCommit repository over SSH. You’ll see it works exactly the same way as GitHub.
Go to IAM - Users - Security credentials - Upload SSH public key for AWS CodeCommit. Register the public key (id_rsa.pub) from the asymmetric key pair generated with the command below. After uploading the public key you’ll get an SSH key ID, which is the value you’ll use in your SSH config.
$ ssh-keygen -t rsa
SSH config
Write the following in your SSH config file:
- Host :
git-codecommit.*.amazonaws.com - User :
SSH key ID - IdentityFile :
the private key of the asymmetric key pair
Host git-codecommit.*.amazonaws.com
    User APKAZN6Q
    IdentityFile C:\Users\tiaz0128\.ssh\id_rsa
Connect the git remote
Copy the Clone URL - SSH address of the repository created in AWS CodeCommit and register it as a git remote.
$ git remote add aws ssh://git-codecommit.ap-northeast-2.amazonaws.com/v1/repos/docker-react
AWS CodeBuild
AWS CodeBuild compiles source code and runs tests in Docker containers. You can also configure the build environment yourself with a custom Docker image. It uses the source artifact and runs according to the phases defined in the buildspec.yml file.
- Compile / build source code
- Run tests
Create a project
- In AWS CodeBuild, go to
Build projects-Create project. - For
Source provider, choose AWS CodeCommit or GitHub. - Under
Environment-Additional configuration, selectEnable this flag if you want to build Docker images or want your builds to get elevated privileges. - Under
Environment-Additional configuration, useCreate parameterto create the sensitive environment variables.- DOCKER_USERNAME : your Docker Hub ID
- DOCKER_PASSWORD : your Docker Hub password
- Under
Buildspec-Build specifications, selectUse a buildspec file -
Artifacts-Type-No artifacts
buildspec.yml
buildspec.yml is a YAML file that defines how the project is built, phase by phase. The main points are:
- Use environment variables stored in the AWS Systems Manager parameter store
- Build the Docker image and push it to Docker Hub
- Copy the files AWS CodeDeploy will use into the artifacts folder
For the details of each section, see the build specification reference for CodeBuild.
version: 0.2
env:
  parameter-store:
    DOCKER_USERNAME: "/CodeBuild/DOCKER_USERNAME"
    DOCKER_PASSWORD: "/CodeBuild/DOCKER_PASSWORD"

phases:
  pre_build:
    commands:
      - mkdir -p artifacts    # create the artifacts directory
      - cp -r scripts/ artifacts/
      - cp appspec.yml artifacts/
      - ls -al artifacts
  build:
    commands:
      - docker build -t $DOCKER_USERNAME/docker-react .
  post_build:
    commands:
      - docker login docker.io -u $DOCKER_USERNAME -p $DOCKER_PASSWORD
      - docker push $DOCKER_USERNAME/docker-react

artifacts:
  files:
    - "**/*"
  base-directory: artifacts
AWS CodeBuild architecture
As described above, it builds the Docker image and pushes it to Docker Hub. Then it passes the files needed by the next stage, AWS CodeDeploy, along as an artifact.
> Building a Docker image with AWS CodeBuild and pushing it to Docker Hub
AWS CodeDeploy
AWS CodeDeploy is a service that automates application deployment. Based on tags, it runs the appspec.yml deployment script through the CodeDeploy agent on the target EC2 instances.
Create a CodeDeploy role
Let’s create the role AWS CodeDeploy needs for deployments.
- AWSCodeDeployRole
Create an application
First, in AWS CodeDeploy, go to Application configuration - Compute platform, select EC2/On-premises, and create the application.
Deployment group
Next, create a group of target instances within the application.
-
Service role- selectthe CodeDeploy role you created -
Deployment type- selectIn-place -
Environment configuration- selectAmazon EC2 instances -
Environment configuration-Tag group- enter the key and value- ⚠️Note: type Name with exactly this capitalization: Name.
-
Name:fe-server
-
Load balancer- uncheckEnable load balancing
appspec.yml
appspec.yml is the core configuration file of AWS CodeDeploy; it defines the deployment process and steps. See the CodeDeploy AppSpec file reference.
- Runs a hooks script at each defined lifecycle event
- BeforeInstall: stops the existing Docker container with the cleanup.sh script
- AfterInstall: pulls the new Docker image and runs the container with the update_container.sh script
version: 0.0
os: linux
files:
  - source:  /
    destination: /home/ec2-user
    overwrite: true
file_exists_behavior: OVERWRITE

permissions:
  - object: /
    pattern: "**"
    owner: ec2-user
    group: ec2-user

hooks:
  BeforeInstall:
    - location: scripts/cleanup.sh
      runas: ec2-user
  AfterInstall:
    - location: scripts/update_container.sh
      runas: ec2-user
Target EC2
AWS CodeDeploy sends the artifact to the CodeDeploy agent on EC2 instances with the specified tag. The deployment happens when the scripts are run via the appspec.yml inside the artifact.
> The appspec.yml file runs on EC2 instances with the specified tag
EC2 name and tags
Create the target EC2 instance with Name and tags - fe-server. AWS CodeDeploy finds its deployment targets based on the EC2 tags specified in the tag group, so it’s important to enter the tag exactly when you create the instance.
> AWS CodeDeploy finds target EC2 instances by name and tags.
Attach a role to EC2
To use AWS CodeDeploy from EC2, create the role it needs and attach it.
- AmazonEC2RoleforAWSCodeDeploy
Install Docker
Install Docker on the EC2 instance.
$ sudo yum -y install docker

$ sudo systemctl restart docker

$ sudo usermod -a -G docker ec2-user
Install the CodeDeploy agent
Finally, install the agent that lets the EC2 instance talk to AWS CodeDeploy. Follow the CodeDeploy agent installation guide to install it.
$ wget https://aws-codedeploy-ap-northeast-2.s3.ap-northeast-2.amazonaws.com/latest/install

$ chmod +x ./install

$ sudo ./install auto
You can check the main agent log with the command below. Double-check that the EC2 instance’s role has the AmazonEC2RoleforAWSCodeDeploy permission.
$ sudo tail -f /var/log/aws/codedeploy-agent/codedeploy-agent.log
Wiring It Up with AWS CodePipeline
Now connect the services to each stage with AWS CodePipeline.
-
Create pipeline-Build custom pipeline -
Add source stage- forSource provider, choose AWS CodeCommit or GitHub -
Add build stage-Other build providers- selectAWS CodeBuild -
Add deploy stage- selectAWS CodeDeploy, then choose theApplication name/Deployment group
Check the deployment
Whenever git changes, you’ll see the Docker image get built and deployed, and the container replaced.
Finally, you can check the log with the command below to confirm the deployment to EC2 went through properly.
$ sudo tail -f /opt/codedeploy-agent/deployment-root/deployment-logs/codedeploy-agent-deployments.log
Wrapping Up
We’ve now built CI/CD with AWS CodePipeline for source code that uses Docker.
- Connected git to AWS CodeCommit
- Built and pushed the Docker image with AWS CodeBuild
- Deployed to each EC2 instance with AWS CodeDeploy
Each service has many more features, so give them a try. Going further, it would be great to level up your CI/CD by combining it with other AWS services and third-party tools! 😊