HTTPS를 위한 SSL 인증서 발급Issuing SSL Certificates for HTTPS
HTTPS 통신을 위한 SSL개념과 인증서 발급해보기SSL concepts and issuing a certificate for HTTPS

HTTP와 HTTPS
HTTP
웹에서 데이터를 전송하기 위한 기본 프로토콜입니다. 암호화되지 않은 평문으로 데이터를 전송 하기 때문에 보안에 취약합니다.
HTTPS (HTTP Secure)
HTTP의 보안 버전입니다. HTTP 프로토콜에 SSL/TLS 프로토콜을 결합하여 만들어졌습니다. 웹사이트의 신뢰성을 보장하기 위해 SSL/TLS 인증서를 사용합니다. 데이터를 암호화하여 전송하므로 보안성이 높습니다. 중간자 공격, 도청 등으로부터 데이터를 보호할 수 있습니다.
SSL(Secure Sockets Layer)과 인증서
https 통신을 위해서 필요한 SSL 인증서에 대해서 알아보겠습니다.
SSL(Secure Sockets Layer)
SSL은 웹 통신을 암호화하고 보안을 유지하는 프로토콜입니다. 네스케이프에 의해서 처음 만들어지고 그 이후 표준화 관리 명칭은 TLS(Transport Layer Security)로 부릅니다. 하지만 일반적으로 SSL이라는 용어를 더 많이 사용하고 있습니다.
인증서
인증서는 SSL/TLS 통신의 핵심 요소로, 신뢰할 수 있는 인증 기관(CA, Certificate Authority)에서 검증 받고 인증서를 발급 받습니다. 발급 받은 인증서는 다음과 같은 중요한 정보를 포함합니다.
- 서비스 정보
- 도메인 이름
- 조직 이름
- 위치 정보 등
- 서버 측 공개키
- 공개키 자체
- 사용된 암호화 알고리즘 (예: RSA, ECC 등)
인증서 종류
인증서의 종류는 심사 수준에 따라, 각 유형은 다른 수준의 신뢰와 검증 과정을 거칩니다.
| 유형 | 의미 | 검증 수준 | 발급 시간 | 신뢰도 | 주요 용도 |
|---|---|---|---|---|---|
| DV (Domain Validation) | 도메인 소유권 확인 | 낮음 | 빠름 (몇 분 ~ 몇 시간) | 낮음 | 개인 블로그, 소규모 웹사이트 |
| OV (Organization Validation) | 조직 확인 | 중간 | 보통 (1-3일) | 중간 | 기업 웹사이트, 온라인 서비스 |
| EV (Extended Validation) | 확장 검증 | 높음 | 느림 (1-2주) | 높음 | 금융기관, 대기업, 정부기관 |
인증서 발급 및 검증 과정
아래의 그림은 브라우저와 서버간의 https 통신을 위한 과정을 시퀀스 다이어그램으로 표현했습니다. 크게 두 부분으로 볼 수 있습니다.
- CA에서 SSL 인증서를 발급 받고 서버에 세팅하는 과정
- 브라우저에서 https 통신을 위해 인증서를 검증하고 사용하는 과정
여기서 우리는 CA에서 인증서를 발급받아 서버에 세팅 해보겠습니다. 한번 해보고 다시 아래의 다이어그램을 보면 좀 더 쉽게 이해하실 수 있습니다.
%%{
  init: {
    'theme': 'base',
    'themeVariables': {
      'primaryColor': '#2a3844',
      'tertiaryColor': '#fff'
    }
  }
}%%
sequenceDiagram
    participant WS as 웹 서버
    participant CA as CA (인증기관)
    participant WB as 웹 브라우저

    WS ->>+ CA: 1. 인증 요청 : 공개 키 + 서버 정보

    %% Note right of CA: 2. 서버 정보를 검증하고 인증서 생성
    %% Note right of CA: 3. CA의 비밀키로 인증서 서명

    CA ->> CA: 2. 서버 정보를 검증하고 인증서 생성
    CA ->> CA: 3. CA의 비밀키로 인증서 서명

    CA -->>- WS: 4. 서버로 서명된 인증서 발급

    CA ->> WB: 5. 웹 브라우저에 CA의 공개키 제공

    WB ->> WS: 6. 서버(웹 사이트) 접속 요청
    WS -->> WB: 7. 발급받은 인증서 전달

    WB ->> WB: 8. CA 공개키로 인증서 검증

    WB ->> WB: 9. 서버 공개키로 대칭키 암호화
    WB ->> WS: 10. 서버로 암호화된 대칭키 전송
    WS ->> WS: 11. 서버 비밀키로 대칭키 복호화

    WS  <<->> WB: 12. 대칭키를 이용하여 암호화된 정보를 주고 받음
    Note over WS, WB: https 통신
서버 세팅
서버는 아래의 스펙을 기반으로 진행하겠습니다.
- AWS EC2 : Amazon Linux 2023
- NGINX : nginx/1.26.2
- 퍼블릭 IPv4 DNS 활성화 or 개인 도메인
NGINX 설치
nginx: Linux packages를 참고해서 nginx/1.26.2 버전으로 설치했습니다.
$ sudo yum install yum-utils

$ sudo vim /etc/yum.repos.d/nginx.repo
[nginx-stable]
name=nginx stable repo
baseurl=http://nginx.org/packages/amzn/2023/$basearch/
gpgcheck=1
enabled=1
gpgkey=https://nginx.org/keys/nginx_signing.key
module_hotfixes=true
priority=9

[nginx-mainline]
name=nginx mainline repo
baseurl=http://nginx.org/packages/mainline/amzn/2023/$basearch/
gpgcheck=1
enabled=0
gpgkey=https://nginx.org/keys/nginx_signing.key
module_hotfixes=true
priority=9
$ sudo yum install nginx

$ sudo systemctl restart nginx
퍼블릭 IPv4 DNS 활성화
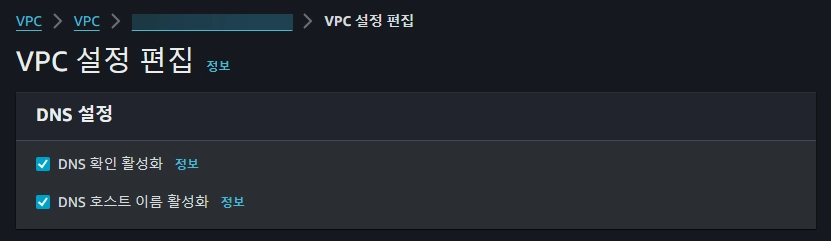
CA 인증에 필요한 도메인은 Public IPv4 DNS를 사용 하겠습니다. ‘VPC’ > ‘VPC 설정 편집’ > ‘DNS 호스트 이름 활성화’를 확인 합니다. 소유한 도메인이 있는 경우 해당 도메인을 사용해도 됩니다.
자체 서명된 SSL 인증서
우선은 자체 서명된 SSL 인증서를 만들어 보고, NGINX에 적용해보겠습니다.
1. SSL 인증서 생성
먼저 OpenSSL을 사용하여 자체 서명된 SSL 인증서를 생성합니다. 폴더를 생성하고 아래의 명령을 입력합니다. 이 명령은 1년간 유효한 2048비트 RSA 키 쌍과 자체 서명된 인증서를 생성합니다. 명령을 실행하면 인증서 정보를 입력하라는 프롬프트가 나타납니다.
$ sudo mkdir /etc/nignx/ssl

$ sudo openssl req -x509 -nodes -days 365 -newkey rsa:2048 -keyout /etc/nginx/ssl/self.key -out /etc/nginx/ssl/self.crt
-
req: 인증서 서명 요청(CSR) 및 인증서를 생성하는 명령 -
-x509: 공인 CA의 서명 없는 자체 서명된 인증서 생성 -
-nodes: ‘no DES’의 약자로, 비밀키를 암호화하지 않음 -
-days 365: 인증서의 유효 기간을 365일(1년)로 설정 -
-newkey rsa:2048: 새로운 2048비트 RSA 키 쌍을 생성 -
-keyout /etc/nginx/ssl/self.key: 생성된 비밀키를 저장할 경로를 지정 -
-out /etc/nginx/ssl/self.crt: 생성된 인증서를 저장할 경로를 지정
2. NGINX 설정 파일 수정
SSL을 사용하도록 NGINX 설정을 변경해야 합니다. /etc/nginx/conf.d/ 디렉토리에 새 설정 파일을 만들거나 기존 파일을 수정합니다.
$ sudo vim /etc/nginx/conf.d/default.conf
ssl_certificate 지시어에 self.crt 파일을 지정하고, self.key 비밀키 파일은 ssl_certificate_key 지시어에 지정 합니다.
server {
    listen 443 ssl;
    server_name ec2-3-36-45-120.....; # 자신의 도메인으로 변경

    ssl_certificate /etc/nginx/ssl/self.crt;     # 인증서 파일
    ssl_certificate_key /etc/nginx/ssl/self.key; # 비밀키 파일

    # SSL 설정
    ssl_protocols TLSv1.2 TLSv1.3;
    ssl_prefer_server_ciphers on;
    ssl_ciphers ECDHE-RSA-AES256-GCM-SHA512:DHE-RSA-AES256-GCM-SHA512:ECDHE-RSA-AES256-GCM-SHA384:DHE-RSA-AES256-GCM-SHA384:ECDHE-RSA-AES256-SHA384;

    # 나머지 서버 설정
    location / {
        root   /usr/share/nginx/html;
        index  index.html index.htm;
    }
}

# HTTP에서 HTTPS로 리다이렉트
server {
    listen 80;
    server_name ec2-3-36-45-120.....; # 자신의 도메인으로 변경

    # 모든 요청은 HTTPS로 리다이렉트
    location / {
        return 301 https://$server_name$request_uri;
    }
}
3. NGINX 설정 확인 & 재시작
설정 파일을 수정한 후, 구문 오류를 확인합니다. 설정이 올바르다면 NGINX를 재시작하여 변경사항을 적용합니다.
$ sudo nginx -t

$ sudo systemctl restart nginx
AWS 환경인 경우 필요에 따라 보안 그룹(Security Groups)에 http, https 인바운드 규칙(inbound rules)을 수정합니다.
브라우저로 확인
이제 자체 서명된 SSL 인증서가 NGINX에 적용되었습니다. 브라우저에서 접속하면 보안 연결이 설정되었음을 확인할 수 있습니다. 생성된 인증서는 개발 환경이나 내부 테스트용으로는 적합하지만, 프로덕션 환경의 공개 웹사이트에서는 사용자에게 보안 경고를 표시할 수 있으므로 사용 할 수 없습니다.
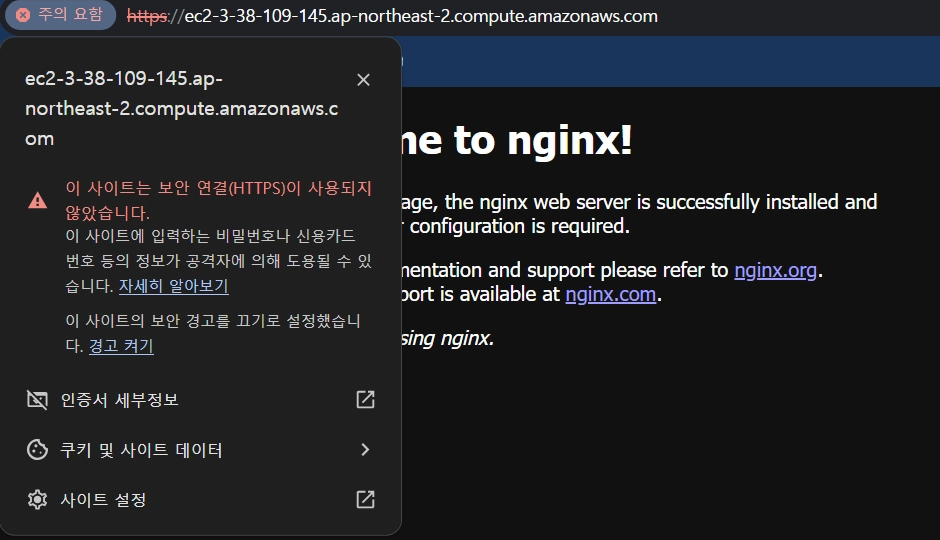
> 보안 경고와 자체 서명 된 인증서를 확인 가능
CA 인증 : GOGETSSL
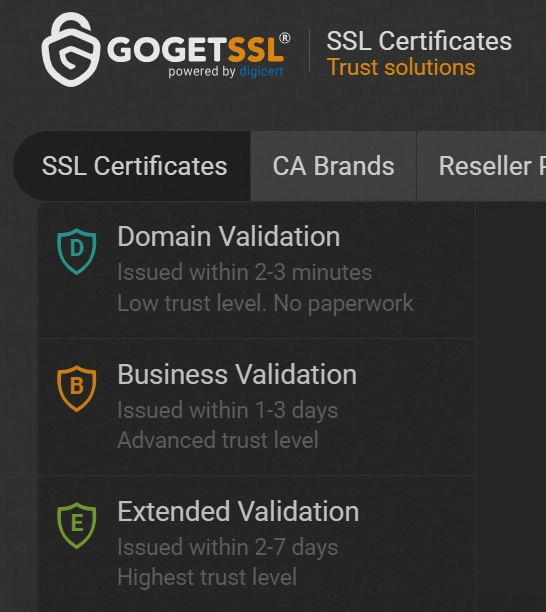
GOGETSSL 사이트에 90일 동안 유효한 CA 인증서를 발급 받을 수 있습니다. 로그인하고 SSL Certificates 탭에서 Domain Validation을 선택합니다. Product 리스트에서 90-day Trial SSL를 찾아서 선택합니다.
인증서 발급 해보기
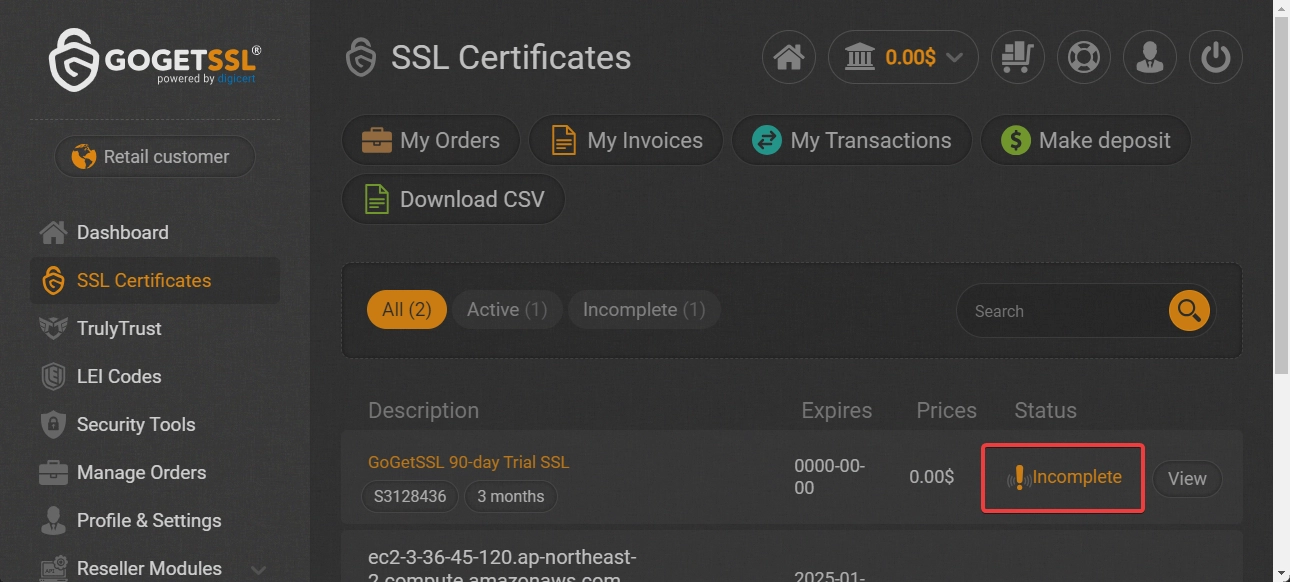
처음 SSL Certificates에서 Status가 Incomplete 상태로 생성 됩니다. View 버튼을 누르고 Generate Certificate 버튼을 눌러서 서버 정보를 검증하고 인증서를 생성해 보겠습니다.
CSR Configuration
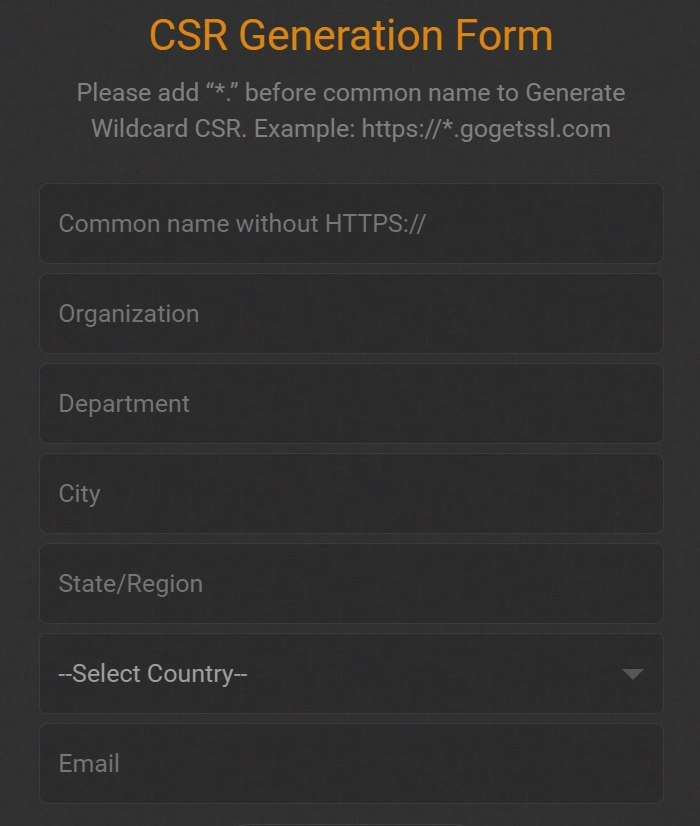
CSR은 SSL 인증서를 발급받기 위해 CA에 제출하는 암호화된 텍스트 파일입니다. Online CSR Generator을 사용하여 CSR Generation Form을 작성해서 생성 할 수 있습니다.
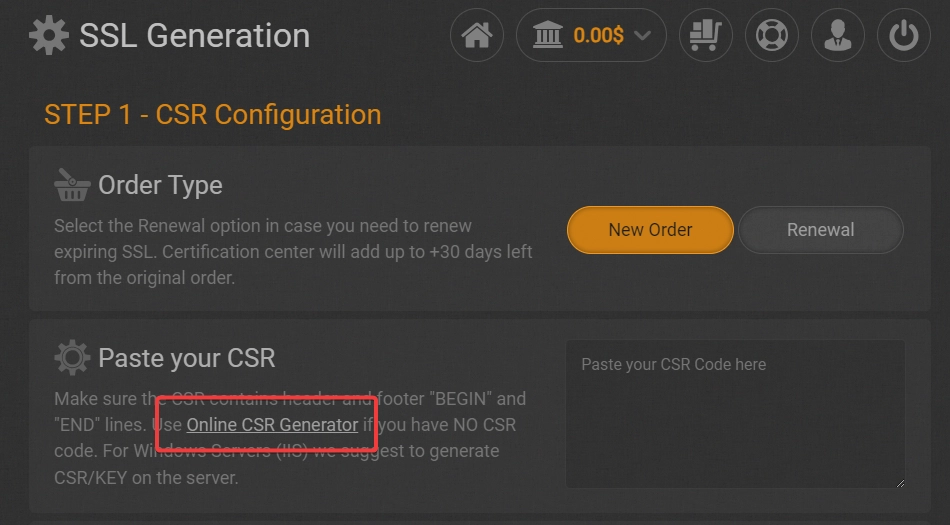
CSR Generation Form 작성
CSR Generation Form에 가장 첫번째에 common name에 도메인 이름을 작성합니다. DV 인증서의 경우, 도메인을 제외한 나머지 값은 아무렇게 넣어도 상관없습니다. Generate CSR 하면 두개의 키값이 생성이 됩니다.
CSR 값, 비밀키 저장
Certificate Signing Request(CSR)의 아래의 문장으로 시작하는 값을 이전 페이지(= CSR Configuration)에서 Paste your CSR에 붙여 넣어줍니다.
-----BEGIN CERTIFICATE REQUEST-----
MIICtTCCAZ0CAQAwcDELMAkGA1UEBhMCQlMxCjAIBgNVBAgMAXgxCjAIBgNVBAcM
...
-----END CERTIFICATE REQUEST-----
여기서 중요합니다! Your Private Server Key는 서버에 저장해야 하는 비밀키입니다. 이 파일은 반드시 자신의 서버에 저장합니다. 아래의 경로에 해당 비밀키를 저장하도록 하겠습니다.
$ sudo vim /etc/nginx/ssl/GoGetSSL_private.key
-----BEGIN PRIVATE KEY-----
MIIEvQIBADANBgkqhkiG9w0BAQEFAASCBKcwggSjAgEAAoIBAQC2EwrnXq5f6EtL
...
-----END PRIVATE KEY-----
Validation Methods
Validation Methods에서 http를 선택합니다. 다음 필요한 정보를 입력합니다.
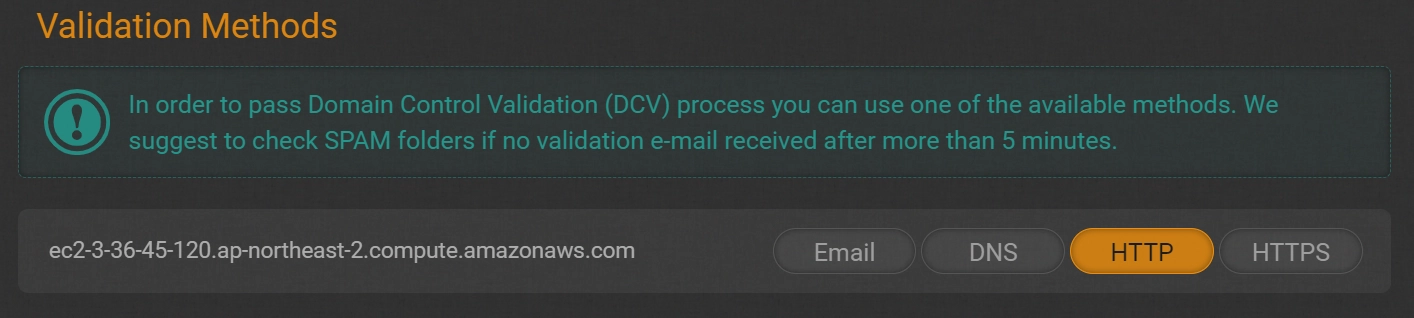
Domain Validation
SSL Certificates에서 Status가 Processing 상태로 변경된 것을 확인 할수 있습니다. Domain Validation 탭에서 서버 인증용 파일(Validation File)을 받아서 서버에 저장 하겠습니다.

다운 받은 파일의 내용을 아래 경로 파일에 붙여넣겠습니다.
$ sudo vim /usr/share/nginx/html/validation.txt
4182A51E1A437B4763ACE010E0DCEABEE1BCCEF81872BE2C0C8841C542C393F7
sectigo.com
t0031261001728017854
NGINX 수정
alias 지시어를 사용하여 검증 URL이 해당 파일을 찾을 수 있게, 파일을 직접 지정해 줍니다. 이후 몇 분 기다려 보면 SSL Certificates에서 Status가 Active 상태로 변경되고 서버 인증이 완료됩니다.
server {
    # SSL 설정
    ...

    # CA가 인증 파일에 접근할 수 있도록 설정
    location = /.well-known/pki-validation/350105A2....txt {
        alias /usr/share/nginx/html/validation.txt;
    }
}
전체 인증서 파일 다운 & 업로드
이제 https 통신에 필요한 SSL 인증서가 만들졌습니다. All files 버튼으로 전체 파일을 다운로드 해서 서버에 3개의 인증서 파일을 업로드 하겠습니다.
home/
├── ec-user/
│   └── ec2-3-...compute_amazonaws_com.crt
│   └── GoGetSSL_RSA_DV_CA.crt
│   └── USERTrust_RSA_Certification_Authority.crt
이 3개의 파일을 통해 인증서 체인(Chain of Trust)에 사용할 fullchain.crt 파일을 생성해야 합니다. 잠시 후에 서버에 적용해 보도록 하겠습니다.
CA 인증서 발급 정리
여기까지가 CA 인증서를 발급받는 과정입니다. 다이어그램을 다시 한번 보면서 과정을 이해해 봅시다.
CSR을 통한 인증서 발급
GOGETSSL 사이트에서 했던 작업 순서를 다시 기억해 봅시다.
- CSR 생성
- 비밀키를 서버에 저장
- CA에서 서버 검증
- 서버의 인증서 발급
CA는 서버의 인증서에 자신의 비밀키로 디지털 서명을 합니다.
%%{
  init: {
    'theme': 'base',
    'themeVariables': {
      'primaryColor': '#2a3844',
      'tertiaryColor': '#fff'
    }
  }
}%%

sequenceDiagram
    participant WS as 웹 서버
    participant CA as CA (인증기관)

    WS ->>+ CA: 1. CSR : 공개 키 + 서버 정보

    %% Note right of CA: 2. 서버 정보를 검증하고 인증서 생성
    %% Note right of CA: 3. CA의 비밀키로 인증서 서명

    CA ->> CA: 2. 서버 정보를 검증하고 인증서 생성
    CA ->> CA: 3. CA의 비밀키로 인증서 서명

    CA -->>- WS: 4. 서버로 서명된 인증서 발급
브라우저에서 인증서
CA가 인증서에 해둔 디지털 서명을 통해, 브라우저에서 이 인증서가 유효하다는 것을 CA의 공개키를 통해 검증 할 수 있게 됩니다.
유효한 인증서 내부에는 아래의 정보가 포함되어 있습니다.
- 서버의 공개키
- 서버의 정보
- CA의 디지털 서명
%%{
  init: {
    'theme': 'base',
    'themeVariables': {
      'primaryColor': '#2a3844',
      'tertiaryColor': '#fff'
    }
  }
}%%
sequenceDiagram
    participant WS as 웹 서버
    participant CA as CA (인증기관)
    participant WB as 웹 브라우저

    CA -->> WS: 4. 서버로 서명된 인증서 발급

    CA ->> WB: 5. 웹 브라우저에 CA의 공개키 제공

    WB ->> WS: 6. 서버(웹 사이트) 접속 요청
    WS -->> WB: 7. 발급받은 인증서 전달

    WB ->> WB: 8. CA 공개키로 인증서 검증
https
유효한 인증서 내부에 있는 서버의 공개키가 안전하다는 것을 브라우저가 확인 했습니다. 검증된 서버의 공개키를 사용해 서버와 브라우저가 함께 사용할 대칭키를 안전하게 생성할 수 됐습니다. 이로써 브라우저와 서버간 https 통신이 가능하게 됩니다.
%%{
  init: {
    'theme': 'base',
    'themeVariables': {
      'primaryColor': '#2a3844',
      'tertiaryColor': '#fff'
    }
  }
}%%
sequenceDiagram
    participant WS as 웹 서버
    participant WB as 웹 브라우저

    WB ->> WB: 8. CA 공개키로 인증서 검증

    WB ->> WB: 9. 서버 공개키로 대칭키 암호화
    WB ->> WS: 10. 서버로 암호화된 대칭키 전송
    WS ->> WS: 11. 서버 비밀키로 대칭키 복호화

    WS  <<->> WB: 12. 대칭키를 이용하여 암호화된 정보를 주고 받음
    Note over WS, WB: https 통신
위의 과정으로 인증서를 통해 서버의 공개키가 안전하다 것은 이해했습니다. 그런데 인증서 자체가 유효한지는 어떻게 알수 있을까요?
Fullchain 동작 방식
인증서가 유효한지 검증하는 Fullchain 방식에 대해 알아보겠습니다.
- 각 단계의 CA는 하위 인증서에 대해 자신의 비밀키로 서명합니다.
- 각 인증서는 바로 상위 CA에 의해 서명됩니다.
- 루트 CA의 인증서는 자체 서명됩니다 (self-signed).
- 이 과정이 루트 CA까지 반복되어 신뢰 체인을 형성합니다.
- 루트 CA의 인증서는 보통 브라우저나 운영체제에 미리 설치되어 있어 신뢰의 앵커 포인트 역할을 합니다.
%%{
  init: {
    'theme': 'base',
    'themeVariables': {
      'primaryColor': '#2a3844',
      'tertiaryColor': '#fff'
    }
  }
}%%
sequenceDiagram
    participant WS as 웹 서버
    participant LCA as 하위 CA
    participant ICA as 중간 CA
    participant RCA as 루트 CA

    WS->>LCA: 1. CSR 제출
    LCA->>LCA: 2. 서버 인증서 생성 및 서명
    LCA->>ICA: 3. 하위 CA 인증서 요청
    ICA->>ICA: 4. 하위 CA 인증서 생성 및 서명
    ICA->>RCA: 5. 중간 CA 인증서 요청
    RCA->>RCA: 6. 중간 CA 인증서 생성 및 서명
    RCA-->>ICA: 7. 서명된 중간 CA 인증서
    ICA-->>LCA: 8. 서명된 하위 CA 인증서
    LCA-->>WS: 9. 서명된 서버 인증서 + 인증서 체인
클라이언트(브라우저)는 이 체인을 따라 각 인증서를 검증하며, 최종적으로 루트 CA까지 도달하여 전체 체인의 신뢰성을 확인합니다.
fullchain.crt 파일 생성
아직 서버 설정이 끝나지 않았으니 계속해서 진행해 봅시다. 풀체인 파일은 SSL 인증서 체인을 구성하는 여러 인증서를 하나로 결합한 파일입니다. 여러개의 인증서 파일을 하나로 합쳐줌으로써 생성 할 수 있습니다.
$ cat (server.crt) (Intermediate.crt) [Root.crt] > fullchain.crt

$ cat ec2-3-...compute_amazonaws_com.crt GoGetSSL_RSA_DV_CA.crt USERTrust_RSA_Certification_Authority.crt > /etc/nginx/ssl/GoGetSSL_fullchain.crt
풀체인 파일을 만들 때의 일반적인 순서
루트 인증서의 경우 대부분의 브라우저와 운영 체제에 이미 신뢰할 수 있는 인증서로 포함되어 있기 때문에 생략이 가능합니다.
- 서버(도메인) 인증서
- 중간 인증서
- 루트 인증서 (선택적)
NGINX 설정
NGINX에서 이 풀체인 파일을 사용할 때는 ssl_certificate 지시어에 이 파일을 지정하면 됩니다. 비밀키 파일은 별도로 ssl_certificate_key 지시어에 지정 합니다.
server {
    listen 443 ssl;
    server_name ec2-3-36-45-120.....;

    ssl_certificate /etc/nginx/ssl/GoGetSSL_fullchain.crt; # 체인 파일
    ssl_certificate_key /etc/nginx/ssl/GoGetSSL_private.key; # 비밀키

    ...
}
전체 파일 구성 & NGINX 설정
전체 파일 구성
etc/
├── nginx/
│   └── ssl/
│       ├── GoGetSSL_fullchain.crt
│       └── GoGetSSL_private.key
usr/
├── share/nginx/html/
│               └── validation.txt
NGINX 설정
server {
    listen 443 ssl;
    server_name ec2-3-36-45...;

    ssl_certificate /etc/nginx/ssl/GoGetSSL_fullchain.crt;
    ssl_certificate_key /etc/nginx/ssl/GoGetSSL_private.key;

    # SSL 설정
    ssl_protocols TLSv1.2 TLSv1.3;
    ssl_prefer_server_ciphers on;
    ssl_ciphers ECDHE-RSA-AES256-GCM-SHA512:DHE-RSA-AES256-GCM-SHA512:ECDHE-RSA-AES256-GCM-SHA384:DHE-RSA-AES256-GCM-SHA384:ECDHE-RSA-AES256-SHA384;

    # HTTP 인증 파일에 접근할 수 있도록 설정
    location = /.well-known/pki-validation/257021C3....txt {
        alias /usr/share/nginx/html/validation.txt;
    }

    # 나머지 서버 설정
    location / {
        root   /usr/share/nginx/html;
        index  index.html index.htm;
    }
}

# HTTP에서 HTTPS로 리다이렉트
server {
    listen 80;
    server_name ec2-3-36-45...;

    # 다른 모든 요청은 HTTPS로 리다이렉트
    location / {
        return 301 https://$server_name$request_uri;
    }
}
마무리
https 통신을 하기 위한 준비 과정으로 SSL 인증서 발급을 공부해 봤습니다. 기본적인 ‘공개키 & 비밀키’에 대해서 알고 있다면 좀더 이해하기 쉬운 내용입니다.
추가로 아래의 내용을 공부해 보면 좋을듯 합니다. 😊
- 인증서 갱신 과정
- Let’s Encrypt + CertBot 사용
- 자주 발생할 수 있는 문제점들과 해결 방법 (예: 인증서 만료, 자체 서명 인증서 사용 시 주의사항 등)
참고 문헌
HTTP and HTTPS
HTTP
HTTP is the basic protocol for transferring data on the web. It sends data as unencrypted plain text, which makes it insecure.
HTTPS (HTTP Secure)
HTTPS is the secure version of HTTP, built by combining the HTTP protocol with the SSL/TLS protocol. It uses SSL/TLS certificates to vouch for a website’s authenticity. Because data is encrypted in transit, it is far more secure and protects your data from man-in-the-middle attacks, eavesdropping and the like.
SSL (Secure Sockets Layer) and Certificates
Let’s look at the SSL certificate you need for HTTPS communication.
SSL (Secure Sockets Layer)
SSL is a protocol that encrypts web traffic and keeps it secure. It was originally created by Netscape, and the standardized version that followed is called TLS (Transport Layer Security). Still, most people keep using the term SSL.
Certificates
A certificate is the core of SSL/TLS communication. You get verified by a trusted Certificate Authority (CA), which then issues you a certificate. The issued certificate contains important information such as:
- Service information
- Domain name
- Organization name
- Location, etc.
- The server’s public key
- The public key itself
- The encryption algorithm used (e.g. RSA, ECC)
Types of Certificates
Certificates come in types based on how thoroughly they are vetted, and each type goes through a different level of trust and validation.
| Type | Meaning | Validation level | Issuance time | Trust | Typical use |
|---|---|---|---|---|---|
| DV (Domain Validation) | Verifies domain ownership | Low | Fast (minutes to hours) | Low | Personal blogs, small websites |
| OV (Organization Validation) | Verifies the organization | Medium | Moderate (1-3 days) | Medium | Corporate websites, online services |
| EV (Extended Validation) | Extended validation | High | Slow (1-2 weeks) | High | Financial institutions, large enterprises, government agencies |
How Certificates Are Issued and Verified
The sequence diagram below shows the steps for HTTPS communication between a browser and a server. It breaks down into two main parts:
- Getting an SSL certificate issued by a CA and setting it up on the server
- The browser verifying and using the certificate for HTTPS communication
Here we’ll actually get a certificate issued by a CA and set it up on a server. Once you’ve done it yourself, the diagram below will be much easier to follow.
%%{
  init: {
    'theme': 'base',
    'themeVariables': {
      'primaryColor': '#2a3844',
      'tertiaryColor': '#fff'
    }
  }
}%%
sequenceDiagram
    participant WS as Web server
    participant CA as CA (Certificate Authority)
    participant WB as Web browser

    WS ->>+ CA: 1. Certificate request : public key + server info

    %% Note right of CA: 2. Verify server info and create certificate
    %% Note right of CA: 3. Sign certificate with CA's private key

    CA ->> CA: 2. Verify server info and create certificate
    CA ->> CA: 3. Sign certificate with CA's private key

    CA -->>- WS: 4. Issue signed certificate to server

    CA ->> WB: 5. Provide CA's public key to web browser

    WB ->> WS: 6. Request to access server (website)
    WS -->> WB: 7. Send issued certificate

    WB ->> WB: 8. Verify certificate with CA public key

    WB ->> WB: 9. Encrypt symmetric key with server public key
    WB ->> WS: 10. Send encrypted symmetric key to server
    WS ->> WS: 11. Decrypt symmetric key with server private key

    WS  <<->> WB: 12. Exchange data encrypted with the symmetric key
    Note over WS, WB: HTTPS communication
Server Setup
We’ll use the following server specs:
- AWS EC2 : Amazon Linux 2023
- NGINX : nginx/1.26.2
- Public IPv4 DNS enabled, or your own domain
Installing NGINX
I installed version nginx/1.26.2 following nginx: Linux packages.
$ sudo yum install yum-utils

$ sudo vim /etc/yum.repos.d/nginx.repo
[nginx-stable]
name=nginx stable repo
baseurl=http://nginx.org/packages/amzn/2023/$basearch/
gpgcheck=1
enabled=1
gpgkey=https://nginx.org/keys/nginx_signing.key
module_hotfixes=true
priority=9

[nginx-mainline]
name=nginx mainline repo
baseurl=http://nginx.org/packages/mainline/amzn/2023/$basearch/
gpgcheck=1
enabled=0
gpgkey=https://nginx.org/keys/nginx_signing.key
module_hotfixes=true
priority=9
$ sudo yum install nginx

$ sudo systemctl restart nginx
Enabling Public IPv4 DNS
For the domain the CA needs to validate, we’ll use the Public IPv4 DNS. Go to ‘VPC’ > ‘Edit VPC settings’ and check ‘Enable DNS hostnames’. If you own a domain, you can use that instead.
Self-Signed SSL Certificate
First, let’s create a self-signed SSL certificate and apply it to NGINX.
1. Create the SSL Certificate
Start by generating a self-signed SSL certificate with OpenSSL. Create a folder and run the command below. It generates a 2048-bit RSA key pair and a self-signed certificate valid for one year. When you run it, you’ll be prompted to enter the certificate details.
$ sudo mkdir /etc/nignx/ssl

$ sudo openssl req -x509 -nodes -days 365 -newkey rsa:2048 -keyout /etc/nginx/ssl/self.key -out /etc/nginx/ssl/self.crt
-
req: the command for creating certificate signing requests (CSRs) and certificates -
-x509: creates a self-signed certificate with no signature from a public CA -
-nodes: short for ‘no DES’; the private key is not encrypted -
-days 365: sets the certificate’s validity period to 365 days (one year) -
-newkey rsa:2048: generates a new 2048-bit RSA key pair -
-keyout /etc/nginx/ssl/self.key: the path where the generated private key is saved -
-out /etc/nginx/ssl/self.crt: the path where the generated certificate is saved
2. Edit the NGINX Configuration File
Next, change the NGINX configuration to use SSL. Create a new config file in the /etc/nginx/conf.d/ directory or edit an existing one.
$ sudo vim /etc/nginx/conf.d/default.conf
Point the ssl_certificate directive at the self.crt file, and the ssl_certificate_key directive at the self.key private key file.
server {
    listen 443 ssl;
    server_name ec2-3-36-45-120.....; # change to your own domain

    ssl_certificate /etc/nginx/ssl/self.crt;     # certificate file
    ssl_certificate_key /etc/nginx/ssl/self.key; # private key file

    # SSL settings
    ssl_protocols TLSv1.2 TLSv1.3;
    ssl_prefer_server_ciphers on;
    ssl_ciphers ECDHE-RSA-AES256-GCM-SHA512:DHE-RSA-AES256-GCM-SHA512:ECDHE-RSA-AES256-GCM-SHA384:DHE-RSA-AES256-GCM-SHA384:ECDHE-RSA-AES256-SHA384;

    # the rest of the server settings
    location / {
        root   /usr/share/nginx/html;
        index  index.html index.htm;
    }
}

# redirect HTTP to HTTPS
server {
    listen 80;
    server_name ec2-3-36-45-120.....; # change to your own domain

    # redirect every request to HTTPS
    location / {
        return 301 https://$server_name$request_uri;
    }
}
3. Check the NGINX Configuration & Restart
After editing the config file, check it for syntax errors. If the configuration is valid, restart NGINX to apply the changes.
$ sudo nginx -t

$ sudo systemctl restart nginx
If you’re on AWS, update the inbound rules of your Security Groups for http and https as needed.
Check in the Browser
The self-signed SSL certificate is now applied to NGINX. When you visit the site in a browser, you can see that a secure connection has been established. A certificate like this is fine for development or internal testing, but you can’t use it on a public production website, because it may show users a security warning.
> You can see the security warning and the self-signed certificate
CA Certificate : GOGETSSL
On the GOGETSSL site, you can get a CA certificate that is valid for 90 days. Log in, go to the SSL Certificates tab and choose Domain Validation. Find 90-day Trial SSL in the Product list and select it.
Issuing the Certificate
At first, the entry under SSL Certificates is created with a Status of Incomplete. Click the View button, then the Generate Certificate button to verify the server information and create the certificate.
CSR Configuration
A CSR is an encoded text file you submit to a CA to get an SSL certificate issued. You can create one by filling in the CSR Generation Form with the Online CSR Generator.
Filling in the CSR Generation Form
Enter your domain name in common name, the very first field of the CSR Generation Form. For a DV certificate, everything other than the domain can be anything you like. Click Generate CSR and two key values are generated.
Save the CSR Value and the Private Key
Copy the Certificate Signing Request (CSR) value that starts with the line below and paste it into Paste your CSR on the previous page (= CSR Configuration).
-----BEGIN CERTIFICATE REQUEST-----
MIICtTCCAZ0CAQAwcDELMAkGA1UEBhMCQlMxCjAIBgNVBAgMAXgxCjAIBgNVBAcM
...
-----END CERTIFICATE REQUEST-----
This part is important! Your Private Server Key is the private key you need to keep on your server. Make sure to save this file on your own server. We’ll save the private key at the path below.
$ sudo vim /etc/nginx/ssl/GoGetSSL_private.key
-----BEGIN PRIVATE KEY-----
MIIEvQIBADANBgkqhkiG9w0BAQEFAASCBKcwggSjAgEAAoIBAQC2EwrnXq5f6EtL
...
-----END PRIVATE KEY-----
Validation Methods
Choose http under Validation Methods, then fill in the required information.
Domain Validation
Under SSL Certificates, you can see the Status has changed to Processing. From the Domain Validation tab, download the server validation file (Validation File) and save it on the server.
Paste the contents of the downloaded file into the file at the path below.
$ sudo vim /usr/share/nginx/html/validation.txt
4182A51E1A437B4763ACE010E0DCEABEE1BCCEF81872BE2C0C8841C542C393F7
sectigo.com
t0031261001728017854
Update NGINX
Use the alias directive to point the validation URL directly at that file so it can be found. Wait a few minutes and the Status under SSL Certificates changes to Active, meaning server validation is complete.
server {
    # SSL settings
    ...

    # let the CA access the validation file
    location = /.well-known/pki-validation/350105A2....txt {
        alias /usr/share/nginx/html/validation.txt;
    }
}
Download & Upload All Certificate Files
The SSL certificate needed for HTTPS has now been created. Download everything with the All files button and upload the three certificate files to the server.
home/
├── ec-user/
│   └── ec2-3-...compute_amazonaws_com.crt
│   └── GoGetSSL_RSA_DV_CA.crt
│   └── USERTrust_RSA_Certification_Authority.crt
From these three files, we need to build a fullchain.crt file for the Chain of Trust. We’ll apply it to the server shortly.
Recap: Issuing a CA Certificate
That’s the whole process of getting a CA certificate issued. Let’s look at the diagram again and make sense of the steps.
Issuing a Certificate via a CSR
Let’s recall the order of what we did on the GOGETSSL site.
- Generate a CSR
- Save the private key on the server
- The CA validates the server
- The server’s certificate is issued
The CA digitally signs the server’s certificate with its own private key.
%%{
  init: {
    'theme': 'base',
    'themeVariables': {
      'primaryColor': '#2a3844',
      'tertiaryColor': '#fff'
    }
  }
}%%

sequenceDiagram
    participant WS as Web server
    participant CA as CA (Certificate Authority)

    WS ->>+ CA: 1. CSR : public key + server info

    %% Note right of CA: 2. Verify server info and create certificate
    %% Note right of CA: 3. Sign certificate with CA's private key

    CA ->> CA: 2. Verify server info and create certificate
    CA ->> CA: 3. Sign certificate with CA's private key

    CA -->>- WS: 4. Issue signed certificate to server
The Certificate in the Browser
Thanks to the digital signature the CA put on the certificate, the browser can use the CA’s public key to verify that the certificate is valid.
A valid certificate contains the following:
- The server’s public key
- The server’s information
- The CA’s digital signature
%%{
  init: {
    'theme': 'base',
    'themeVariables': {
      'primaryColor': '#2a3844',
      'tertiaryColor': '#fff'
    }
  }
}%%
sequenceDiagram
    participant WS as Web server
    participant CA as CA (Certificate Authority)
    participant WB as Web browser

    CA -->> WS: 4. Issue signed certificate to server

    CA ->> WB: 5. Provide CA's public key to web browser

    WB ->> WS: 6. Request to access server (website)
    WS -->> WB: 7. Send issued certificate

    WB ->> WB: 8. Verify certificate with CA public key
HTTPS
The browser has confirmed that the server’s public key inside the valid certificate can be trusted. Using that verified public key, the server and browser can now safely set up a symmetric key to share. That’s what makes HTTPS communication between the browser and the server possible.
%%{
  init: {
    'theme': 'base',
    'themeVariables': {
      'primaryColor': '#2a3844',
      'tertiaryColor': '#fff'
    }
  }
}%%
sequenceDiagram
    participant WS as Web server
    participant WB as Web browser

    WB ->> WB: 8. Verify certificate with CA public key

    WB ->> WB: 9. Encrypt symmetric key with server public key
    WB ->> WS: 10. Send encrypted symmetric key to server
    WS ->> WS: 11. Decrypt symmetric key with server private key

    WS  <<->> WB: 12. Exchange data encrypted with the symmetric key
    Note over WS, WB: HTTPS communication
With the process above, we understand how the certificate proves the server’s public key is safe. But how do we know the certificate itself is valid?
How the Fullchain Works
Let’s look at the Fullchain approach used to verify that a certificate is valid.
- The CA at each level signs the certificate below it with its own private key.
- Each certificate is signed by the CA directly above it.
- The root CA’s certificate is self-signed.
- This repeats all the way up to the root CA, forming a chain of trust.
- The root CA’s certificate is usually preinstalled in browsers and operating systems, acting as the anchor point of trust.
%%{
  init: {
    'theme': 'base',
    'themeVariables': {
      'primaryColor': '#2a3844',
      'tertiaryColor': '#fff'
    }
  }
}%%
sequenceDiagram
    participant WS as Web server
    participant LCA as Issuing CA
    participant ICA as Intermediate CA
    participant RCA as Root CA

    WS->>LCA: 1. Submit CSR
    LCA->>LCA: 2. Create and sign server certificate
    LCA->>ICA: 3. Request issuing CA certificate
    ICA->>ICA: 4. Create and sign issuing CA certificate
    ICA->>RCA: 5. Request intermediate CA certificate
    RCA->>RCA: 6. Create and sign intermediate CA certificate
    RCA-->>ICA: 7. Signed intermediate CA certificate
    ICA-->>LCA: 8. Signed issuing CA certificate
    LCA-->>WS: 9. Signed server certificate + certificate chain
The client (browser) follows this chain, verifying each certificate, until it finally reaches the root CA and confirms that the whole chain can be trusted.
Creating the fullchain.crt File
The server setup isn’t done yet, so let’s keep going. A fullchain file combines the several certificates that make up an SSL certificate chain into a single file. You create it by simply concatenating the certificate files into one.
$ cat (server.crt) (Intermediate.crt) [Root.crt] > fullchain.crt

$ cat ec2-3-...compute_amazonaws_com.crt GoGetSSL_RSA_DV_CA.crt USERTrust_RSA_Certification_Authority.crt > /etc/nginx/ssl/GoGetSSL_fullchain.crt
The Usual Order When Building a Fullchain File
The root certificate can be left out, since most browsers and operating systems already include it as a trusted certificate.
- Server (domain) certificate
- Intermediate certificate
- Root certificate (optional)
NGINX Configuration
To use this fullchain file in NGINX, just point the ssl_certificate directive at it. The private key file goes separately in the ssl_certificate_key directive.
server {
    listen 443 ssl;
    server_name ec2-3-36-45-120.....;

    ssl_certificate /etc/nginx/ssl/GoGetSSL_fullchain.crt; # chain file
    ssl_certificate_key /etc/nginx/ssl/GoGetSSL_private.key; # private key

    ...
}
Full File Layout & NGINX Configuration
Full File Layout
etc/
├── nginx/
│   └── ssl/
│       ├── GoGetSSL_fullchain.crt
│       └── GoGetSSL_private.key
usr/
├── share/nginx/html/
│               └── validation.txt
NGINX Configuration
server {
    listen 443 ssl;
    server_name ec2-3-36-45...;

    ssl_certificate /etc/nginx/ssl/GoGetSSL_fullchain.crt;
    ssl_certificate_key /etc/nginx/ssl/GoGetSSL_private.key;

    # SSL settings
    ssl_protocols TLSv1.2 TLSv1.3;
    ssl_prefer_server_ciphers on;
    ssl_ciphers ECDHE-RSA-AES256-GCM-SHA512:DHE-RSA-AES256-GCM-SHA512:ECDHE-RSA-AES256-GCM-SHA384:DHE-RSA-AES256-GCM-SHA384:ECDHE-RSA-AES256-SHA384;

    # let the CA access the HTTP validation file
    location = /.well-known/pki-validation/257021C3....txt {
        alias /usr/share/nginx/html/validation.txt;
    }

    # the rest of the server settings
    location / {
        root   /usr/share/nginx/html;
        index  index.html index.htm;
    }
}

# redirect HTTP to HTTPS
server {
    listen 80;
    server_name ec2-3-36-45...;

    # redirect every other request to HTTPS
    location / {
        return 301 https://$server_name$request_uri;
    }
}
Wrapping Up
As groundwork for HTTPS communication, we studied how SSL certificates are issued. If you already know the basics of ‘public keys & private keys’, this material is a lot easier to follow.
It would also be worth studying the following topics. 😊
- The certificate renewal process
- Using Let’s Encrypt + CertBot
- Common problems and how to fix them (e.g. expired certificates, caveats when using self-signed certificates)