쿠키(Cookie)의 개념과 실전 예제Cookies: Concepts and Hands-On Examples
FastAPI로 알아보는 쿠키(Cookie)의 개념과 동작 원리Understanding how cookies work with FastAPI

HTTP의 무상태(Stateless) 특성
HTTP 프로토콜은 기본적으로 무상태(Stateless)입니다. 이는 각 요청이 독립적이며, 서버가 이전 요청에 대한 정보를 기억하지 않는다는 의미입니다. 이런 특성은 다음과 같은 문제가 있었습니다.
- 사용자가 로그인한 후, 다음 페이지로 이동하면 로그인 정보가 유지되지 않음
- 장바구니에 상품을 담아도 페이지 이동 시 정보가 사라짐
- 사용자 설정을 저장할 수 없음
쿠키는 이러한 무상태 특성에서 상태를 유지할 수 있게 해주는 핵심 메커니즘입니다.
쿠키(Cookie)
쿠키(Cookie)는 웹 서버가 사용자의 브라우저에 저장하는 작은 텍스트 데이터입니다. 이 데이터는 서버와 클라이언트 간의 상태 정보를 유지하는 데 중요한 역할을 합니다.
쿠키(Cookie) 용어의 유래
1994년 넷스케이프 커뮤니케이션즈(Netscape Communications)의 프로그래머 루 몬튤리(Lou Montulli)가 웹 브라우저와 서버 간에 정보를 저장하고 유지하는 메커니즘이 필요했고, 쿠키라는 개념을 처음 도입했습니다.
“쿠키(Cookie)”라는 이름은 ‘포춘 쿠키’ 안에 메시지가 들어있듯이, 쿠키도 정보를 담고 있는 작은 데이터 조각이라는 유사성에서 명칭이 유래됐습니다.

> Lou Montull – the inventor of the browser cookie
쿠키의 역할
쿠키는 웹사이트가 사용자의 활동을 기억하기 위해 사용하는 소량의 데이터로, 사용자 브라우저에 저장됩니다. 주요 역할은 다음과 같습니다.
- 로그인 상태 유지
- 사용자 선호 설정 저장(언어, 테마 등)
- 장바구니 정보 유지
- 사용자 행동 추적과 분석
쿠키의 동작 원리
쿠키는 다음과 같이 동작합니다.
- 서버는 HTTP 응답 헤더의
Set-Cookie필드를 통해 쿠키를 설정합니다. - 브라우저는 이 쿠키를 저장합니다.
- 이후 같은 서버로 요청을 보낼 때마다 브라우저는 HTTP 요청 헤더의
Cookie필드에 이 값을 포함시킵니다.
서버 응답(Response) 헤더 예시
HTTP/1.1 200 OK
Set-Cookie: user_id=12345; Max-Age=3600; Path=/
클라이언트 요청(Request) 헤더 예시
GET /profile HTTP/1.1
Host: example.com
Cookie: user_id=12345
실습 방법
웹 브라우저의 개발자 도구(Dev Tools)를 이용해 아래의 정보를 확인하면서 쿠키의 설정값을 확인하고 수정, 삭제할 수 있습니다. 키보드 F12를 통해 개발도구 창을 열어줍니다.
- 서버 응답(Response) 헤더
- 클라이언트 요청(Request) 헤더
- 쿠키
개발자 도구: Network 탭
Network 탭에서 서버 응답(Response) 헤더와 클라이언트 요청(Request) 헤더를 확인할 수 있습니다. 각 헤더에서 아래의 값이 어떻게 오고 가는지 관찰해봅시다.
- 서버 응답(Response) 헤더 -
set-cookie - 클라이언트 요청(Request) 헤더 -
cookie
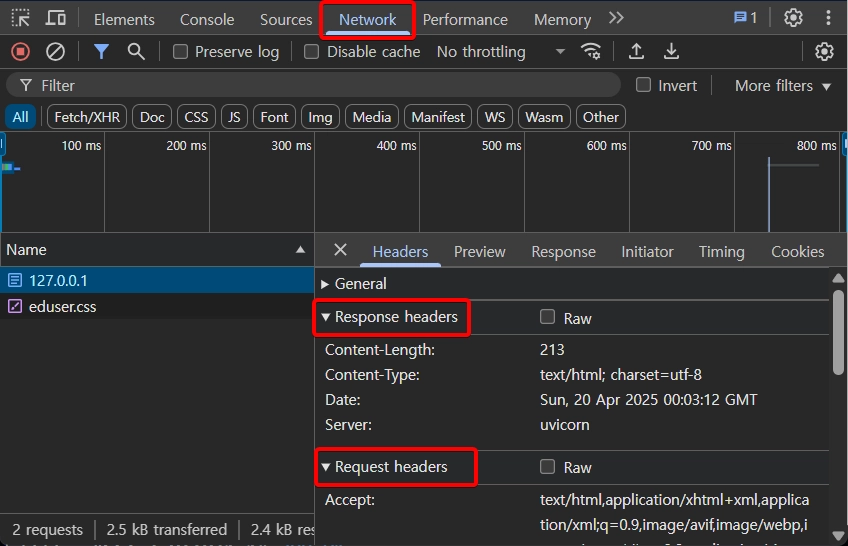
> Chrome Network 탭에서 헤더를 확인하자
개발자 도구: Application 탭
쿠키는 Application 탭에서 확인 및 값을 변경 및 삭제 가능합니다. 다양한 쿠키의 속성값에 따른 쿠키의 변화를 관찰해봅시다.
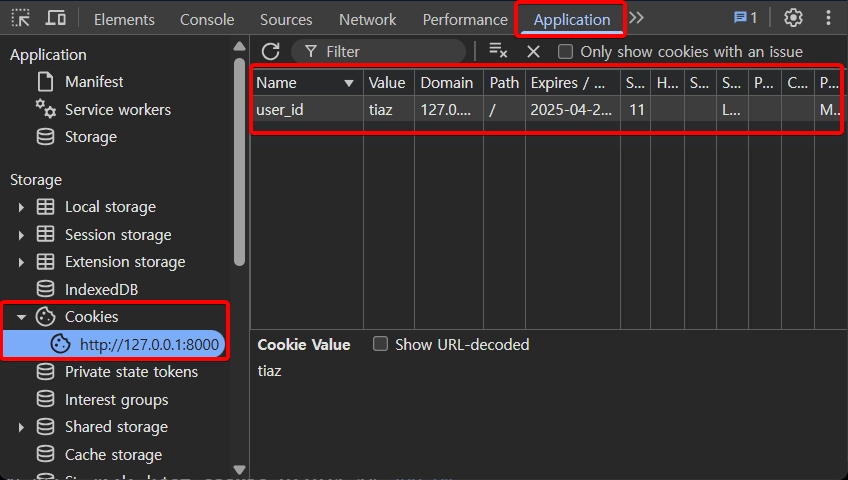
> Chrome Application 탭에서 쿠키를 확인하자
실전 예제
여기에서는 FastAPI 그리고 웹 브라우저의 개발자 도구(Dev Tools)를 통해 쿠키를 확인하고 테스트 해보겠습니다. 우선은 아래의 명령으로 필요한 패키지를 설치합니다.
패키지 설치
$ pip install fastapi "uvicorn[standard]"
소스코드
FastAPI는 쿠키를 설정할 때 Response.set_cookie() 메서드를 사용하며, 이 메서드로 쿠키의 다양한 옵션을 설정할 수 있습니다.
from datetime import datetime, UTC
from fastapi import FastAPI, Response, Request
from fastapi.responses import HTMLResponse

app = FastAPI()

# 쿠키 설정 엔드포인트
@app.get("/set_cookie")
async def set_cookie(response: Response):
    response.set_cookie(
        key="user_id",
        value="tiaz",
    )
    return {"message": "쿠키가 설정되었습니다!"}

# 쿠키 확인 엔드포인트
@app.get("/get_cookie")
async def get_cookie(request: Request):
    user_id = request.cookies.get("user_id", "없음")  # 쿠키 읽기
    theme = request.cookies.get("theme", "없음")
    return {"user_id": user_id, "theme": theme}

# 테스트용 HTML 페이지
@app.get("/", response_class=HTMLResponse)
async def home():
    return """
    <html>
        <body>
            <h1>FastAPI 쿠키 테스트</h1>
            <a href="/set_cookie">쿠키 설정</a><br>
            <a href="/get_cookie">쿠키 확인</a>
        </body>
    </html>
    """
서버 동작
작성 코드로 서버를 동작시켜 줍니다. 그리고 아래의 주소로 웹 브라우저로 접속합니다.
$ uvicorn main:app --reload
http://127.0.0.1:8000/
이제 쿠키의 다양한 설정값을 세팅해보면서 각 속성의 특징을 확인해 보겠습니다.
쿠키의 주요 설정값
쿠키의 주요 설정값은 다음과 같습니다.
- 쿠키 이름과 값 (key-value)
- 만료 시간과 수명 관리 (Expires, Max-Age)
- 도메인과 경로 제한 (Domain, Path)
- 보안 속성 (Secure, HttpOnly, SameSite)
key-value (필수)
- 쿠키의 이름 (문자열)
- 쿠키에 저장할 값 (문자열)
response.set_cookie(
    key="user_id",
    value="tiaz",
)
max_age
- 쿠키의 유효 기간 (초 단위, 정수)
- 값이 없으면 브라우저 세션이 끝날 때 쿠키가 삭제됨 (세션 쿠키)
response.set_cookie(
    key="user_id",
    value="tiaz",
    max_age=30,
)
expires
- 쿠키가 만료되는 정확한 날짜/시간
- max_age와 함께 사용할 경우 max_age가 우선
response.set_cookie(
    key="user_id",
    value="tiaz",
    expires=datetime(2025, 12, 31, tzinfo=UTC),
)
세션 쿠키(Session Cookie)
영속적 쿠키(Persistent Cookie)는 Expires 또는 Max-Age 속성이 있는, 지정된 시간 동안 유지하는 쿠키를 의미합니다. 반대로 Expires, Max-Age 속성이 없는 쿠키를 ‘세션 쿠키(Session Cookie)’라 합니다.
| 특성 | 세션 쿠키 | 영속적 쿠키 |
|---|---|---|
| 수명 | 브라우저 세션 동안 | 설정된 기간 동안 |
| 저장 위치 | 주로 메모리 | 디스크 |
| 삭제 시점 | 브라우저 종료 시 | 만료 시간 도달 또는 수동 삭제 시 |
| 속성 | Expires/Max-Age 없음 | Expires 또는 Max-Age 설정됨 |
| 보안 측면 | 상대적으로 안전 | 오용 가능성 있음 |
path
- 쿠키가 유효한 URL 경로
- 기본값: “/” (모든 경로에서 사용 가능)
- 예시)
- path=”/get_cookie” (특정 경로에서만 쿠키 사용)
- path=”/” 에서는 Request 헤더에 쿠키가 세팅되지 않음
response.set_cookie(
    key="user_id",
    value="tiaz",
    path="/get_cookie",  # 쿠키가 유효한 경로
)
domain
- 도메인 제한 의미, 쿠키가 전송될 수 있는 도메인을 지정
- “브라우저가 이 도메인으로 요청을 보낼 때만 이 쿠키를 포함시켜라”
- 기본값: 쿠키를 설정하는 서버의 현재 호스트명 (서브도메인 제외) → “127.0.0.1”
- 예시)
- domain=”localhost” 설정 시
- 웹 브라우저에서 “localhost”로 접속하면 쿠키가 저장됨
- 웹 브라우저에서 “127.0.0.1”로 접속하면 쿠키가 저장되지 않음 (다른 도메인으로 간주)
- 도메인 간 쿠키 공유를 제한하는 브라우저의 보안 정책 때문에 위와 같이 동작함
response.set_cookie(
    key="user_id",
    value="tiaz",
    domain="localhost", # localhost로 접속 시에만 브라우저에 쿠키가 저장됨
)
쿠키와 관련된 보안 설정
쿠키의 보안 설정값은 특히 중요합니다. 실무에서도 해당 속성들을 설정하고 사용하는 과정에서 빈번히 실수를 합니다. 각 속성의 정확한 의미와 특징을 이해하고 실습해보겠습니다.
secure
- True로 설정 시, HTTPS 연결에서만 쿠키 전송
- 보안 강화를 위해 프로덕션 환경에는 필수로 설정
response.set_cookie(
    key="user_id",
    value="tiaz",
    secure=True
)
-
로컬 개발 환경 예외: 대부분의 브라우저(Chrome, Firefox, Edge 등)는 개발 편의를 위해
localhost와127.0.0.1에 대해서는 HTTPS가 아니더라도 Secure 속성이 있는 쿠키를 허용합니다. -
프로덕션 환경: 실제 인터넷 도메인에서는 HTTPS를 사용하지 않으면
Secure=True속성의 쿠키는 설정되지 않습니다.
httponly
- True로 설정 시, JavaScript에서 쿠키 접근 불가
- XSS(Cross-site scripting) 공격 방지
response.set_cookie(
    key="user_id",
    value="tiaz",
    httponly=False
)
httponly=False 설정하는 경우에는 브라우저의 콘솔창에서 쿠키 값에 접근하고 변경까지 가능합니다. 반대로 True인 경우에는 접근이 불가능 합니다.
document.cookie = 'user_id=test1234'
samesite
이 설정을 통해 브라우저가 다른 사이트에서 요청을 보낼 때 쿠키를 함께 전송할지 여부를 제어할 수 있습니다.
- 설정값
- “strict”: 동일 도메인 요청에서만 쿠키 전송
- “lax”: 일부 외부 요청(예: 링크 클릭) 허용
- “none”: 모든 요청에서 쿠키 전송 (반드시, secure=True 필요)
- CSRF 공격 방지를 위한 설정
response.set_cookie(
    key="user_id",
    value="tiaz",
    samesite="strict",
)
| SameSite 값 | 동일 사이트 요청 | 링크 클릭 | 폼 제출 | iframe/이미지 | fetch/XHR | 특징 |
|---|---|---|---|---|---|---|
| Strict | ✅ 허용 | ❌ 차단 | ❌ 차단 | ❌ 차단 | ❌ 차단 | 가장 안전하지만 사용자 경험 저하 |
|
Lax (기본값) |
✅ 허용 | ✅ 허용 (GET만) |
❌ 차단 | ❌ 차단 | ❌ 차단 | 보안과 사용성의 균형 |
| None | ✅ 허용 | ✅ 허용 | ✅ 허용 | ✅ 허용 | ✅ 허용 | 레거시 동작 (Secure=True 필수) |
마무리
지금까지 HTTP의 무상태(Stateless) 특성을 극복하기 위한 쿠키의 개념, 동작 원리, 그리고 실제 구현 방법에 대해 알아보았습니다. 쿠키는 간단한 텍스트 데이터지만, 웹 애플리케이션에서 사용자 경험을 유지하는 데 중요한 역할을 합니다.
쿠키 외에도 웹 애플리케이션에서 상태를 유지하는 다양한 방법이 있습니다. 다음에는 아래의 다른 방법에 대해서 알아보도록 하겠습니다! 감사합니다. 😊
- 서버 세션(Server Session)
- 웹 스토리지(Web Storage)
- JWT(JSON Web Token)
- IndexedDB
- URL 파라미터/쿼리 스트링
참고 문헌
HTTP Is Stateless
The HTTP protocol is stateless by design. Each request is independent, and the server doesn’t remember anything about previous requests. That caused problems like these:
- After a user logs in, the login isn’t kept when they move to the next page
- Items added to a shopping cart vanish when you move between pages
- User preferences can’t be saved
Cookies are the key mechanism that lets you keep state on top of this stateless protocol.
Cookies
A cookie is a small piece of text data that a web server stores in the user’s browser. This data plays an important role in keeping state information between the server and the client.
Where the Name “Cookie” Comes From
In 1994, Lou Montulli, a programmer at Netscape Communications, needed a mechanism to store and keep information between web browsers and servers, and he introduced the concept of cookies for the first time.
The name “cookie” comes from the resemblance to a fortune cookie: just as a fortune cookie holds a message inside, a cookie is a small piece of data that carries information.
> Lou Montull – the inventor of the browser cookie
What Cookies Do
Cookies are small amounts of data that websites use to remember user activity, stored in the user’s browser. Their main jobs are:
- Keeping users logged in
- Saving user preferences (language, theme, etc.)
- Keeping shopping cart contents
- Tracking and analyzing user behavior
How Cookies Work
Cookies work like this:
- The server sets a cookie through the
Set-Cookiefield of the HTTP response header. - The browser stores the cookie.
- From then on, every time it sends a request to the same server, the browser includes the value in the
Cookiefield of the HTTP request header.
Example Server Response Header
HTTP/1.1 200 OK
Set-Cookie: user_id=12345; Max-Age=3600; Path=/
Example Client Request Header
GET /profile HTTP/1.1
Host: example.com
Cookie: user_id=12345
How to Follow Along
Using your browser’s Dev Tools, you can check the information below to see a cookie’s settings, and edit or delete it. Press F12 on your keyboard to open the Dev Tools window.
- Server response header
- Client request header
- Cookies
Dev Tools: Network Tab
In the Network tab, you can see the server response headers and client request headers. Watch how the values below travel back and forth in each header.
- Server response header -
set-cookie - Client request header -
cookie
> Check the headers in Chrome's Network tab
Dev Tools: Application Tab
In the Application tab, you can view cookies and change or delete their values. Let’s watch how cookies change with their various attribute values.
> Check the cookies in Chrome's Application tab
Hands-On Example
Here we’ll inspect and test cookies with FastAPI and the browser’s Dev Tools. First, install the packages you need with the command below.
Installing Packages
$ pip install fastapi "uvicorn[standard]"
Source Code
FastAPI sets cookies with the Response.set_cookie() method, which lets you configure the various cookie options.
from datetime import datetime, UTC
from fastapi import FastAPI, Response, Request
from fastapi.responses import HTMLResponse

app = FastAPI()

# endpoint that sets the cookie
@app.get("/set_cookie")
async def set_cookie(response: Response):
    response.set_cookie(
        key="user_id",
        value="tiaz",
    )
    return {"message": "Cookie has been set!"}

# endpoint that reads the cookie
@app.get("/get_cookie")
async def get_cookie(request: Request):
    user_id = request.cookies.get("user_id", "none")  # read the cookie
    theme = request.cookies.get("theme", "none")
    return {"user_id": user_id, "theme": theme}

# HTML page for testing
@app.get("/", response_class=HTMLResponse)
async def home():
    return """
    <html>
        <body>
            <h1>FastAPI Cookie Test</h1>
            <a href="/set_cookie">Set cookie</a><br>
            <a href="/get_cookie">Check cookie</a>
        </body>
    </html>
    """
Running the Server
Start the server with the code you wrote. Then open the address below in your web browser.
$ uvicorn main:app --reload
http://127.0.0.1:8000/
Now let’s try out the various cookie settings and see what each attribute does.
Key Cookie Settings
The key cookie settings are:
- Cookie name and value (key-value)
- Expiration and lifetime (Expires, Max-Age)
- Domain and path restrictions (Domain, Path)
- Security attributes (Secure, HttpOnly, SameSite)
key-value (required)
- The cookie’s name (string)
- The value stored in the cookie (string)
response.set_cookie(
    key="user_id",
    value="tiaz",
)
max_age
- How long the cookie is valid (in seconds, integer)
- Without a value, the cookie is deleted when the browser session ends (session cookie)
response.set_cookie(
    key="user_id",
    value="tiaz",
    max_age=30,
)
expires
- The exact date/time the cookie expires
- When used together with max_age, max_age takes precedence
response.set_cookie(
    key="user_id",
    value="tiaz",
    expires=datetime(2025, 12, 31, tzinfo=UTC),
)
Session Cookies
A persistent cookie is one that has an Expires or Max-Age attribute and lasts for a set amount of time. Conversely, a cookie without Expires or Max-Age is called a ‘session cookie’.
| Property | Session cookie | Persistent cookie |
|---|---|---|
| Lifetime | For the browser session | For the configured period |
| Stored in | Mostly memory | Disk |
| Deleted when | The browser closes | It expires or is deleted manually |
| Attributes | No Expires/Max-Age | Expires or Max-Age set |
| Security | Relatively safe | Potential for misuse |
path
- The URL path where the cookie is valid
- Default: “/” (usable on every path)
- Example)
- path=”/get_cookie” (the cookie is used only on that path)
- On path=”/”, the cookie isn’t set in the Request header
response.set_cookie(
    key="user_id",
    value="tiaz",
    path="/get_cookie",  # path where the cookie is valid
)
domain
- A domain restriction: specifies the domains the cookie can be sent to
- “Only include this cookie when the browser sends a request to this domain”
- Default: the current hostname of the server setting the cookie (excluding subdomains) → “127.0.0.1”
- Example)
- With domain=”localhost”
- When you visit “localhost” in the browser, the cookie is stored
- When you visit “127.0.0.1” in the browser, the cookie is not stored (treated as a different domain)
- This happens because of the browser’s security policy restricting cookie sharing across domains
response.set_cookie(
    key="user_id",
    value="tiaz",
    domain="localhost", # the browser stores the cookie only when visiting localhost
)
Cookie Security Settings
Cookie security settings are especially important. Even in real-world projects, people frequently make mistakes when setting and using these attributes. Let’s understand exactly what each attribute means and how it behaves, and try them out.
secure
- When set to True, the cookie is sent only over HTTPS connections
- A must in production environments for stronger security
response.set_cookie(
    key="user_id",
    value="tiaz",
    secure=True
)
-
Local development exception: for convenience during development, most browsers (Chrome, Firefox, Edge, etc.) allow cookies with the Secure attribute on
localhostand127.0.0.1even without HTTPS. -
Production: on real internet domains, a cookie with
Secure=Truewon’t be set unless you use HTTPS.
httponly
- When set to True, JavaScript can’t access the cookie
- Prevents XSS (Cross-site scripting) attacks
response.set_cookie(
    key="user_id",
    value="tiaz",
    httponly=False
)
With httponly=False, you can access and even change the cookie value from the browser console. When it’s True, you can’t.
document.cookie = 'user_id=test1234'
samesite
This setting controls whether the browser sends the cookie along with requests made from other sites.
- Values
- “strict”: send the cookie only on same-domain requests
- “lax”: allow some cross-site requests (e.g. clicking a link)
- “none”: send the cookie on every request (requires secure=True)
- A setting for preventing CSRF attacks
response.set_cookie(
    key="user_id",
    value="tiaz",
    samesite="strict",
)
| SameSite value | Same-site request | Link click | Form submit | iframe/image | fetch/XHR | Notes |
|---|---|---|---|---|---|---|
| Strict | ✅ Allowed | ❌ Blocked | ❌ Blocked | ❌ Blocked | ❌ Blocked | Safest, but hurts user experience |
|
Lax (default) |
✅ Allowed | ✅ Allowed (GET only) |
❌ Blocked | ❌ Blocked | ❌ Blocked | Balances security and usability |
| None | ✅ Allowed | ✅ Allowed | ✅ Allowed | ✅ Allowed | ✅ Allowed | Legacy behavior (Secure=True required) |
Wrapping Up
We’ve covered the concept of cookies as a way around HTTP’s stateless nature, how they work, and how to implement them in practice. A cookie is just simple text data, but it plays an important role in keeping the user experience going in web applications.
Besides cookies, there are many other ways to keep state in web applications. Next time, let’s look at the approaches below! Thanks for reading. 😊
- Server Session
- Web Storage
- JWT (JSON Web Token)
- IndexedDB
- URL parameters/query strings